



1.3L petrol engine, 1.6L petrol engine (4A-L, 4A-LC), diesel engine with a working volume of 1.8 l
Distinctive features of removal and installation of the camshaft of a diesel engine with a working volume of 1.8 liters are given at the end of the section.
Removal
Remove the cylinder head cover together with the gasket.
Install the piston first cylinder at TDC.
Note: Do not change the position of the crankshaft further.
Remove the timing belt.
Remove the ignition distributor.
Remove the fuel pump from the cylinder head, if it exists.
Engines with a working volume of 1.6 liters (4A-L, 4A-LC)
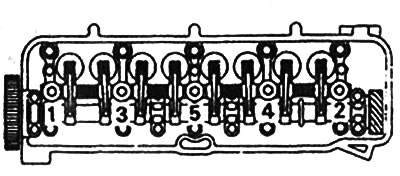
Loosen the valve rocker arm mounting bolts in order from 1 to 5.
Remove and set aside the camshaft complete with rocker arms and springs.
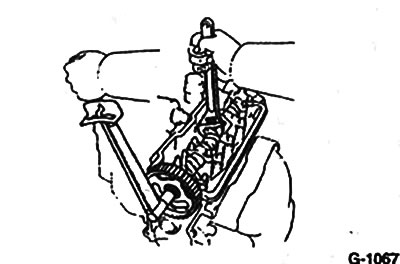
Hold the camshaft from turning with a wrench, such as HAZET 279-15, and loosen the gear wheel mounting bolt. Remove the wheel, using a rubber hammer if necessary.
Caution: Be careful not to damage the cylinder head with the wrench.
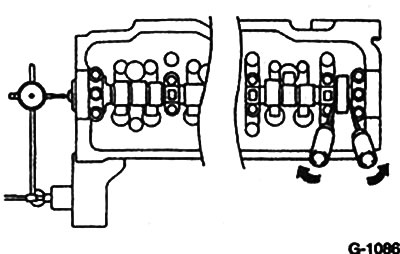
Check the axial clearance of the camshaft. Its value should be 0.08-0.18 mm. The maximum permissible axial clearance is 0.25 mm. If the clearance exceeds the permissible value, the camshaft, and possibly the cylinder head, should be replaced.
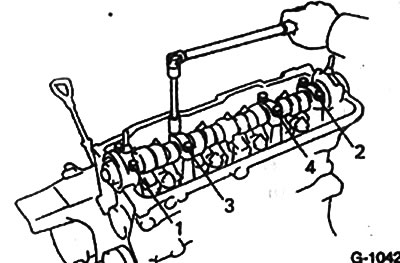
Loosen the camshaft bearing cap mounting bolts in the sequence shown in the figure. Loosen the bolts in several steps.
Please note: For models from 8/84 the bearing caps cannot be removed.
Remove the bearing caps and place them in this order (or mark), so that they are installed in their original places during assembly.
Remove the camshaft.
Installation
Lubricate the camshaft bearings with oil.
Install the camshaft so that the camshaft pulley alignment pin faces upward.
Install the camshaft bearing caps in place according to the markings. Secure by hand with bolts.
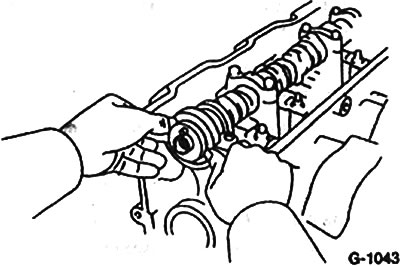
Install a new camshaft oil seal, after lubricating it with oil.
Attention: Do not tilt the seal during installation.
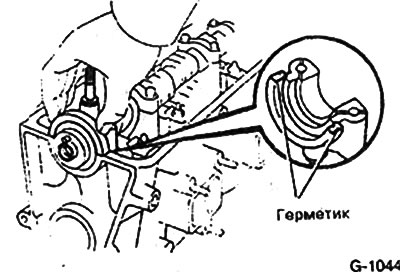
Coat the camshaft wheel bearing cap with sealant and install it in place. Specialized workshops use TOYOTA sealant No.102 for this purpose (ET Nr.08826-00080) or any other silicone-based sealant.
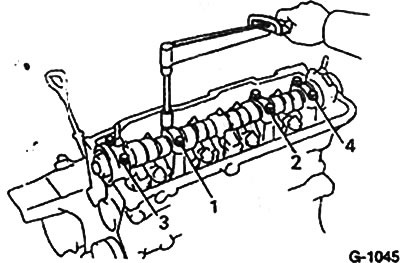
Tighten the bearing cap mounting bolts with a torque wrench in the specified sequence. The bolts are tightened in two steps.
- 1 step - with a force of 10 Nm
- 2nd step - with a force of 14 Nm
Turn the camshaft so that the wheel alignment pin points to the upper marking on the bearing cap.
Install the camshaft wheel so that the locating pin fits into hole "2E". Tighten the bolt to 50 Nm, holding the camshaft from turning with a wrench.
Caution: Be careful not to damage the cylinder head with the key.
Clean the camshaft wheel from water and oil.
Put on the timing belt and tighten it.
Engines with a working volume of 1.3 l up to 7/84 year of production, engines with a working volume of 1.6 l (4A-L, 4A-LC)
Loosen the locknuts of the valve adjustment screws.
Install the camshaft in place, complete with rocker arms and springs.
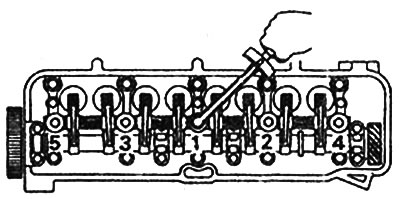
Tighten the rocker arm mounting bolts in three stages in the sequence shown in the figure with the following forces:
- 1 step - 10 Nm
- 2nd step - 20 Nm
- 3rd step - 25 Nm
Check valve clearances.
Install the cylinder head cover with gasket.
Removal. Diesel with a working volume of 1.8 l
The presence of noise in the operation of the valve timing mechanism indicates that the radial clearance of the valve timing is too large. The radial clearance must be measured before dismantling the camshaft in a specialized workshop. It must be 0.037-0.073 mm. Its maximum permissible value is 0.1 mm.
Caution: Do not turn the camshaft after removing the timing belt. This may cause damage to the valves and pistons when they collide.
Remove the intake manifold.
Remove the camshaft timing gear while holding the camshaft from turning with tool SST 09278-54011 or another suitable tool.
Unscrew the 5 bolts securing the camshaft oil seal support and remove the support.
Loosen the camshaft bearing cover mounting bolts in several steps, working from the outer covers to the inner ones.
Installation
Tighten the bearing cap mounting bolts with a torque wrench from the inside out. Tighten in three stages:
- 1 step - 10 Nm
- 2nd step - 14 Nm
- 3rd step - 18 Nm
Install the camshaft oil seal using TOYOTA sealant #102 (ET No.08826-00080) or any other silicone-based sealant and tighten with 5 bolts.
Secure the camshaft wheel with a bolt to 100 Nm, holding the camshaft from turning with tool SST 09278-54011.
Install the intake manifold.