Company Honda Company Ford Company Skoda Company Kia Company Mazda Company Mercedes Company Renault
English Русский
Български
Беларускі
Український
Српски
Hrvatski
Română
Polski
Slovenský
Magyar
Bookmark Articles Sitemap Contacts
ToyotaMan.ru


Camry Corolla Corona Carina Land Cruiser Highlander 4Runner RAV4 Others
Cruiser 100 (1998-2007) Cruiser 60/80 (1980-1997, petrol) Cruiser 70 (1985-1996, diesel)

Installing the cylinder head [Toyota Land Cruiser J70]

  • Main
  • Land Cruiser
  • J70 (1985-1996)
  • Power unit
  • Engine repair
  • Installing the cylinder head
0
Contents: L-series engines ↓ KZ series engines ↓
Check piston protrusion and select cylinder head gasket thickness.

A. Check the protrusion of pistons No.1 and No.4.

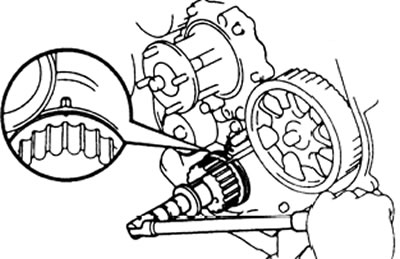
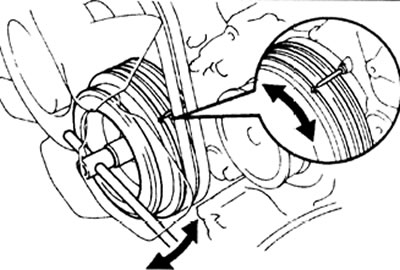
a) Align the TDC mark on the crankshaft pulley with the reference mark.


L-series engines


Engine 1KZ-T


b) Install the dial indicator on the cylinder block, place the tip of the indicator on the piston bottom.

c) Slowly turn the crankshaft clockwise and counterclockwise to find the point where the piston crown protrudes the maximum distance.
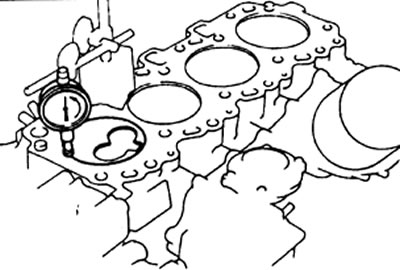


d) Set the dial indicator to zero - 0 mm.


d) Measure the piston protrusion from the cylinder block by moving the dial indicator.

Protrusion - 0.68 - 0.97 mm

Note: Check the protrusion at least at two points.
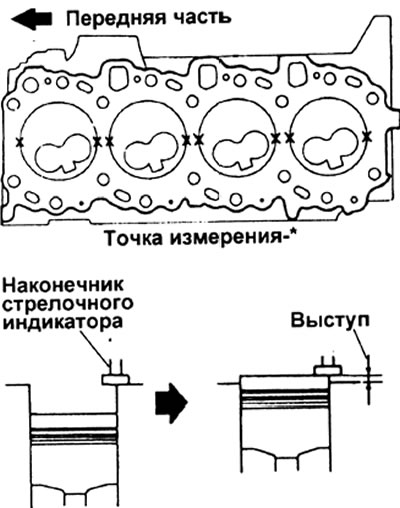


If the protrusion is not as specified, remove the connecting rod and piston group and replace it.

B. Check the protrusion of pistons No.2 and No.3.

a) Turn the crankshaft half a turn (180°).

b) Measure the piston protrusion as described above.

B. Select a new cylinder head gasket. When selecting a new cylinder head gasket, use the largest protrusion value.

L-series engines


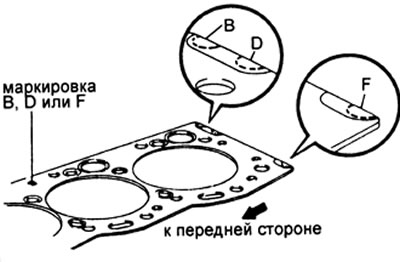
Please note: Cylinder head gaskets come in three sizes, which are marked with either the letters "B", "D" or "F", or the location of the cutout.


Note: There are 6 types of cylinder head gaskets installed at the factory (marked from A to F), but only three types are supplied as spare parts (B, D and F), so when replacing the gasket you need to choose from the three types listed above.


Thickness of new cylinder head gasket:
  • Marking B - 1.40 - 1.50 mm
  • Marking D - 1.50-1.60 mm
  • Marking F - 1.60 - 1.70 mm


Piston protrusion Gasket type
0,68-0,77 "IN"
0,78 - 0,87 "D"
0,88-0,97 "R"


KZ series engines


Please note: Cylinder head gaskets are available in three sizes, each marked with the number of holes.


Note: There are 5 types of head gaskets installed at the factory, but only three types are available as replacement parts (one, three and five holes), therefore, when replacing the gasket, you need to choose from the three types listed above
.
Thickness of new cylinder head gasket:
  • Marking 1 - 0.8 - 0.9 mm
  • Marking 3 - 0.9 -1.0 mm
  • Marking 5 - 1.0 -1.1 mm


Piston protrusion Gasket type
0,08-0,12 "1"
0,13-0,22 "3"
0,23-0,33 "5"


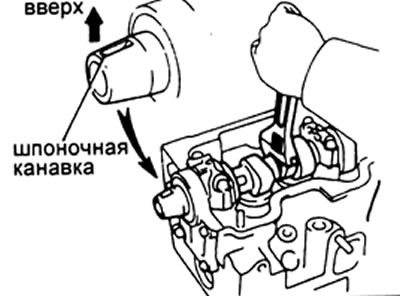
2. (L only): Set the piston of cylinder No.1 to TDC.

a) Install the camshaft with the keyway facing up.


b) Align the TDC mark on the crankshaft pulley with the reference mark.


Install the cylinder head.

A. (ALL ENGINES) Install the head onto the cylinder block.

a) Place the new one on the cylinder block.

Note: Orient the gasket correctly.


b) Install the cylinder head on the pins.

B. Install the cylinder head bolts.

Note: The cylinder head bolts are tightened in three successive stages.


If any of the bolts are broken or deformed, replace them.

a) Apply a thin coat of engine oil to the threads and caps of the cylinder head bolts.

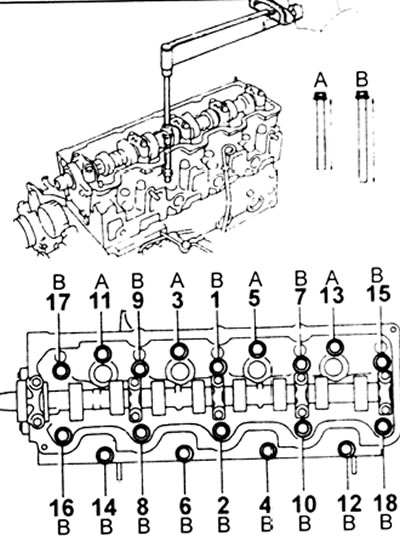
b) First, install and tighten the eighteen cylinder head bolts uniformly in several passes, in the sequence shown in the figure, to a torque of 78 N·m (L series) or 39 N·m (KZ series).

Note: L series engine cylinder head bolts of two types A and B:
  • Type A - 107 mm
  • Type B - 127 mm


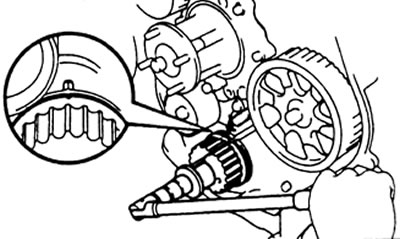
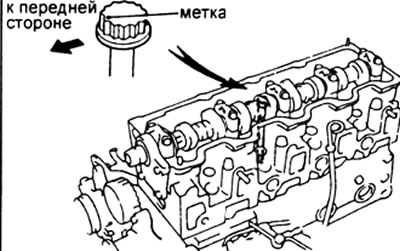
c) Mark the cylinder head bolts.


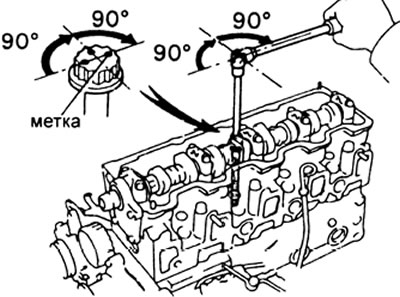
d) On the second pass, tighten the cylinder head bolts by an additional 90° in the same sequence as described above.


d) On the third pass, tighten the cylinder head bolts an additional 90°.

e) The mark should now be facing the back side.

This article is available at: russian, bulgarian, belarusian, ukrainian, serbian, croatian, romanian, polish, slovak, hungarian
The article material has been checked: Mitrofanova Elena
Share information:
◀ Previous
Cruiser 70: Engine repair
Next ▶

Cylinder head assembly
Replacing the camshaft seal
Condition monitoring, cleaning and repair of cylinder head components
Disassembling the cylinder head
Removal the cylinder head — KZ series engines
Engine reassembly
Preparing for disassembling the cylinder block
Disassembling the cylinder block
Checking the cylinder block
Disassembling the piston and connecting rod
Similar articles on other Toyota models

➥ Installing the cylinder head cover Toyota Camry XV30 (2001-2006)
➥ Installing the cylinder head Toyota Carina T190 (1992-1996)
➥ Installing the cylinder head Toyota Dyna Y50/Y60 (1984-1995)
➥ Cylinder head — petrol 1.3 liters Toyota Corolla E80 (1983-1990)
➥ Cylinder head (3S-FE, 4S-FE) — removal Toyota Corona T190 (1992-1997)
➥ Cylinder Head Cover — Removal and Installation Toyota Highlander 1 (2000-2007, petrol)
Link in different formats to this article
Comments and feedback from visitors
No comments yet


Add two numbers 24 + 28


Cruiser 100 (1998-2007) 
  • General information
  • Introduction to the guide
  • Controls and instruments
  • Maintenance
  • Power unit
  • Petrol engines
  • Diesel engines
  • Cooling and heating
  • Power and exhaust systems
  • Engine electrical equipment
  • Engine management systems
  • Transmission
  • Automatic gearbox
  • Transmission line
  • Chassis, running gear
  • Brake system
  • Car suspension
  • Steering
  • Body and interior
  • Exterior (external elements)
  • Interior (internal elements)
  • Doors, locks and windows
  • Electrical equipment
  • Equipment and devices
  • Electrical circuits
Cruiser 60/80 (1980-1997, petrol) 
  • General information
  • User manual
  • Maintenance
  • Power unit
  • Petrol engines 2F and 3F-E
  • Petrol engines 1FZ-FE
  • Engine overhaul
  • Engine electrical equipment
  • Cooling and heating
  • Fuel system (carburetor)
  • Fuel system (injector)
  • Toxicity reduction system
  • Transmission
  • Car gearbox
  • Clutch
  • Transfer case
  • Drive shafts and axles
  • Chassis, running gear
  • Brake system
  • Car suspension
  • Steering
  • Body and interior
  • Exterior and interior
  • Doors, locks and windows
  • Electrical equipment
  • Equipment and devices
  • Electrical circuits
Cruiser 70 (1985-1996, diesel) 
  • General information
  • User manual
  • Maintenance
  • Power unit
  • Engine adjustment
  • Engine repair
  • Fuel system
  • Control system
  • Turbocharging system
  • Cooling and lubrication system
  • Charge and start system
  • Transmission
  • Clutch
  • Mechanical gearbox
  • Automatic gearbox
  • Transfer case
  • Chassis, running gear
  • Car suspension
  • Brake system
  • Steering
  • Body and interior
  • Body elements
  • Heating and air conditioning
  • Electrical equipment
  • Equipment and devices
  • Electrical circuits
ToyotaMan.ru © 2018–2026 • Mobile version • Interesting about Toyota • Administration • Sitemap: EN BG BY UA RS HR RO PL SK HU • Search system • Bookmark
Camry Vista-V40 • Camry XV10 • Camry XV20 • Camry XV30 • Corolla Verso-AR10 • Corolla E80 • Corona T190 • Carina T170 • Carina T190 • Land Cruiser J70 (diesel) • Land Cruiser J60 (petrol) • Land Cruiser J100 • Highlander XU20 (petrol) • 4Runner N120 • RAV4 XA10 • RAV4 XA20 • Duet M100 • Dyna Y50 •
We require cookies to enable some interactive features. Is that ok with you?