
Removing and installing the pump
Removal and installation of the pump is different on both engines due to differences in the drive.
Engine 1.6 l
- Drain the coolant as described in chapter 4.1.
- Before removing the V-belt, remove the 4 water pump pulley bolts.
- Loosen the bolts securing the alternator to the body and to the tension bar and remove the V-belt.
- Unscrew the water pump pulley and remove it from the shaft.
- Disconnect the water hoses from the water pump tube.
- Unscrew the pipe from the engine side. It is attached with one bolt to the cylinder block and two nuts on the rear side of the water pump. Remove the O-ring.
- Unscrew the oil dipstick guide tube and remove it together with the dipstick. Immediately close the opened hole with a rag to prevent foreign objects from getting into the engine.
- Unscrew the top timing belt cover
- Remove the three pump bolts and remove the pump. Avoid contaminating the engine with leaking coolant, which should not fall on the timing belt. When installing an old pump, clean the contact surface of the pump. When installing the water pump, install a new O-ring. Tighten the pump bolts to a torque of 12–17 Nm. Bcq the rest of the work is done in reverse order. Finally, add coolant to the engine and check for leaks. Adjust the tension of the water pump and alternator V-belt as described below.
Engine 2.0 l
- Drain the coolant as described in chapter 4.1, and collect it in a container if it was recently poured into the engine.
- Disconnect the water hose from the inlet fitting.
- Remove all timing gear drive parts as described in chapter 2.8 for the corresponding engine. This also includes the generator V-belt..
- Unscrew the heater pipe (bolt and nuts).
- Unscrew both nuts of the drainage pipe from the water pump in the place shown in Figure 123.
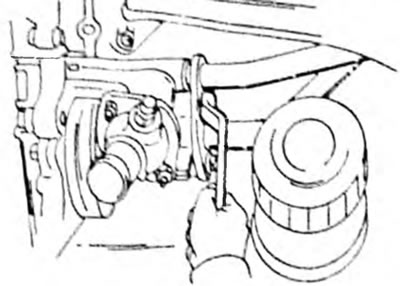
Pic. 123. Unscrewing the water pipe from the engine side.
- Unscrew the three water pump bolts in the sequence shown in Figure 124 and remove the water pump along with the O-ring and gasket.
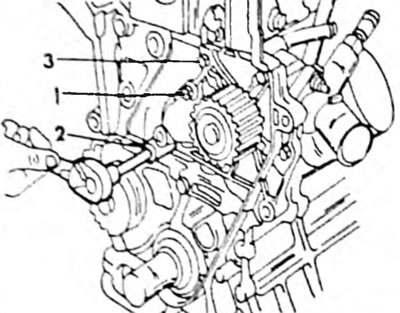
Pic. 124. Unscrew the pump bolts in the specified sequence. Tighten the bolts in reverse order.
- If necessary, unscrew the pump cover (this is a pump part with an inlet fitting, inside of which there is a thermostat) and remove the gasket between the cover and the pump housing.
- Assembling and installing the pump is carried out in the reverse order. Place a new gasket between the body and the cover and install both parts with two bolts. Tighten the bolts to 9 Nm. Install a new water pump outlet tube O-ring into the recess of the pump cover. Apply a new gasket and place the pump on the engine. Tighten the bolts in the reverse order shown in Figure 124 to a torque of 9 Nm. Install and tension the timing belt as described when installing the cylinder head on the 2.0 liter engine. Adjust the tension of the generator V-belt and fill the cooling system with liquid.
4.3.2. Water pump repair
From a technical point of view, the 1.6L engine water pump can be repaired, but this requires a special tool to press out the pulley hub, water pump bearing and impeller wheel. Therefore, if smudges are detected or the shaft bearing is difficult to turn when turning the hub (1.6 l engine) or drive gear (2.0 l engine), it is recommended to install a new pump. On the 2.0L engine, the cover can be turned away from the housing. This is required, for example, when replacing a water pump. In this case, it is recommended to simultaneously remove the thermostat from the inlet fitting, especially if there are disturbances in the operation of the cooling system. After this you should check the thermostat (chapter 4.4). Figure 126 shows the installation drawing of this water pump, which also shows the installation position of the thermostat.
V-belt tension | water pump (1.6 l engine)
Depending on the installed units, the V-belt routing on 1.6 l and 2.0 l engines is different. The V-belt should be tensioned so that the belt can deflect approximately 8.5-10 mm in the middle between the crank belt and water pump pulleys when a force of 10 kg is applied. The meaning is different for a new belt and a used belt. The indicated value is given for a new belt; for a used belt, it is sufficient if it bends by 10-12 mm under this force. The tension of the remaining belts is described in the corresponding chapter. To adjust, loosen the bolts securing the generator and the tension bar and use a powerful screwdriver to press the generator outward until the required tension is obtained. After adjustment, tighten the bolts. The tightening torque of the tension bar is 12-15 Nm; Tighten the lower bolts to a torque of 20-25 Nm.