
Company Honda Company Ford Company Skoda Company Kia Company Mazda Company Mercedes Company Renault
English Русский
Български
Беларускі
Український
Српски
Hrvatski
Română
Polski
Slovenský
Magyar
Bookmark Articles Sitemap Contacts
ToyotaMan.ru


Camry Corolla Corona Carina Land Cruiser Highlander 4Runner RAV4 Others
Carina T190 (1992-1996) Carina T170 (1988-1992)

Radiator — removal [Toyota Carina T170]

  • Main
  • Carina
  • T170 (1988-1992)
  • Power unit
  • Cooling system
  • Radiator — removal
0
Contents: 4.2.1. Removing the radiator ↓ 4.2.2. Removal ↓

4.2.1. Removing the radiator


  • Drain the coolant according to the instructions in chapter 4.1.
  • Disconnect the upper and lower water hoses after releasing their clamps.
  • Disconnect the battery terminals.
  • Disconnect the fan motor cable harness wire connection and also disconnect the wire from the temperature switch to turn on the fan.
  • If you have an automatic transmission, disconnect both oil cooler hoses. At the same time, drain the fluid, collecting it in an appropriate manner.
  • If the air filter hose is in the way, disconnect it.
  • Disconnect the bypass hose between the expansion tank and the radiator.
  • Unscrew the fan casing and move it to the side.
  • On each side, unscrew the radiator mounting bracket and pull out the radiator, without touching the body parts of the engine. Check for cracks in the cooling system hoses and replace them if damage is found. Check for leaks on the radiator, which are often determined by corrosion. Take a leaking radiator to a repair shop for repair. If you have a pump for checking radiators, you can test the radiator cap under pressure. To do this, install the pump on the cap, as shown in Figure 121, and put it under pressure. The valve in the cap should open at a pressure of 0.8-1.0 atm. The permissible minimum pressure is 0.6 atm. In the same way, you can also put the radiator itself under pressure after installing it. To do this, connect the pump, as shown in Figure 122 and use the pump to raise the pressure to 1.2 atm. The pressure readings should not decrease during the test. Only the radiator unit itself is supplied as a spare part. Since special tools are required to remove and secure the upper and lower water heaters, you should contact a TOYOTA workshop to assemble the radiator as a set.
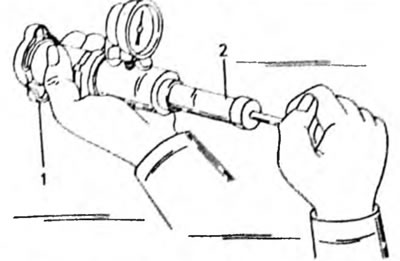


Fig. 121. Checking the radiator cap using a radiator test pump
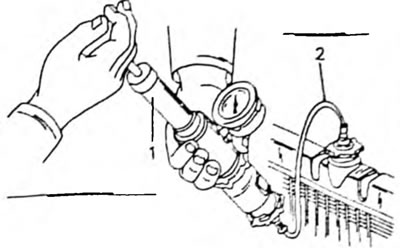


Fig. 122. To check the radiator leak points, connect the test pump (1) using a hose (2) to the radiator filler neck.


4.2.2. Removal


Removal is carried out in the reverse order. If defects are suspected, be sure to replace the hoses. Fill the cooling system as described in section 4.1. After warming up the engine to operating temperature, check for leaks. If there is a pressure test pump, test the system under pressure (no more than 1.2 atm). If the pressure drops, there is a leak. In this case, park the car on a dry place to determine where the fluid is leaking.
This article is available at: russian, bulgarian, belarusian, ukrainian, serbian, croatian, romanian, polish, slovak, hungarian
The article material has been checked: Kondratyeva Ulyana
Share information:
◀ Previous
Carina T170: Cooling system
Next ▶

Draining and filling the cooling system
Engine cooling system
Water pump
Thermostat — Removal, Checking and Installation
Radiator fan
Size and Adjustment Tables — Cooling System
Similar articles on other Toyota models

➥ Radiator and expansion tank — removal and installation Toyota Camry XV20 (1996-2001)
➥ Removal and installation the radiator Toyota Corolla E80 (1983-1990)
➥ Radiator — Cleaning and Checking Toyota Corona T190 (1992-1997)
➥ Radiator and expansion tank — removal and installation Toyota Cruiser 60/80 (1980-1997, petrol)
➥ Radiator and expansion tank — removal and installation Toyota Highlander 1 (2000-2007, petrol)
➥ Radiator and reservoir — removal and installation Toyota 4Runner N120 (1989-1995)
Link in different formats to this article
Comments and feedback from visitors
No comments yet


Add two numbers 18 + 32


Carina T190 (1992-1996) 
  • General information
  • User manual
  • Maintenance
  • Power unit
  • Engines 4A-FE, 5A-FE, 7A-FE
  • Engines 3S-FE, 4S-FE
  • Diesel engines 2C
  • Engine repair
  • Cooling system
  • Lubrication system
  • Fuel system
  • Control system (diesel)
  • Fuel injection system
  • Engine electrical equipment
  • Transmission
  • Clutch
  • Mechanical gearbox
  • Automatic gearbox
  • Drive shafts
  • Chassis, running gear
  • Car suspension
  • Steering
  • Brake system
  • Body and interior
  • Exterior (external elements)
  • Interior (internal elements)
  • Air conditioning and heater
  • Electrical equipment
  • Equipment and devices
  • Headlights and lighting
  • Breakers and switches
  • Electrical circuits
Carina T170 (1988-1992) 
  • General information
  • Introduction to the manual
  • Power unit
  • Gasoline engines
  • Diesel engines
  • Lubrication system
  • Cooling system
  • Fuel system (carburetor)
  • Fuel system (injector)
  • Ignition system
  • Transmission
  • Clutch
  • Car gearbox
  • Drive shafts
  • Chassis, running gear
  • Front suspension
  • Rear suspension
  • Steering
  • Brake system
  • Electrical equipment
  • Power devices
  • Electrical circuits
ToyotaMan.ru © 2018–2026 • Mobile version • Interesting about Toyota • Administration • Sitemap: EN BG BY UA RS HR RO PL SK HU • Search system • Bookmark
Camry Vista-V40 • Camry XV10 • Camry XV20 • Camry XV30 • Corolla Verso-AR10 • Corolla E80 • Corona T190 • Carina T170 • Carina T190 • Land Cruiser J70 (diesel) • Land Cruiser J60 (petrol) • Land Cruiser J100 • Highlander XU20 (petrol) • 4Runner N120 • RAV4 XA10 • RAV4 XA20 • Duet M100 • Dyna Y50 •
We require cookies to enable some interactive features. Is that ok with you?