



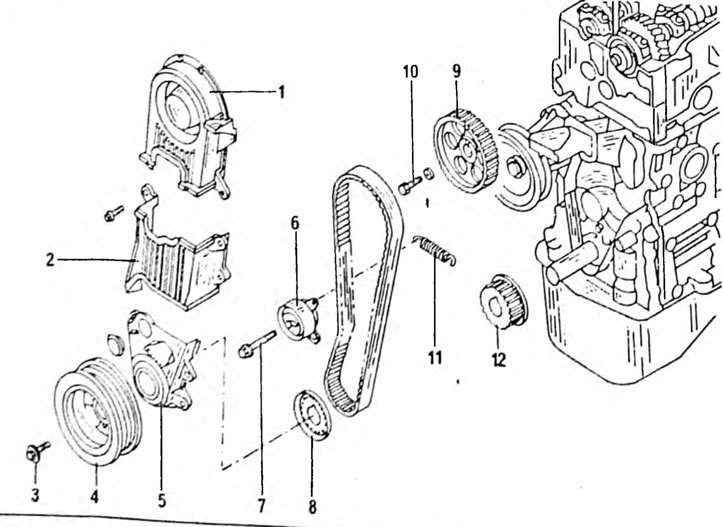
Fig. 109. Timing drive parts of the 4A-F/FE engine. 1. Upper timing belt cover; 2 Middle timing belt cover; 3. Bolt 120 Nm; 4. Crankshaft pulley; 5 Lower timing belt cover; 6. Tension roller; 7. Bolt. 37 Nm; 8. Timing belt guide washer; 9. Camshaft gear wheel; 10. Bolt. 47 Nm; 11. Tension spring; 12. Crankshaft gear.
Both overhead camshafts are driven via a toothed belt and gears on each camshaft and on the crankshaft. The toothed belt is connected only to the exhaust camshaft, through which the inlet camshaft is driven by gears. The gear on the base of the shaft is located behind the crankshaft pulley. A sliding tension roller serves to tension the toothed belt. By moving the tension roller, the tension of the toothed belt is adjusted. Under normal operating conditions, it is not necessary to tighten the belt. If the belt is not damaged, it has a long service life, but it is generally accepted that it should be replaced after 100,000 km.
The belt tension must be adjusted if the belt has been removed or replaced, or if the tension roller has been removed. The removed belt, if it is to be reinstalled, must not come into contact with oil or grease. It must also not be bent, otherwise it may be damaged.
Removal and installation
Although the work was described during engine disassembly, it should be described additionally for the case when only the toothed belt needs to be replaced. The drawings associated with the description have already been provided on the previous pages. The general appearance of the mechanism drive is given here.
- Loosen the water pump pulley nuts, loosen the adjusting bolt or new belt and remove the V-belt (Fig. 5). Loosen the water pump pulley.
- Remove the four spark plugs. To do this, you will need an extended spark plug wrench, which should be inserted into the holes as shown in Figure 6.
- Disconnect the crankcase ventilation hose from the ventilation valve.
- Unscrew the three cylinder head cover nuts and remove the cover together with the nut sealing rings and gasket.
- Turn the crankshaft pulley until the mark aligns with the "0" mark on the timing belt cover. Check that the valve tappets of the first cylinder have clearances. If this is not the case, turn the engine one more revolution. Figure 7 shows how the crankshaft pulley should be positioned in the TDC position of the engine.
- Unscrew the crankshaft pulley from the crankshaft and remove it from the shaft using a puller. The belt pulley has two threaded holes for installing a puller, as shown in Figure 8.
- Unscrew the upper, middle and lower toothed belt covers and remove the gaskets. In total, 9 bolts should be unscrewed.
- Remove the timing belt guide washer. It is mounted on the front side of the crankshaft and is easily removed as shown in Figure 9.
- If the timing belt is to be reinstalled, mark it with a direction arrow and a mark for the position of the camshaft and crankshaft gears, as shown in Figure 10.
- Loosen the timing belt tensioner bolt at the front of the engine, press the tensioner to the left with a screwdriver as shown in Figure 11, and tighten it in the new position. The timing belt is now free and can be removed. If desired, the belt tension roller can be removed.
- Remove the timing belt wheel from the crankshaft. If necessary, use a powerful screwdriver or crowbar for this.
- Loosen the camshaft gear bolt. Hold the shaft to prevent it from turning. The shaft has a hexagon in the place shown in Figure 12 where a spanner can be inserted. Be careful not to damage the cylinder head by pressing the spanner against it. A belt with broken teeth must be replaced. Other defects include cracks, abrasions on the sides, or rounding of some or all of the teeth. In this case, also check the teeth of the gear wheels. Hold the belt tensioner with one hand and turn the roller with the other. Rubbing when turning the roller requires replacing the belt tensioner. When installing the toothed belt, set the marks as described when removing the cylinder head. This also includes the belt tension.
[The original source is located on the website: toyotaman.ru]