
Fuel pressure check
Prepare a new fuel line.
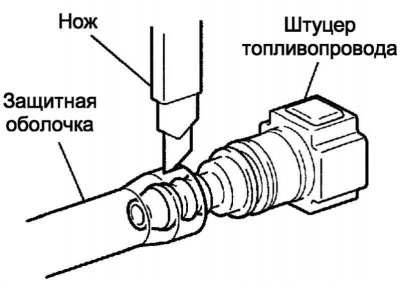
Pic. 2.473. Cutting the protective sheath
Note. With a sharp knife, cut through the protective shell of the fuel line, as shown in Figure 2.473. Break the protective sheath with your hand, then remove the fuel line fitting.
Note. Do not cut the protective sheath too deep, otherwise the O-ring of the fuel line fitting may be damaged.
Reduce the pressure in the fuel system.
Measure the battery voltage with a voltmeter.
Rated value: 9.0-14V.
Disconnect the negative battery terminal.
Disconnect the fuel supply line.
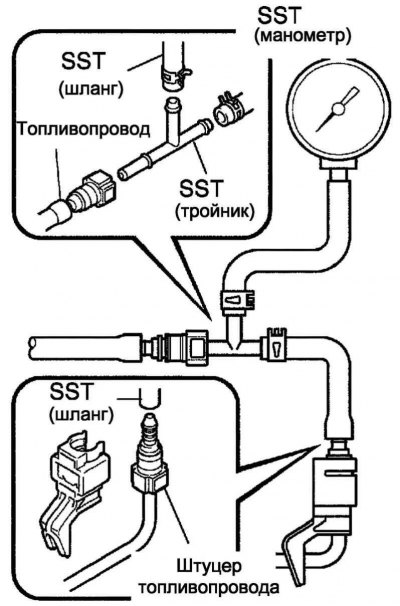
Pic. 2.474. Installation of special devices
Install SST and fuel line fitting to vehicle (pic. 2.474).
Wipe up spilled fuel.
Connect the negative battery terminal.
Tightening torque: 5.4 Nm.
Connect the handheld diagnostic tool II to the DLC3 diagnostic socket.
Turn the ignition ON (IG).
Turn on the portable diagnostic tool II.
Select instrument mode: Powertrain/ Engine and ECT/ Active Test/ Fuel Pump.
Measure fuel pressure.
Rated value: 304-343 kPa.
If the pressure exceeds the maximum allowable value, replace the fuel pump.
If the pressure is below the nominal value, check the connection of the fuel line to the fuel pump.
Disconnect the Handheld Diagnostic Tool II from the DLC3 Diagnostic Connector.
Start the engine.
Measure the fuel pressure with the engine idling.
Rated value: 304-343 kPa.
Turn off the engine.
Make sure that 5 minutes after stopping the engine, the fuel pressure has not changed.
Rated value: 147 kPa.
If the pressure is out of specification, check the fuel pump and injectors.
After measuring the fuel pressure, disconnect the negative battery terminal. Remove the SST and fuel line fitting, taking precautions against fuel splashing.
Connect the fuel line.
Fuel pump check
Connect the handheld diagnostic tool II to the DLC3 diagnostic socket.
Turn the ignition ON (IG).
Turn on the portable diagnostic tool II.
Note. Do not start the engine.
Select instrument mode: Powertrain/ Engine and ECT/ Active Test/ Fuel Pump.
Check the operation of the fuel pump by operating it from the handheld diagnostic tool II.
If the fuel pump does not work, it should be replaced.
Check for fuel leaks when pressurizing the fuel system.
Checking the fuel injector assembly
Check resistance.
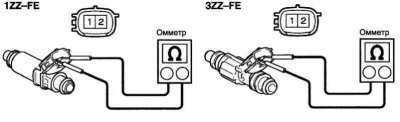
Pic. 2.475. Resistance test
Measure the resistance between the terminals with an ohmmeter (pic. 2.475).
Verification conditions
If the resistance is not within specification, the injector should be replaced.
For 1ZZ-FE engine

For 3ZZ-FE engine

Checking the volume of injected fuel
Prepare a new fuel line.
The test should be carried out in a well-ventilated area away from open flames.
Note. Be careful when handling the fuel line fitting.
With a sharp knife, cut through the protective shell of the fuel line, as shown in Figure 2.473. Break the protective sheath with your hand, then remove the fuel line fitting.
Note. Do not cut the protective sheath too deep, otherwise the O-ring of the fuel line fitting may be damaged.
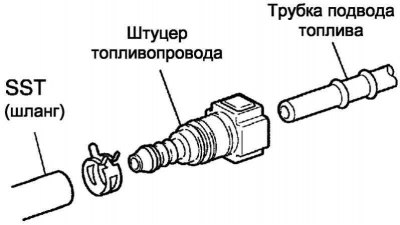
Pic. 2.476. Connection diagram of the fitting with the fuel line
Install the fuel line fitting on the SST hose and connect the fitting to the fuel line (from the side of the car) (pic. 2.476).
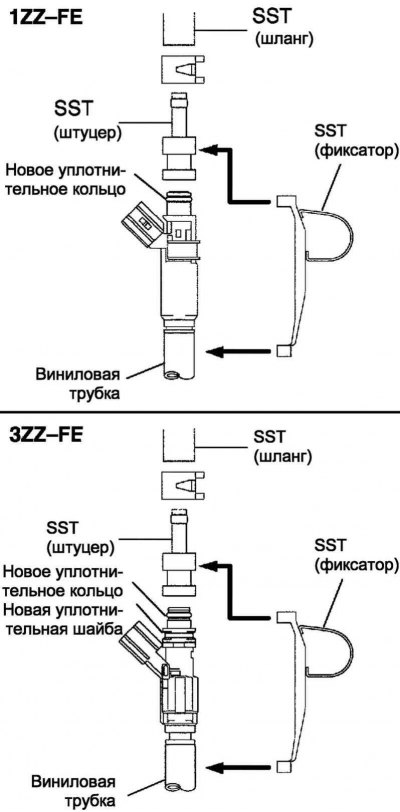
Install a new O-ring to the fuel injector.
Pic. 2.477. Wiring diagram for special tool
Connect to the SST nozzle and put on the vinyl tube (pic. 2.477).
Pic. 2.478. Placement of the vinyl nozzle tube in the volumetric flask
Place the vinyl nozzle tube into the volumetric flask (pic. 2.478).
Turn on the fuel pump.
Attach SST 09842-30080 to fuel injector.
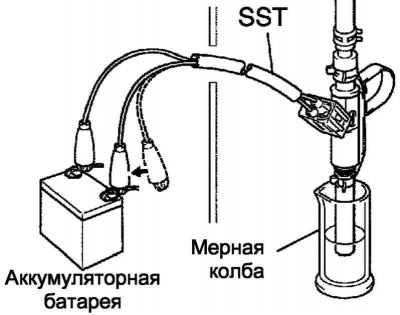
Connect the SST to the battery, then measure the amount of fuel injected in 15 seconds. Perform the check 2-3 times, then calculate the average value.
Verification conditions
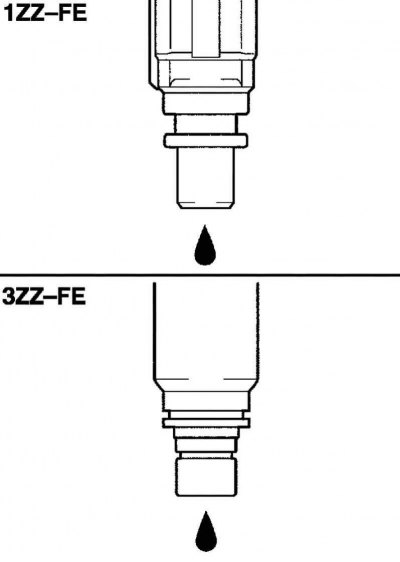
Pic. 2.479. Nozzle Leak Check
Make sure there are no leaks.
Disconnect the SST from the battery when checking the fuel injection volume. Check for fuel leakage from the fuel injector.
For 1ZZ-FE engine

For 3ZZ-FE engine

Note. Wires should only be connected to the battery.
Note. If the result is not as specified, the nozzle should be replaced.
Verification conditions
1 drop or less per 12 min.
If the result is not as specified, the nozzle should be replaced.
Fuel pump check
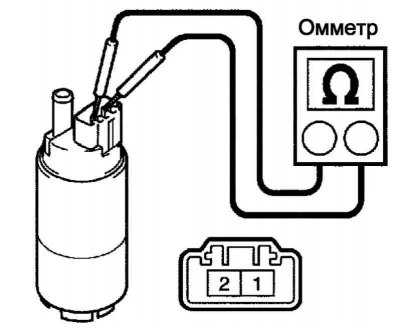
Check resistance.
Pic. 2.480. Resistance test
Measure the resistance between the terminals with an ohmmeter (pic. 2.480).
Verification conditions

If the result is not as specified, the fuel pump should be replaced.
Health check
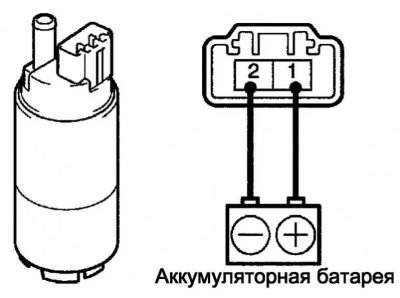
Pic. 2.481. Health check
Make sure the pump is running when battery voltage is applied to the battery terminals (pic. 2.481).
Note. Verification should be done quickly (no more than 10 s).
Note. The fuel pump must be located as far away from the battery as possible.
Note. Connect the voltage supply wires only on the battery side.
Note. If the electric motor does not run, the fuel pump must be replaced
Table 2.29. Technical data for inspection and adjustment work (1ZZ-FE / 3ZZ-FE)
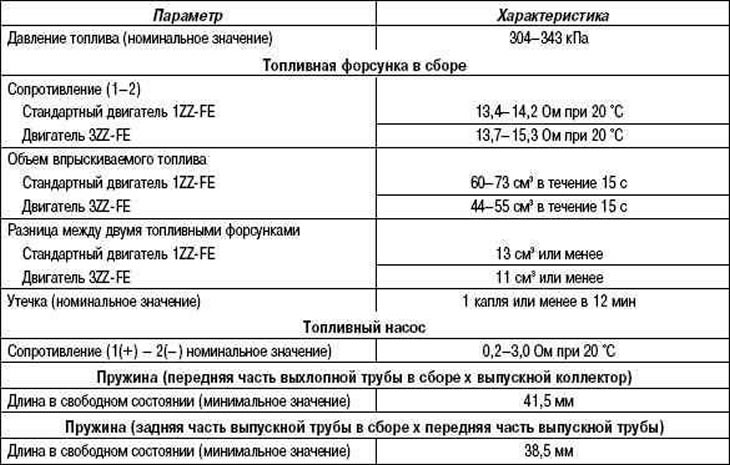
Table 2.31. Rated tightening torques (1ZZ-FE / 3ZZ-FE)
