
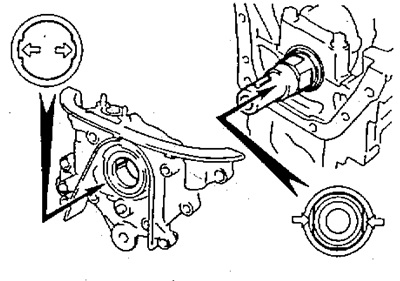
A) Place a new gasket on the surface of the cylinder block that mates with the oil pump housing.
b) Align the pump main rotor keyway with the large crankshaft key and fit the pump onto the shaft as shown.
V) Wrap 7 bolts of fastening.
- Tightening torque - 21 Nm
2. (7A-FE) Install the top of the oil pan.
A) Remove the old sealant from the surfaces of the sump and block connector, being careful not to damage the surfaces of the sump and cylinder block, clean the contact surfaces with a solvent..
Note: Do not use a solvent that could damage the painted surfaces.
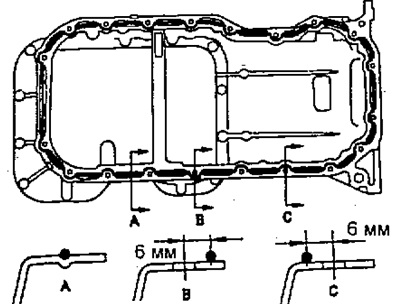
b) Apply fresh sealant to the surface of the pan as shown.
Notes:
- - The hole in the tube should ensure that the diameter of the extruded sealant is 3-5 mm. The parts must be connected within 5 minutes after applying the sealant, otherwise the sealant must be removed and fresh applied.
- - After applying the sealant, the nozzle of the tube must be removed and cleaned of traces of sealant, and the tube must be tightly closed.
b) Wrap 14 bolts of fastening.
- Tightening torque - 17 Nm
V) Tighten 6 mounting bolts (under the hexagon).
- Tightening torque - 8 Nm
G) Wrap 3 bolts of fastening to the case of a transmission.
- Tightening torque - 23 Nm
3. (4A-FE, 5A-FE) Install the oil receiver with a new gasket by tightening the 2 bolts and 2 fastening nuts.
- Tightening torque - 10 Nm
4. (7A-FEJ Install the oil receiver with a new gasket by tightening the 3 nuts G fastening.
- Tightening torque - 10 Nm
4. Install the oil separator by tightening the 2 bolts and 2 fastening nuts.
- Tightening torque - 8 Nm
5. (7A-FE) Install the bottom of the oil pan.
A) Remove the old sealant from the pallet parting surfaces, being careful not to damage them, clean the contact surfaces with a solvent.
Note: Do not use a solvent that could damage the painted surfaces.
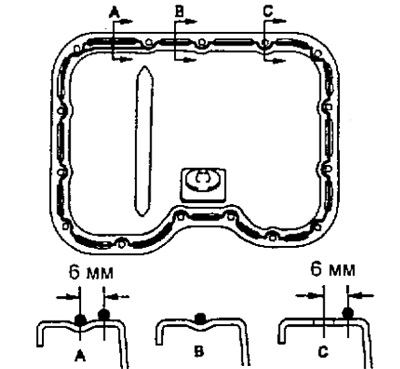
b) Apply fresh sealant to the surface of the sump as shown in the illustration, similar to the top of the oil pan.
b) Wrap 13 bolts of fastening.
- Tightening torque - 5 Nm
6. (4A-FE, -5A-FE) Install the oil pan.
A) Remove the old sealant from the surfaces of the sump and block connector, being careful not to damage the surfaces of the sump and cylinder block, clean the contact surfaces with a solvent:
Note: do not use a solvent that could damage the painted surfaces
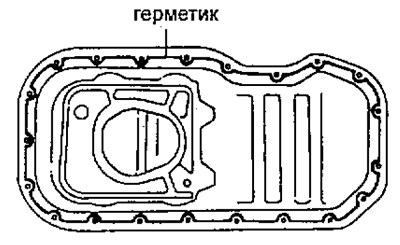
b) Apply fresh sealant to the surface of the pan as shown.
Notes:
- - The hole in the tube should ensure that the diameter of the extruded sealant is 3-5mm.
- - The parts must be connected within 5 minutes after applying the sealant, otherwise the sealant must be removed and fresh applied.
- - After applying the sealant, the nozzle of the tube must be removed and cleaned of traces of sealant, and the tube must be tightly closed.
V) Wrap 2 nuts and 19 bolts of fastening.
- Tightening torque - 5 Nm
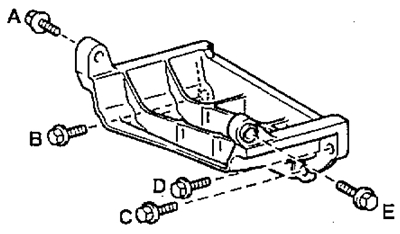
7. (4A-FE, 5A-FE) Install stiffener.
A) Install the stiffener and temporarily tighten the bolt "A".
b) Tighten the bolts in the following order: "IN" - "A"- "WITH" - "D" - "E".
- Tightening torque - 23 Nm
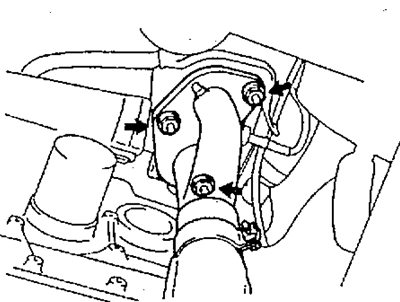
8. (4A-FE until 1994) Install the catalytic converter.
A) Install the converter with a new gasket and tighten the 2 mounting bolts.
- Tightening torque - 30 Nm
b) Install the mounting bracket by tightening the 2 bolts.
- Tightening torque - 40 Nm
9. Install center beam.
A) Wrap 7 bolts of fastening.
Torque:
- body bolt - 36 Nm
- shock absorber mounting bolt - 74 Nm
b) Install plugs.
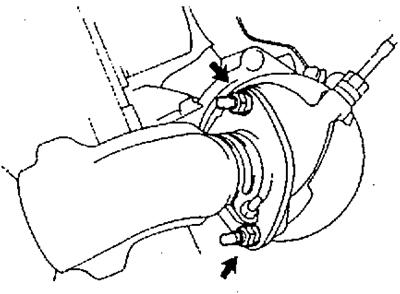
10. (5A-FE, 4A-FE after 1994) Install the downpipe of the exhaust system with catalytic converter.
A) Install downpipe and mounting bracket #1.
b) Install a new gasket and connect the downpipe to the manifold by tightening the 3 nuts.
- Tightening torque - 63 Nm
V) Install a new gasket and connect the pipe with the catalytic converter installed in it to the rear exhaust pipe by tightening the bolt and nut.
- Tightening torque - 44 Nm
G) Install the oxygen sensor with a new gasket.
11. (4A-FE until 1994) Establish a reception pipe of system of release with the central pipe.
A) Install downpipe and mounting bracket #1.
b) Install a new gasket and connect the downpipe to the manifold by tightening the 2 nuts.
- Tightening torque - 63 Nm
V) Install a new gasket and connect the center pipe to the rear exhaust pipe by tightening the bolt and nut.
- Tightening torque - 44 Nm
12. (7A-FE) Install the exhaust pipe.
A) Install the exhaust pipe with a new gasket and tighten the 3 fastening nuts.
- Tightening torque - 63 Nm
b) Install the mounting bracket by tightening the 2 mounting nuts.
- Tightening torque - 33 Nm
V) Install a new gasket and connect the exhaust pipe to the pipe with the catalytic converter installed in it, wrapping 2 bolts and 2 nuts.
- Tightening torque - 44 Nm
13. Remove the engine lifting hook.
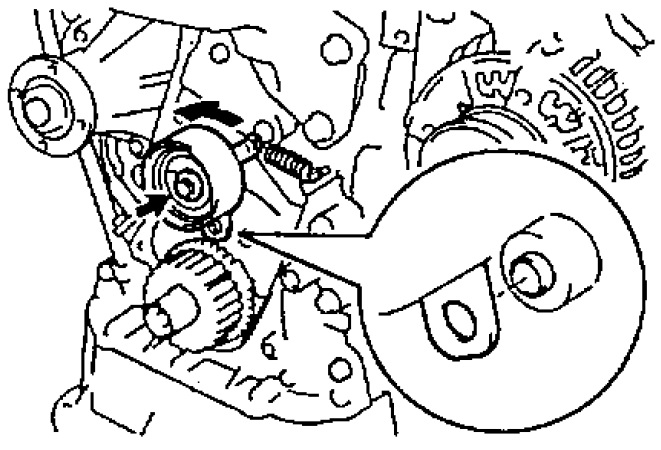
14. Install the timing belt tensioner.
15. Install the crankshaft sprocket.
16. (4A-FE, 7A-FE) Install the crankshaft position sensor.
17. Install the dipstick and guide by tightening the mounting bolt.
- Tightening torque - 10 Nm
18. (4A-FE, 7A-FE) Connect the crankshaft position sensor connector.
19. Install the timing belt.
20. Install the left side of the motor guard.
21. Fill the system with oil.
22. Start the engine and check for oil leakage.
23. Check the oil level.