



2. Check the quality of injection by the injectors.
Note: Avoid sparking during testing. Keep a fire extinguisher handy.
a) Prepare the necessary service tools.
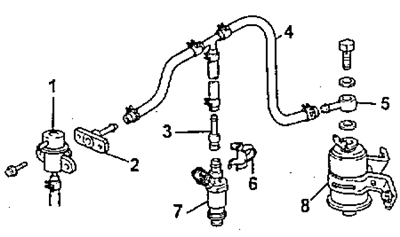
Injector testing scheme (4A-FE, 5A-FE, 7A-FE)
1 - fuel pressure regulator (remove from car),
2 - adapter fitting to the regulator,
3 - adapter fitting to the injector,
4 - Service hose,
5 - adapter fitting to the fuel filter,
6 - clamp for fastening the injector,
7 - nozzle,
8 - fuel filter.
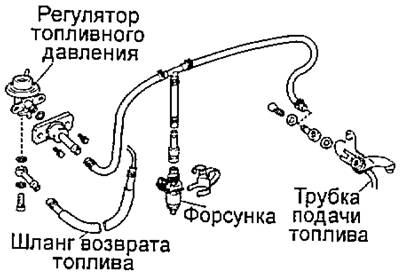
Injector testing scheme (3S-FE, 4S-FE)
(4A-FE, 5A-FE and 7A-FE)
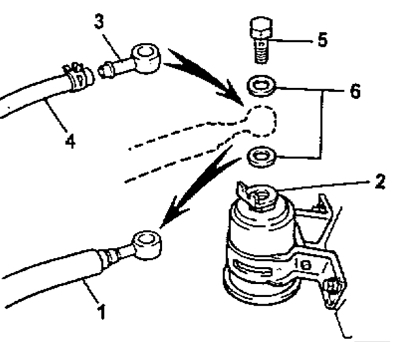
b) Disconnect the fuel inlet hose from the fuel filter.
[See the source on the internet resource TOYOTAMAN]
c) Connect the adapter fitting (3) and the service hose (4) to the outlet of the fuel filter (2) using the bolt (5), installed together with new gaskets (6).
- Tightening torque - 29 Nm
Note: Use the vehicle's fuel filter.
(3S-FE, 4S-FE)
b) Loosen the bypass bolt, remove 2 gaskets and disconnect the fuel inlet hose from the fuel supply pipe.
Note: When removing the bypass bolt, hold the fuel filter in place with a wrench.
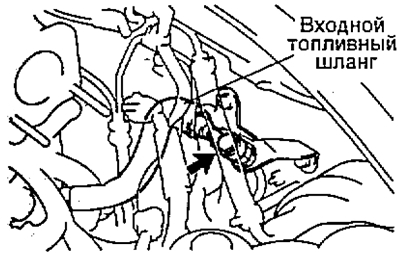
c) Connect the adapter nipple and service hose to the fuel supply pipe using two new gaskets and bypass bolts.
- Tightening torque - 29 Nm
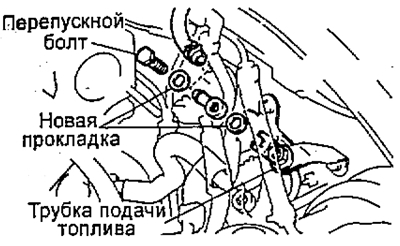
(All engines)
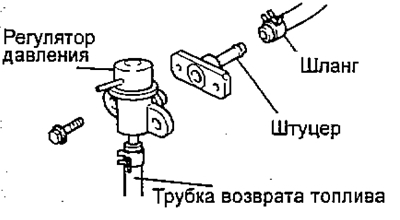
Disconnect the fuel pressure regulator from the fuel manifold and connect the service hose to it using the adapter fitting, attaching it to the regulator with 2 bolts.
- Tightening torque - 9 Nm
Connect the fuel return hose (4) to the regulator.
Note: Install new gaskets on the fuel pressure regulator.
d) Install a new safety sleeve and a new O-ring (1) on the injector (2).
e) Connect the adapter fitting; (3) and service hose (4) to the injector; (2) Secure the nozzle with the retainer (5).
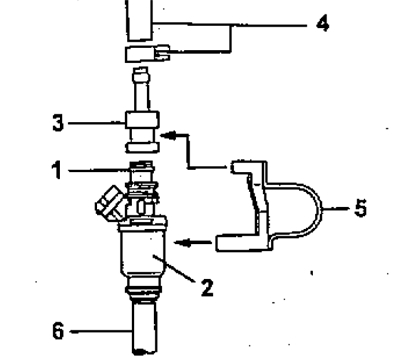
g) Install the nozzle in a measuring container. Put a suitable vinyl hose (6) on the nozzle to prevent fuel splashing.
h) Connect the (-) wire to the negative (-) terminal of the battery and turn on the ignition.
Note: Do not start the engine.
i) Use a jumper to connect the "FP" and "+B" terminals of the diagnostic connector.
k) Connect the service cable to the injector and the battery for 15 s, measure the volume of fuel injected into the measuring vessel. Repeat the test 2-3 times for each injector.
Fuel injection volume:
- 3S-FE, 4S-FE — 49-52 cm³ in 15 sec
- 4A-FE, 5A-FE - 54-64 cm³ in 15 s
- 7A-FE — 54-64 cm³ in 15 sec
The difference in flow between nozzles is up to 5 cm³
If the fuel supply is outside the acceptable range, replace the injector.
3. Check for leaks.
a) After completing the previous check, disconnect the wires from the battery and check for fuel leakage through the injector.
Leakage no more than 1 drop per 1 minute
b) Turn off the ignition, remove the jumper from the diagnostic connector and disconnect the (-) wire from the negative battery terminal.
c) Remove the adapter fittings and service hoses.
g) (4A-FE, 5A-FE and 7A-FE) Connect the fuel hose to the fuel filter outlet by tightening the bypass bolt.
- Tightening torque - 29 Nm
d) (3S-FEt 4S-FE) Connect the fuel inlet hose to the fuel feed pipe using 2 new gaskets and the bypass bolt.
- Tightening torque - 29 Nm
Note: When removing or installing the bypass bolt, hold the fuel filter in place with a wrench.
4. Check the operation of the injectors.
a) Apply 12 V from the battery to the injector and, based on a "dry" clear click, make a conclusion about the serviceability of the injector. If there is a dull or unclear click, the injector must be washed.
Attention:
- - A large current passes through the injector winding, so it cannot be used for a long time (more than 0.5 sec) do not supply power to it, otherwise it will overheat and burn out.
- - Voltage should be applied briefly (stick the wire into the terminals and remove it immediately).