
Company Honda Company Ford Company Skoda Company Kia Company Mazda Company Mercedes Company Renault
English Русский
Български
Беларускі
Український
Српски
Hrvatski
Română
Polski
Slovenský
Magyar
Bookmark Articles Sitemap Contacts
ToyotaMan.ru


Camry Corolla Corona Carina Land Cruiser Highlander 4Runner RAV4 Others
Carina T190 (1992-1996) Carina T170 (1988-1992)

Installing the transverse arm [Toyota Carina T170]

  • Main
  • Carina
  • T170 (1988-1992)
  • Chassis, running gear
  • Front suspension
  • Installing the transverse arm
0
Using Figure 197:

If the ball joint was removed, insert the joint rod into the steering knuckle and tighten the old nut with a tightening torque of 20 Nm. Then unscrew the nut and tighten the new one with a tightening torque of 127 Nm. Lock the nut with a new cotter pin. If the cotter pin does not fit, tighten the nut slightly. The transverse arm is installed differently depending on the design:

Except for the left shaft when an automatic transmission is installed


  • Install the wishbone onto the crossmember. The bolt at the front and the 3 bolts at the rear are temporarily finger-tightened. The final tightening is done with the vehicle on the ground.
  • Connect the wishbone to the steering knuckle. To do this, insert 2 bolts from above and tighten the nuts to 130 Nm. The mounting locations are shown in Figure 200.
  • Connect the anti-roll bar connecting rod to the wishbone and tighten the ball joint nut to a torque of 35 Nm.
  • Lower the car and pump the front of the car several times to settle the front suspension.
  • After this, the transverse arm can be tightened to the cross member of the suspension. For this, use Fig. 201, since individual nuts and bolts have different tightening torques.
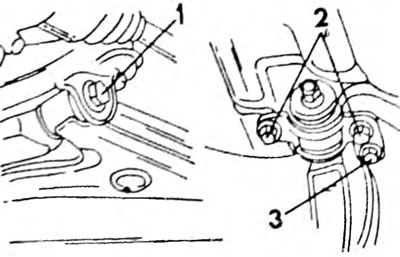


Fig. 201.


  • Finally, check the front wheel alignment angles and, if necessary, adjust the toe-in as described in chapter 12.5.
  • Left shaft with automatic transmission installed
  • Temporarily install the cross arm on the cross beam. Tighten the bolts and nuts with your fingers.
  • Raise the cross beam with the transverse levers installed on it using a jack. At the same time, engage the intermediate shaft. steering gear with the pinion. Insert the bolts and tighten them to a torque of 160 Nm.
  • Install the connecting bolt of the intermediate steering shaft and pinion, screw on the nut and tighten the bolt and nut to a torque of 35 Nm.
  • Install the rear engine mount bolt and nut and tighten to 30 Nm.
  • If equipped with hydraulic power steering, connect the supply or return pipes and bleed the air from the hydraulic steering system as described in the relevant chapter.
  • Install the muffler pipe. Tighten the flange mount to 62 Nm, the mount with the rear pipe to 20 Nm. Secure the pipe to the gearbox bracket with a tightening torque of 20 Nm.
  • Connect the anti-roll bar connecting rod to the ball joint on the wishbone. Screw on the nut and tighten it to 35 Nm.
  • Further work is carried out in the same way as described for other vehicles.
This article is available at: russian, bulgarian, belarusian, ukrainian, serbian, croatian, romanian, polish, slovak, hungarian
The article material has been checked: Kondratyeva Ulyana
Share information:
◀ Previous
Carina T170: Front suspension
Next ▶

Wishbone repair
Removal the wishbone
Installing the wheel hub
Replacing a wheel bearing
Front Wheel Steering Knuckles and Hubs — Removal and Installation
Transverse stability stabilizer
Adjusting the front wheel alignment angles
Adjusting the toe-in
Adjusting the steering angle of the steering wheels
Adjusting the longitudinal angle of the wheel pivot axis
Similar articles on other Toyota models

➥ Installing an engine balancing device Toyota Camry XV20 (1996-2001)
➥ Installing the hip support Toyota Corolla E80 (1983-1990)
➥ Installing an oil pump Toyota Corona T190 (1992-1997)
➥ Installing piston rings Toyota Cruiser 60/80 (1980-1997, petrol)
➥ Lifting and installing the car on supports Toyota Highlander 1 (2000-2007, petrol)
➥ Dismantling and installing the engine Toyota 4Runner N120 (1989-1995)
Link in different formats to this article
Comments and feedback from visitors
No comments yet


Add two numbers 13 + 16


Carina T190 (1992-1996) 
  • General information
  • User manual
  • Maintenance
  • Power unit
  • Engines 4A-FE, 5A-FE, 7A-FE
  • Engines 3S-FE, 4S-FE
  • Diesel engines 2C
  • Engine repair
  • Cooling system
  • Lubrication system
  • Fuel system
  • Control system (diesel)
  • Fuel injection system
  • Engine electrical equipment
  • Transmission
  • Clutch
  • Mechanical gearbox
  • Automatic gearbox
  • Drive shafts
  • Chassis, running gear
  • Car suspension
  • Steering
  • Brake system
  • Body and interior
  • Exterior (external elements)
  • Interior (internal elements)
  • Air conditioning and heater
  • Electrical equipment
  • Equipment and devices
  • Headlights and lighting
  • Breakers and switches
  • Electrical circuits
Carina T170 (1988-1992) 
  • General information
  • Introduction to the manual
  • Power unit
  • Gasoline engines
  • Diesel engines
  • Lubrication system
  • Cooling system
  • Fuel system (carburetor)
  • Fuel system (injector)
  • Ignition system
  • Transmission
  • Clutch
  • Car gearbox
  • Drive shafts
  • Chassis, running gear
  • Front suspension
  • Rear suspension
  • Steering
  • Brake system
  • Electrical equipment
  • Power devices
  • Electrical circuits
ToyotaMan.ru © 2018–2026 • Mobile version • Interesting about Toyota • Administration • Sitemap: EN BG BY UA RS HR RO PL SK HU • Search system • Bookmark
Camry Vista-V40 • Camry XV10 • Camry XV20 • Camry XV30 • Corolla Verso-AR10 • Corolla E80 • Corona T190 • Carina T170 • Carina T190 • Land Cruiser J70 (diesel) • Land Cruiser J60 (petrol) • Land Cruiser J100 • Highlander XU20 (petrol) • 4Runner N120 • RAV4 XA10 • RAV4 XA20 • Duet M100 • Dyna Y50 •
We require cookies to enable some interactive features. Is that ok with you?