
A set of tools needed to change the engine oil and oil filter
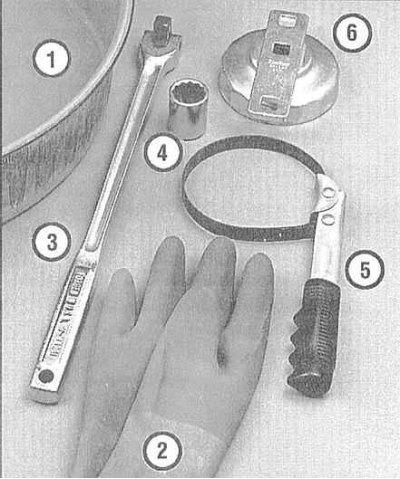
- 1 - The drain pan should be shallow and wide enough to minimize the chance of oil spilling onto the ground
- 2 - Rubber gloves will help protect your hands from burns if oil inevitably gets on them while turning out the drain plug of the oil pan
- 3 - The gate sometimes the drain plug is tightened quite tightly, which requires considerable effort when turning it out
- 4 - A replaceable end head is used in tandem with a gate or a drive equipped with a ratchet when turning out the drain plug, must correspond to the latter in size
- 5 - The tape wrench allows you to turn out the full-flow oil filter in conditions of limited access to it
- 6 - A special ring wrench is put on the end of the filter and can then be rotated using a winch or ratchet drive, must match the filter housing in size
1. Make sure you have all the materials and tools needed to perform an oil and oil filter change on hand (refer to illustration above). Also, have enough rags and old newspapers ready to catch any spilled oil.
2. In order to provide free access to the oil pan and oil filter, lift the car with a winch, drive it onto a flyover, or jack it up and place it on props.
Attention! Never carry out any work under the car, supported only by the bumper or held in a raised position only by a jack!

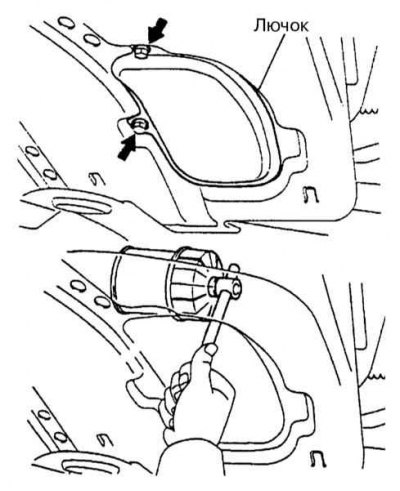
3. Get under the car and familiarize yourself with the location of the drain plug of the oil pan and oil filter (refer to accompanying illustration). Remember that the power unit and components of the exhaust system will remain hot enough during the entire procedure, consider a safe hand manipulation scheme to avoid accidental contact with hot surfaces.
4. Make sure the vehicle is level on the stands/lift. Warm up the engine to normal operating temperature, hot oil is more fluid and is better at flushing out sludge and deposits. Use the forced downtime in order to lay out in a convenient manner all the necessary tools and materials. Stop the engine and remove the engine oil filler cap (refer to the accompanying illustrations in Vehicle settings and routine maintenance).
5. Make sure that the car is securely fixed in the raised position.
6. Be careful (see paragraph 3), climb under the car and place a drain container under the oil pan so that at the first moment the jet will flow through the hole with a decent pressure. Taking care not to touch the hot surfaces of the power unit and exhaust system components, remove the drain plug from the bottom of the oil pan. Depending on the temperature of the oil, at the final stage of turning the cork, you can use rubber gloves, or refuse them.
7. Allow the oil to flow freely into the container, adjusting the position of the latter accordingly as the pressure of the jet weakens. Check for metal filings in the drained oil.
8. After the oil stops flowing from the crankcase, carefully wipe the drain plug with a clean rag, small metal filings may stick to it, which will immediately lead to contamination of fresh oil.
9. Wipe the surface of the pan around the drain hole, screw the plug into place and tighten it with the required force.
10. Move a drain pan under the oil filter.
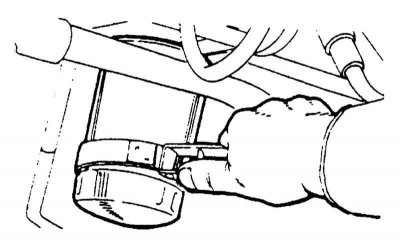
11a. Using one of the types of special keys (refer to the illustration at the beginning of this Section) loosen the filter (refer to accompanying illustrations). In the process of turning out the filter housing may be damaged, which is not of particular importance in the case of its unambiguous replacement (the old filter to turn out can simply be pierced with a large screwdriver, get ready to collect the spilled oil).
11b. Manually unscrew the filter completely from the block, remember that there is still some oil left in it, which should be released into the drain container. Make sure that the rubber seal comes off with the filter, if not, carefully separate it from the surface of the engine block.
12. Thoroughly wipe the filter seat on the unit with a clean rag. Once again, make sure that the old gasket is not left on the engine, if necessary, use a scraper.
13. Make sure that the new filter matches the size removed from the car. Lubricate the rubber seal of the new filter with a thin layer of clean engine oil and screw the new filter into the engine, following the direction of rotation indicated by the arrow on its housing. To avoid damaging the gasket, do not use any wrenches to tighten the oil filter. After the filter is pressed against the surface of the block by the gasket, tighten it another 3/4 turn.
14. Remove all tools and materials from under the car, try not to overturn the drain container. Lower the car to the ground.
15. Remove the cap from the engine oil filler neck and fill it with fresh oil - use a funnel to minimize losses. Filled with about 2.8 liters, wait a few minutes, allowing the oil to drain into the sump, then check its level on the dipstick (see Section Checking fluid levels). If the level is above the low mark, start the engine with fresh oil circulating.
16. After running the engine for about a minute, shut it off again and immediately look under the vehicle, checking for leaks from the drain plug and full flow filter. Tighten the leaking component slightly if necessary.
17. During the circulation of oil through the engine (about 1 minute), the new oil filter is being filled. Now it is necessary to check the oil level again and, if necessary, add some more of it, bringing the level to the upper mark on the dipstick blade (check a few minutes after turning off the engine - the oil should have time to completely drain into the oil pan).
During the first few trips after changing the engine oil, check the oil level as often as possible.
Used oil drained from the engine cannot be reused and must be handed over to a special collection point. In no case do not drain the mining to the ground or into the sewer - pour it into a hermetically sealed container and hand it over as soon as possible.