
Company Honda Company Ford Company Skoda Company Kia Company Mazda Company Mercedes Company Renault
English Русский
Български
Беларускі
Український
Српски
Hrvatski
Română
Polski
Slovenský
Magyar
Bookmark Articles Sitemap Contacts
ToyotaMan.ru


Camry Corolla Corona Carina Land Cruiser Highlander 4Runner RAV4 Others
Cruiser 100 (1998-2007) Cruiser 60/80 (1980-1997, petrol) Cruiser 70 (1985-1996, diesel)

Starter motor — removal, inspection and installation [Toyota Land Cruiser J60]

  • Main
  • Land Cruiser
  • J60 (1980-1997)
  • Power unit
  • Petrol engines 1FZ-FE
  • Starter motor — removal, inspection and installation
0
Contents: Checking without removing from the…↓ Removal and installation ↓

Starter mounting details
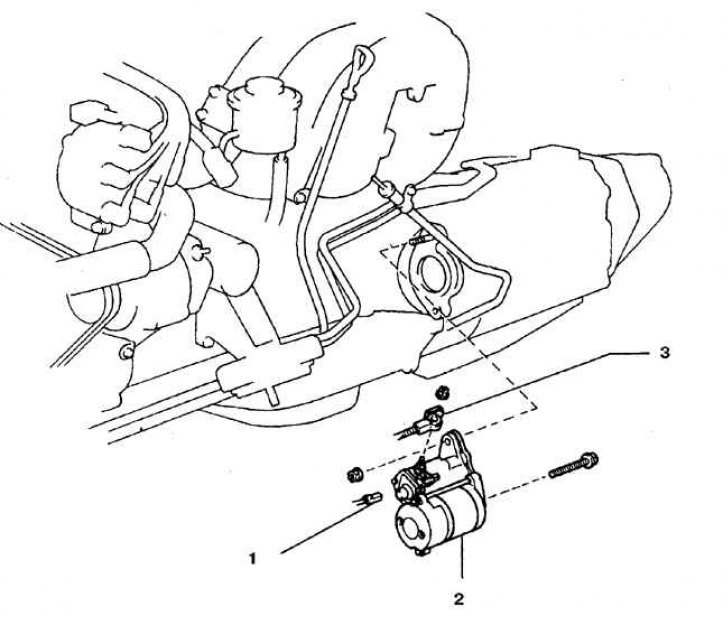


1. Connector
2. Wire
3. Starter


Checking without removing from the vehicle


1. If the starter motor does not turn at all when you turn the key, make sure the selector lever is in the Park or Neutral position (on cars with automatic transmission) or press the clutch pedal.

2. Make sure the battery is charged, check the cleanliness and reliability of the cable fastening on the battery and on the starter solenoid relay.

3. If the starter motor turns on when the key is turned, but the crankshaft does not turn, then the cause is slipping of the starter overrunning clutch. In this case, the starter assembly should be replaced.

4. If the starter motor does not rotate when the key is turned, but the traction relay clicks, then the traction relay contacts, battery and starter motor are faulty (or the crankshaft turns with difficulty).

5. If, when the starter is turned on, the click emitted by the relay anchor is not heard, then the reasons for the failure may be a faulty battery or a burnt-out fuse (the circuit is open), malfunction of the auxiliary starter relay or the traction relay itself.


6. To check the traction relay, short-circuit the (+) battery terminal and the terminal for the wire from the ignition key with a jumper (located on the traction relay).

7. If the starter motor starts, the traction relay is OK and the ignition switch, auxiliary starter relay, or wiring are faulty.

8. If the starter motor still does not start, remove the starter assembly with the traction relay for inspection and repair.

The publication is taken from the website (toyotaman)

9. If the starter turns the crankshaft, but at a very low speed, then first check the battery charge level and the reliability and integrity of the connections. The starter will also turn the engine at a low speed if the crankshaft rotates with difficulty or the engine is filled with oil with too high viscosity.

10. Warm up the engine, then disconnect the coil high-tension wire from the distributor cap and connect it to ground on the engine.

11. Connect the positive terminal of the voltmeter to the positive pole of the battery and the negative terminal to the negative pole.

12. Turn on the starter and read the steady-state voltmeter reading. The starter engagement time should not exceed 15 seconds. The battery voltage at normal crankshaft speed should be 9 V or slightly higher.

13. If the battery voltage is 9 V or slightly above 9 V and the crankshaft speed is low, the starter motor is faulty.

14. If the voltage is less than 9 V and the crankshaft rotation speed is low, then the probable causes are burning of the traction relay contacts, a malfunction of the starter motor, self-discharge of the battery, or poor condition of the contacts.


Removal and installation


1. Disconnect the battery from ground.

2. Remove the battery from the engine compartment.

3. Disconnect and remove the cruise control unit from the engine compartment.

4. Disconnect the connectors from the starter and traction relay.
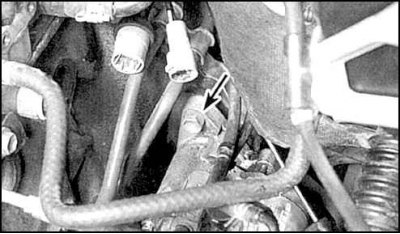


5. Loosen the starter mounting bolts (the arrow indicates the upper starter bolt).

6. Remove the bracket from the top of the starter assembly with the solenoid relay.

Attention! First, partially unscrew one or two bracket bolts, then move the starter with the traction relay down, and then unscrew the remaining bolts.


7. Installation is carried out in reverse order.
This article is available at: russian, bulgarian, belarusian, ukrainian, serbian, croatian, romanian, polish, slovak, hungarian
The article material has been checked: Evdokimov Evgeniy
Share information:
◀ Previous
Cruiser 60/80: Petrol engines 1FZ-FE
Next ▶

Suspension and Engine Parts — Checking and Replacing
Rear Crankshaft Oil Seal — Replacement
Flywheel (torque converter drive disk)
Oil pump — removal, inspection and installation
Oil pan — removal and installation
 
Similar articles on other Toyota models

➥ Starter motor — removal and installation Toyota Camry XV20 (1996-2001)
➥ Checking the starter motor without removing it from the… Toyota Corolla Verso 3 (2004-2009)
➥ Checking the starter motor without removing it from the… Toyota 4Runner N120 (1989-1995)
➥ Checking the fan motor Toyota Corona T190 (1992-1997)
➥ Selecting motor oil Toyota Carina T190 (1992-1996)
➥ Starter and electrical circuit — check Toyota Highlander 1 (2000-2007, petrol)
Link in different formats to this article
Comments and feedback from visitors
No comments yet


Add two numbers 46 + 41


Cruiser 100 (1998-2007) 
  • General information
  • Introduction to the guide
  • Controls and instruments
  • Maintenance
  • Power unit
  • Petrol engines
  • Diesel engines
  • Cooling and heating
  • Power and exhaust systems
  • Engine electrical equipment
  • Engine management systems
  • Transmission
  • Automatic gearbox
  • Transmission line
  • Chassis, running gear
  • Brake system
  • Car suspension
  • Steering
  • Body and interior
  • Exterior (external elements)
  • Interior (internal elements)
  • Doors, locks and windows
  • Electrical equipment
  • Equipment and devices
  • Electrical circuits
Cruiser 60/80 (1980-1997, petrol) 
  • General information
  • User manual
  • Maintenance
  • Power unit
  • Petrol engines 2F and 3F-E
  • Petrol engines 1FZ-FE
  • Engine overhaul
  • Engine electrical equipment
  • Cooling and heating
  • Fuel system (carburetor)
  • Fuel system (injector)
  • Toxicity reduction system
  • Transmission
  • Car gearbox
  • Clutch
  • Transfer case
  • Drive shafts and axles
  • Chassis, running gear
  • Brake system
  • Car suspension
  • Steering
  • Body and interior
  • Exterior and interior
  • Doors, locks and windows
  • Electrical equipment
  • Equipment and devices
  • Electrical circuits
Cruiser 70 (1985-1996, diesel) 
  • General information
  • User manual
  • Maintenance
  • Power unit
  • Engine adjustment
  • Engine repair
  • Fuel system
  • Control system
  • Turbocharging system
  • Cooling and lubrication system
  • Charge and start system
  • Transmission
  • Clutch
  • Mechanical gearbox
  • Automatic gearbox
  • Transfer case
  • Chassis, running gear
  • Car suspension
  • Brake system
  • Steering
  • Body and interior
  • Body elements
  • Heating and air conditioning
  • Electrical equipment
  • Equipment and devices
  • Electrical circuits
ToyotaMan.ru © 2018–2026 • Mobile version • Interesting about Toyota • Administration • Sitemap: EN BG BY UA RS HR RO PL SK HU • Search system • Bookmark
Camry Vista-V40 • Camry XV10 • Camry XV20 • Camry XV30 • Corolla Verso-AR10 • Corolla E80 • Corona T190 • Carina T170 • Carina T190 • Land Cruiser J70 (diesel) • Land Cruiser J60 (petrol) • Land Cruiser J100 • Highlander XU20 (petrol) • 4Runner N120 • RAV4 XA10 • RAV4 XA20 • Duet M100 • Dyna Y50 •
We require cookies to enable some interactive features. Is that ok with you?