
The designation of the manifold mounting bolts on the 3F-E engine
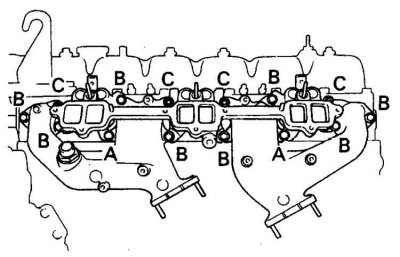
Bolt A and B turnkey 17 and 14
C - nut
Attention! Work is carried out on a cold engine.
Removing
1. Disconnect the battery from the ground.
2. Drain the liquid from the cooling system.
3. Remove the carburetor or surge chamber (see subsection 5.1.8.3 and subsection 5.2.9.2.6).
4. Remove the air pump and air manifold (see subsection 6.3).
5. Loosen the bolts and remove the exhaust manifold bracket.
6. Disconnect the line from the fuel distributor (on injection engines, see subsection 5.2.9.2.5).
7. Remove the heat shield.
8. Remove the power steering pump and set aside without disconnecting the lines.
9. On vehicles with automatic transmission, disconnect the transmission throttle link.
10. Disconnect the recirculation tube (see subsection 3.2.4).
11. Remove the 2 bolts and 2 nuts securing the exhaust pipe to the manifold.
12. Disconnect the connector from the oxygen sensor.
13. Turn away bolts and nuts, remove dividing plugs. Remove manifolds.
Installation
1. Clear the surfaces of seal residues.
2. If the manifold will change, then rearrange all the parts from the replaced one to the new manifold.
3. Install new gasket and manifolds.
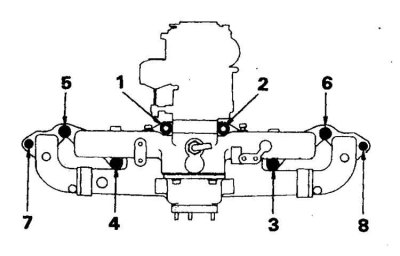
4. Tighten the bolts and nuts in the specified sequence, with the specified torque (see fig. The designation of the manifold mounting bolts on the 3F-E engine).
5. Install all removed parts in reverse order.
6. Start the engine and check for leaks.