



Share information:
Elements of the car body Toyota Vista 4 (V40)

Holders (pistons) — removal and installation
If holders (pistons) are used to fasten parts, when removing and installing them, follow the corresponding drawings (see legend in figures).
If holders (pistons) are used to fasten parts, when removing and installing them, follow the corresponding drawings (see legend in figures).
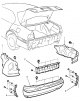
Rear bumper
When removing and installing the bumper, refer to the corresponding assembly drawing. Rear bumper. 1 - side trim of the trunk (left and right), 2 - rear trunk trim, 3 - bumper cover, 4 - side bumper holder (left and...
When removing and installing the bumper, refer to the corresponding assembly drawing. Rear bumper. 1 - side trim of the trunk (left and right), 2 - rear trunk trim, 3 - bumper cover, 4 - side bumper holder (left and...

Adjusting the hood
(See the figure "Adjusting the gap between the hood, trunk lid and the car body".) Note: The hood and its lock cannot be adjusted when the hood and lock are secured with centering bolts. When adjusting, these bolts...
(See the figure "Adjusting the gap between the hood, trunk lid and the car body".) Note: The hood and its lock cannot be adjusted when the hood and lock are secured with centering bolts. When adjusting, these bolts...

Trunk lid
Adjusting the trunk lid (See the figure "Adjusting the gap between the hood, trunk lid and the car body".) 1. Disconnect the clips and remove the trunk lid trim. 2. To adjust in the longitudinal and transverse...
Adjusting the trunk lid (See the figure "Adjusting the gap between the hood, trunk lid and the car body".) 1. Disconnect the clips and remove the trunk lid trim. 2. To adjust in the longitudinal and transverse...

Front bumper
When removing and installing the bumper, refer to the corresponding assembly drawing. Front bumper. 1 - left and right mudguard), 2 - front dimensions (left and right), 3 - engine protection cover, 4 - bumper cover, 5 -...
When removing and installing the bumper, refer to the corresponding assembly drawing. Front bumper. 1 - left and right mudguard), 2 - front dimensions (left and right), 3 - engine protection cover, 4 - bumper cover, 5 -...

Side doors
Adjustment of front and rear doors Note: If necessary, replace the centering bolt with a standard one. 1. Adjusting the door in longitudinal and vertical directions. Loosen the door hinges to the body and adjust the...
Adjustment of front and rear doors Note: If necessary, replace the centering bolt with a standard one. 1. Adjusting the door in longitudinal and vertical directions. Loosen the door hinges to the body and adjust the...

Windshield
Removal the windshield 1. Remove the ventilation grille. 2. Disconnect the two clips and remove the front pillar upper trim as shown in the figure. 3. Remove the sun visors and holders. 4. Remove the interior mirror. 5....
Removal the windshield 1. Remove the ventilation grille. 2. Disconnect the two clips and remove the front pillar upper trim as shown in the figure. 3. Remove the sun visors and holders. 4. Remove the interior mirror. 5....
Rear window
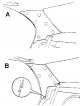
Removal the rear window 1. Remove the rear seat cushion and backrest. 2. Remove the side backrests of the rear seat. 3. Remove the rear pillar trim. Rear pillar trim. A - doors with frame, B - doors without frame. 4....
Removal the rear window 1. Remove the rear seat cushion and backrest. 2. Remove the side backrests of the rear seat. 3. Remove the rear pillar trim. Rear pillar trim. A - doors with frame, B - doors without frame. 4....

Adjusting the hatch
1. Adjusting the hatch in the longitudinal direction. a) Loosen the hatch mounting bolts. b) Adjust the gaps between the roof panel and the sunroof. Remove the sunroof control panel and rotate the drive shaft with a...
1. Adjusting the hatch in the longitudinal direction. a) Loosen the hatch mounting bolts. b) Adjust the gaps between the roof panel and the sunroof. Remove the sunroof control panel and rotate the drive shaft with a...

Seat belts with pretensioner
Attention: 1. For safety reasons, the safety device mechanism must be kept on at all times when performing the following operations. Moreover, it is prohibited to switch off the safety device when the pretensioner is...
Attention: 1. For safety reasons, the safety device mechanism must be kept on at all times when performing the following operations. Moreover, it is prohibited to switch off the safety device when the pretensioner is...
Instrument panel
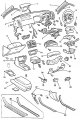
Instrument panel. 1 - upper trim of the front pillar, 2 - front door seal, 3 - passenger side airbag cover, 4 - instrument panel, 5 - storage box, 6 - heater and air conditioner control panel, 7 - steering column, 8 -...
Instrument panel. 1 - upper trim of the front pillar, 2 - front door seal, 3 - passenger side airbag cover, 4 - instrument panel, 5 - storage box, 6 - heater and air conditioner control panel, 7 - steering column, 8 -...
This section is available on: russian, bulgarian, belarusian, ukrainian, serbian, croatian, romanian, polish, slovak, hungarian
Similar sections for other Toyota models
➥ Body and interior elements Toyota Corona T190 (1992-1997)
➥ Body elements Toyota Dyna Y50/Y60 (1984-1995)
➥ Body elements Toyota Cruiser 70 (1985-1996, diesel)
Link in different formats to this article
TEXTHTMLBB Code
- User manual
- Vehicle description
- Keys, locks and alarms
- Governing bodies
- Salon equipment
- Driving and operation
- Maintenance
- Power unit
- 4-cylinder engine
- Control system (I4)
- Engine overhaul (I4)
- 6-cylinder engine
- Control system (V6)
- Engine overhaul (V6)
- Transmission
- Clutch
- Mechanical gearbox
- Automatic gearbox
- Drive mechanism
- Chassis, running gear
- Wheels and tires
- Car suspension
- Steering
- Brake system
- Body and interior
- Exterior (external elements)
- Doors, locks and windows
- Air conditioning and heater
- Electrical equipment
- Equipment and devices
- Power devices
- Electrical circuits
- General information
- Controls and instruments
- Driving and operation
- Daily care
- Maintenance
- Power unit
- 4-cylinder engine
- 6-cylinder engine
- Engine overhaul
- Engine electrical equipment
- Cooling system
- Heating and ventilation
- Fuel system
- Exhaust system
- Transmission
- Mechanical gearbox
- Automatic gearbox
- Clutch
- Chassis, running gear
- Suspension and axle shafts
- Steering
- Brake system
- Body and interior
- Exterior (external elements)
- Interior (internal elements)
- Doors, locks and windows
- Electrical equipment
- Equipment and devices
- Electrical circuits
- General information
- User manual
- Maintenance
- Power unit
- 4-cylinder engine
- 6-cylinder engine
- Overhaul of engines
- Cooling and heating
- Fuel system
- Engine electrical equipment
- Control system
- Transmission
- Mechanical gearbox
- Automatic gearbox
- Clutch and drive shafts
- Chassis, running gear
- Brake system
- Car suspension
- Steering
- Body and interior
- Exterior (external elements)
- Interior (internal elements)
- Doors, locks and windows
- Electrical equipment
- Equipment and devices
- Headlights and lighting
- Electrical circuits
- General information
- User manual
- Maintenance
- Power unit
- Petrol engines
- Diesel engines
- Engine overhaul
- Cooling and lubrication system
- Fuel system (diesel)
- Fuel injection (petrol)
- Engine electrical equipment
- Transmission
- Clutch and cardan
- Automatic gearbox
- Chassis, running gear
- Front suspension
- Rear suspension
- Steering
- Brake system
- Body and interior
- Body elements
- Air conditioning and heater
- SRS security system
- Electrical equipment
- Equipment and devices
- Electrical circuits