



Share information:
Car clutch and drive shafts Toyota Camry 1 (XV10)

Technical characteristics of drive shafts
Length of drive shaft Models with 5S-FE engine Toyota Type: - left 608 mm - right 866 mm GKN Type: - left 609 mm - right: • from 1992 to 1994 880 mm • since 1995 867 mm Models with 3VZ-FE or 1 MZ-FE engine Toyota type...
Length of drive shaft Models with 5S-FE engine Toyota Type: - left 608 mm - right 866 mm GKN Type: - left 609 mm - right: • from 1992 to 1994 880 mm • since 1995 867 mm Models with 3VZ-FE or 1 MZ-FE engine Toyota type...

Clutch — design description
Clutch 1 – flywheel; 2 – clutch disc; 3 – pressure plate; 4 – bolts; 5 – thrust bearing; 6 – clutch release fork; 7 – stud with ball end; 8 – protective cover The clutch is designed for short-term disconnection of the...
Clutch 1 – flywheel; 2 – clutch disc; 3 – pressure plate; 4 – bolts; 5 – thrust bearing; 6 – clutch release fork; 7 – stud with ball end; 8 – protective cover The clutch is designed for short-term disconnection of the...

Checking and replacing the clutch disc
Removal 1. Remove the gearbox. 2. Remove the clutch slave cylinder without disconnecting the hose from it. 3. Mark the position of the clutch master assembly in relation to the flywheel using a marker or paint. 4....
Removal 1. Remove the gearbox. 2. Remove the clutch slave cylinder without disconnecting the hose from it. 3. Mark the position of the clutch master assembly in relation to the flywheel using a marker or paint. 4....

Release bearing — removal, inspection and installation
Removal 1. Remove the ground cable from the battery. Warning: If your radio has an anti-theft code, make sure you have the connection codes before disconnecting the battery. Caution! On models from 1993 onwards, the...
Removal 1. Remove the ground cable from the battery. Warning: If your radio has an anti-theft code, make sure you have the connection codes before disconnecting the battery. Caution! On models from 1993 onwards, the...

Clutch Master Cylinder — Removal and Installation
Removal 1. Remove the ground cable from the battery. Warning: If your radio has an anti-theft code, make sure you have the connection codes before disconnecting the battery. Caution! On models from 1993 onwards, the...
Removal 1. Remove the ground cable from the battery. Warning: If your radio has an anti-theft code, make sure you have the connection codes before disconnecting the battery. Caution! On models from 1993 onwards, the...

Clutch Master Cylinder — Repair
Clutch Master Cylinder Parts 1 – spring pin; 2 – lid; 3 – float; 4 – reservoir; 5 – sealing ring; 6 – spring; 7 – pusher; 8 – retaining ring; 9 – bracket; 10 – cotter pin; 11 – traction; 12 – protective cover; 13 –...
Clutch Master Cylinder Parts 1 – spring pin; 2 – lid; 3 – float; 4 – reservoir; 5 – sealing ring; 6 – spring; 7 – pusher; 8 – retaining ring; 9 – bracket; 10 – cotter pin; 11 – traction; 12 – protective cover; 13 –...

Clutch slave cylinder — removal and installation
Removal Clutch slave cylinder parts 1 – case; 2 – pusher; 3 – piston; 4 – spring; 5 – working cylinder body; 6 – sealing gaskets; 7 – special bolt; 8 – nipple; 9 – pipeline 1. Remove the ground cable from the battery....
Removal Clutch slave cylinder parts 1 – case; 2 – pusher; 3 – piston; 4 – spring; 5 – working cylinder body; 6 – sealing gaskets; 7 – special bolt; 8 – nipple; 9 – pipeline 1. Remove the ground cable from the battery....
Bleeding the hydraulic clutch system
The bleed nipple is located on the side of the clutch slave cylinder. 1. Unscrew the cap of the feed tank and check that the brake fluid level in the tank is at the max mark. When removing air, monitor the presence of...
The bleed nipple is located on the side of the clutch slave cylinder. 1. Unscrew the cap of the feed tank and check that the brake fluid level in the tank is at the max mark. When removing air, monitor the presence of...
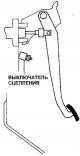
Clutch starter switch
Location of the clutch starter switch The clutch starter switch is located on the bracket behind the clutch pedal. 1. Check the installation height and free play of the clutch pedal. 2. Check that the engine cannot be...
Location of the clutch starter switch The clutch starter switch is located on the bracket behind the clutch pedal. 1. Check the installation height and free play of the clutch pedal. 2. Check that the engine cannot be...

Constant velocity joint (CV joint)
Front wheel drives operate under the most severe and unfavorable conditions, as they are located in the zone of greatest exposure to moisture and dirt and transmit torque to the wheels under constantly changing angles...
Front wheel drives operate under the most severe and unfavorable conditions, as they are located in the zone of greatest exposure to moisture and dirt and transmit torque to the wheels under constantly changing angles...

Replacement of protective covers and repair of CV joints (5S-FE)
1. Remove the drive shaft. 2. Secure the drive shaft in a vice with soft jaws. Disassembly 1. Remove the clamps securing the constant velocity joint protective boot. 2. Slide the protective rubber boot onto the drive...
1. Remove the drive shaft. 2. Secure the drive shaft in a vice with soft jaws. Disassembly 1. Remove the clamps securing the constant velocity joint protective boot. 2. Slide the protective rubber boot onto the drive...

Replacement of protective covers and repair of CV joints (3VZ-FE / 1MZ-FE)
Disassembly Drive shafts for models with 3VZ-FE or 1MZ-FE engines 1 – dust cap; 2 – thrust ring; 3 – bearing; 4 – intermediate shaft; 5 – constant velocity joint; 6 – gasket; 7 – retaining ring; 8 – hinge casing; 9 –...
Disassembly Drive shafts for models with 3VZ-FE or 1MZ-FE engines 1 – dust cap; 2 – thrust ring; 3 – bearing; 4 – intermediate shaft; 5 – constant velocity joint; 6 – gasket; 7 – retaining ring; 8 – hinge casing; 9 –...
This section is available on: russian, bulgarian, belarusian, ukrainian, serbian, croatian, romanian, polish, slovak, hungarian
Similar sections for other Toyota models
➥ Clutch and drive shafts Toyota RAV 4 XA20 (2000-2005)
➥ Clutch Toyota 4Runner N120 (1989-1995)
➥ Clutch Toyota Dyna Y50/Y60 (1984-1995)
➥ Clutch Toyota Corona T190 (1992-1997)
➥ Clutch Toyota Carina T170 (1988-1992)
➥ Clutch Toyota Cruiser 70 (1985-1996, diesel)
Link in different formats to this article
TEXTHTMLBB Code
- User manual
- Vehicle description
- Keys, locks and alarms
- Governing bodies
- Salon equipment
- Driving and operation
- Maintenance
- Power unit
- 4-cylinder engine
- Control system (I4)
- Engine overhaul (I4)
- 6-cylinder engine
- Control system (V6)
- Engine overhaul (V6)
- Transmission
- Clutch
- Mechanical gearbox
- Automatic gearbox
- Drive mechanism
- Chassis, running gear
- Wheels and tires
- Car suspension
- Steering
- Brake system
- Body and interior
- Exterior (external elements)
- Doors, locks and windows
- Air conditioning and heater
- Electrical equipment
- Equipment and devices
- Power devices
- Electrical circuits
- General information
- Controls and instruments
- Driving and operation
- Daily care
- Maintenance
- Power unit
- 4-cylinder engine
- 6-cylinder engine
- Engine overhaul
- Engine electrical equipment
- Cooling system
- Heating and ventilation
- Fuel system
- Exhaust system
- Transmission
- Mechanical gearbox
- Automatic gearbox
- Clutch
- Chassis, running gear
- Suspension and axle shafts
- Steering
- Brake system
- Body and interior
- Exterior (external elements)
- Interior (internal elements)
- Doors, locks and windows
- Electrical equipment
- Equipment and devices
- Electrical circuits
- General information
- User manual
- Maintenance
- Power unit
- 4-cylinder engine
- 6-cylinder engine
- Overhaul of engines
- Cooling and heating
- Fuel system
- Engine electrical equipment
- Control system
- Transmission
- Mechanical gearbox
- Automatic gearbox
- Clutch and drive shafts
- Chassis, running gear
- Brake system
- Car suspension
- Steering
- Body and interior
- Exterior (external elements)
- Interior (internal elements)
- Doors, locks and windows
- Electrical equipment
- Equipment and devices
- Headlights and lighting
- Electrical circuits
- General information
- User manual
- Maintenance
- Power unit
- Petrol engines
- Diesel engines
- Engine overhaul
- Cooling and lubrication system
- Fuel system (diesel)
- Fuel injection (petrol)
- Engine electrical equipment
- Transmission
- Clutch and cardan
- Automatic gearbox
- Chassis, running gear
- Front suspension
- Rear suspension
- Steering
- Brake system
- Body and interior
- Body elements
- Air conditioning and heater
- SRS security system
- Electrical equipment
- Equipment and devices
- Electrical circuits