



Share information:
Electrical equipment and devices of the car Toyota Vista 4 (V40)

General information — body electrical equipment
Precautionary measures 1. Before working on electrical equipment, disconnect the cable from the negative terminal of the battery. 2. If it is necessary to disconnect the battery for a check or repair, be sure to first...
Precautionary measures 1. Before working on electrical equipment, disconnect the cable from the negative terminal of the battery. 2. If it is necessary to disconnect the battery for a check or repair, be sure to first...
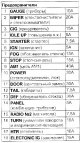
Location of connectors, relays and fuses
Mounting block #1 (on the toolbar) Location of connectors and fuses of the mounting block No.1 (purpose and rating of fuses see table) 1 - integrated relay, 2 - rear side light relay, 3 - rear window heater relay, 4, 5...
Mounting block #1 (on the toolbar) Location of connectors and fuses of the mounting block No.1 (purpose and rating of fuses see table) 1 - integrated relay, 2 - rear side light relay, 3 - rear window heater relay, 4, 5...

Ignition switch
Checking the ignition switch Check the ignition switch circuits with the key in different positions. If there is continuity (state of chains) does not correspond to those specified in the table, then replace the...
Checking the ignition switch Check the ignition switch circuits with the key in different positions. If there is continuity (state of chains) does not correspond to those specified in the table, then replace the...

Headlights — adjustment, replacement, removal
Precautions when replacing lamps 1. Do not hold the glass part of the lamp as this will reduce its service life. When replacing the lamp, do not hold the lamp base. 2. The new lamp must be of the same power as the old...
Precautions when replacing lamps 1. Do not hold the glass part of the lamp as this will reduce its service life. When replacing the lamp, do not hold the lamp base. 2. The new lamp must be of the same power as the old...

Fog lights, direction indicators (Vista) front side lights and cornering lights (Camry)
Replacing lamps Fog lights 1. Remove the fog light. 2. Remove the casing by turning it counterclockwise. 3. Remove the lamp by loosening the clamp. Fog light - 55W Front side light and cornering light (Camry) 1. Remove...
Replacing lamps Fog lights 1. Remove the fog light. 2. Remove the casing by turning it counterclockwise. 3. Remove the lamp by loosening the clamp. Fog light - 55W Front side light and cornering light (Camry) 1. Remove...

Repeater — lamp replacement
1. Remove the repeater assembly by loosening the fasteners. 2. Disconnect the connector. 3. Remove the lamp.
1. Remove the repeater assembly by loosening the fasteners. 2. Disconnect the connector. 3. Remove the lamp.

Rear light
Replacing lamps 1. Remove the rear combination light. 2. Remove the lamp together with the connector. 3. Remove the lamp. Brake light and tail light - 21/5 W Rear turn signal - 21W Reversing light (Vista) - 21W Removal...
Replacing lamps 1. Remove the rear combination light. 2. Remove the lamp together with the connector. 3. Remove the lamp. Brake light and tail light - 21/5 W Rear turn signal - 21W Reversing light (Vista) - 21W Removal...

Reversing light (Camry)
Replacing lamps 1. Remove the service hole cover. 2. Remove the connector with the lamp. Then remove the lamp. Reversing light - 18W Brake light and tail light - 21/5 W Removal and installation the reversing light 1....
Replacing lamps 1. Remove the service hole cover. 2. Remove the connector with the lamp. Then remove the lamp. Reversing light - 18W Brake light and tail light - 21/5 W Removal and installation the reversing light 1....

License plate light
Replacing lamps 1. Remove the upper trunk trim. 2. Disconnect the connector together with the lamp. Then remove the lamp. Removal and installation 1. Remove the upper trunk trim by removing the retaining clips. 2....
Replacing lamps 1. Remove the upper trunk trim. 2. Disconnect the connector together with the lamp. Then remove the lamp. Removal and installation 1. Remove the upper trunk trim by removing the retaining clips. 2....

Combination switch
Removal 1. Loosen the mounting screws and remove the upper and lower steering column covers. 2. Loosen the mounting screws and remove the combination switch assembly, disconnecting the connector. 3. Installation is...
Removal 1. Loosen the mounting screws and remove the upper and lower steering column covers. 2. Loosen the mounting screws and remove the combination switch assembly, disconnecting the connector. 3. Installation is...

Automatic headlight and side light switching system
1. Checking automatic switching on. a) Turn on the ignition. b) Set the lighting control switch to the "AUTO" position. c) Close the light access to the light sensor and make sure that the lamps light up in the order...
1. Checking automatic switching on. a) Turn on the ignition. b) Set the lighting control switch to the "AUTO" position. c) Close the light access to the light sensor and make sure that the lamps light up in the order...

Checking the lighting control system elements
Checking the headlight relay 1. Check for constant conductivity between terminals "1" and "2". 2. Check for continuity between terminals "3" and "4" when applying battery voltage between terminals "3" and "2". Checking...
Checking the headlight relay 1. Check for constant conductivity between terminals "1" and "2". 2. Check for continuity between terminals "3" and "4" when applying battery voltage between terminals "3" and "2". Checking...

Windscreen wiper control switch (combination switch)
Removal the Windshield Wiper Control Switch 1. Loosen the mounting screws and remove the upper and lower steering column covers. 2. Loosen the mounting screws and remove the windshield wiper control switch assembly....
Removal the Windshield Wiper Control Switch 1. Loosen the mounting screws and remove the upper and lower steering column covers. 2. Loosen the mounting screws and remove the windshield wiper control switch assembly....

Instrument cluster
Examination Instrument cluster. 1 - Reversing warning buzzer, 2 - instrument cluster board, 3 - body, 4 - instrument cluster or instrument cluster visor, 5 - glass, 6 - coolant temperature indicator, 7 - tachometer, 8 -...
Examination Instrument cluster. 1 - Reversing warning buzzer, 2 - instrument cluster board, 3 - body, 4 - instrument cluster or instrument cluster visor, 5 - glass, 6 - coolant temperature indicator, 7 - tachometer, 8 -...

Rear window defroster
Checking the heater relay 1. Check for continuous conductivity between terminals "1" and "2" of the relay. 2. Check for continuity between terminals "1" and "2" of the relay when applying battery voltage between...
Checking the heater relay 1. Check for continuous conductivity between terminals "1" and "2" of the relay. 2. Check for continuity between terminals "1" and "2" of the relay when applying battery voltage between...

Electric windows
Checking the main power relay 1. Check for constant conductivity between terminals "1" and "2" of the relay. 2. Check for conductivity between terminals "3" and "5" of the relay when applying battery voltage between...
Checking the main power relay 1. Check for constant conductivity between terminals "1" and "2" of the relay. 2. Check for conductivity between terminals "3" and "5" of the relay when applying battery voltage between...

Central lock
Checking the work 1. Check that when you close and open the door with the key, all doors open and close. 2. Check that at speeds above 20...26 km/h all locks are automatically activated. 3. Check that the locks do not...
Checking the work 1. Check that when you close and open the door with the key, all doors open and close. 2. Check that at speeds above 20...26 km/h all locks are automatically activated. 3. Check that the locks do not...

Remote control lock
Some modifications are equipped with a remote door lock control system. Doors are unlocked and locked by pressing a button on the key. The distance to the car should not exceed 1 m. Examination 1. Checking the operation...
Some modifications are equipped with a remote door lock control system. Doors are unlocked and locked by pressing a button on the key. The distance to the car should not exceed 1 m. Examination 1. Checking the operation...

Electric sunroof drive
Electric sunroof drive. 1 - electric sunroof drive, 2 - hatch control switch, 3 - right cable, 4 - left cable, 5 - hatch control relay, 6, 7 - limit switches. Checking the main power relay 1. Check for constant...
Electric sunroof drive. 1 - electric sunroof drive, 2 - hatch control switch, 3 - right cable, 4 - left cable, 5 - hatch control relay, 6, 7 - limit switches. Checking the main power relay 1. Check for constant...

Seat adjustment system
1 - control panel, 2 - electric motor for adjusting the front part of the seat, 3 - electric motor for adjusting the rear part of the seat, 4 - longitudinal adjustment electric motor. Checking the seat adjustment switch...
1 - control panel, 2 - electric motor for adjusting the front part of the seat, 3 - electric motor for adjusting the rear part of the seat, 4 - longitudinal adjustment electric motor. Checking the seat adjustment switch...

External mirror adjustment system
Disconnect the switch connector and check the continuity between the terminals according to the "Checking the Continuity of the Mirror Control Switch" table. Checking the electric drive 1. Checking the mirror adjustment...
Disconnect the switch connector and check the continuity between the terminals according to the "Checking the Continuity of the Mirror Control Switch" table. Checking the electric drive 1. Checking the mirror adjustment...

Key left in lock warning system
Checking the key presence sensor in the ignition switch Cm. " Central lock ". Checking the door limit switch Cm. " Central lock ". Checking the central control unit 1. Connect the battery to terminal "41" of the control...
Checking the key presence sensor in the ignition switch Cm. " Central lock ". Checking the door limit switch Cm. " Central lock ". Checking the central control unit 1. Connect the battery to terminal "41" of the control...

Door unlock warning system
Checking the door limit switch Cm. " Central lock ". Checking the central control unit Check the circuit according to the table "Checking the central control unit (for door unlock warning system)". Checking the mirror...
Checking the door limit switch Cm. " Central lock ". Checking the central control unit Check the circuit according to the table "Checking the central control unit (for door unlock warning system)". Checking the mirror...
This section is available on: russian, bulgarian, belarusian, ukrainian, serbian, croatian, romanian, polish, slovak, hungarian
Similar sections for other Toyota models
➥ Equipment and devices Toyota Dyna Y50/Y60 (1984-1995)
➥ Equipment and devices Toyota Highlander 1 (2000-2007, petrol)
➥ Equipment and devices Toyota 4Runner N120 (1989-1995)
➥ Equipment and devices Toyota Corona T190 (1992-1997)
➥ Equipment and devices Toyota Corolla E80 (1983-1990)
➥ Equipment and devices Toyota RAV 4 XA20 (2000-2005)
Link in different formats to this article
TEXTHTMLBB Code
- User manual
- Vehicle description
- Keys, locks and alarms
- Governing bodies
- Salon equipment
- Driving and operation
- Maintenance
- Power unit
- 4-cylinder engine
- Control system (I4)
- Engine overhaul (I4)
- 6-cylinder engine
- Control system (V6)
- Engine overhaul (V6)
- Transmission
- Clutch
- Mechanical gearbox
- Automatic gearbox
- Drive mechanism
- Chassis, running gear
- Wheels and tires
- Car suspension
- Steering
- Brake system
- Body and interior
- Exterior (external elements)
- Doors, locks and windows
- Air conditioning and heater
- Electrical equipment
- Equipment and devices
- Power devices
- Electrical circuits
- General information
- Controls and instruments
- Driving and operation
- Daily care
- Maintenance
- Power unit
- 4-cylinder engine
- 6-cylinder engine
- Engine overhaul
- Engine electrical equipment
- Cooling system
- Heating and ventilation
- Fuel system
- Exhaust system
- Transmission
- Mechanical gearbox
- Automatic gearbox
- Clutch
- Chassis, running gear
- Suspension and axle shafts
- Steering
- Brake system
- Body and interior
- Exterior (external elements)
- Interior (internal elements)
- Doors, locks and windows
- Electrical equipment
- Equipment and devices
- Electrical circuits
- General information
- User manual
- Maintenance
- Power unit
- 4-cylinder engine
- 6-cylinder engine
- Overhaul of engines
- Cooling and heating
- Fuel system
- Engine electrical equipment
- Control system
- Transmission
- Mechanical gearbox
- Automatic gearbox
- Clutch and drive shafts
- Chassis, running gear
- Brake system
- Car suspension
- Steering
- Body and interior
- Exterior (external elements)
- Interior (internal elements)
- Doors, locks and windows
- Electrical equipment
- Equipment and devices
- Headlights and lighting
- Electrical circuits
- General information
- User manual
- Maintenance
- Power unit
- Petrol engines
- Diesel engines
- Engine overhaul
- Cooling and lubrication system
- Fuel system (diesel)
- Fuel injection (petrol)
- Engine electrical equipment
- Transmission
- Clutch and cardan
- Automatic gearbox
- Chassis, running gear
- Front suspension
- Rear suspension
- Steering
- Brake system
- Body and interior
- Body elements
- Air conditioning and heater
- SRS security system
- Electrical equipment
- Equipment and devices
- Electrical circuits