



Attention:
- 1. For safety reasons, the safety device mechanism must be kept on at all times when performing the following operations. Moreover, it is prohibited to switch off the safety device when the pretensioner is removed from the vehicle.
- 2. Be very careful when handling the seat belt with pretensioner. Do not hit or throw the pretensioner, do not expose it to strong magnetic field, and do not expose it to water, oil or fuel. If dents, cracks or deformation are found, always replace the pretensioner with a new one.
- 3. Do not place foreign objects on the pretensioner.
- 4. Never attempt to disassemble or repair the seat belt with pretensioner. If a malfunction occurs, replace it.
- 5. Do not allow the pretensioner to heat up above 90°C.
- 6. After the pretensioner has been activated, replace it with a new one.
Description
A seat belt with a pretensioner consists of a tensioner and an acceleration sensor that reacts to the force of an impact. They are built into the belt retractor inertia reel.
The pretensioner mechanism is equipped with a safety mechanism to prevent the system from being triggered when the belt is removed and installed.
To avoid injury to yourself or others due to accidental activation of the seat belt with pretensioner, it is necessary to carefully study and follow all safety requirements during maintenance.
Removal
1. Remove the following parts:
a) Finishing the front door threshold.
b) Finishing the rear door sill.
c) Lower trim of the central pillar.
d) Center trim of the central pillar.
2. Remove the seat belt assembly.
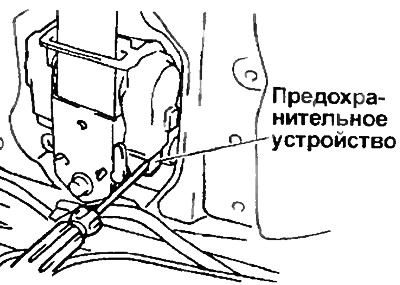
a) Turn on the safety device by pressing the switch with a screwdriver as shown in the figure.
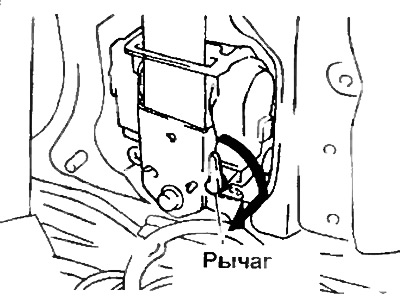
b) Turn the safety device lever as shown in the figure.
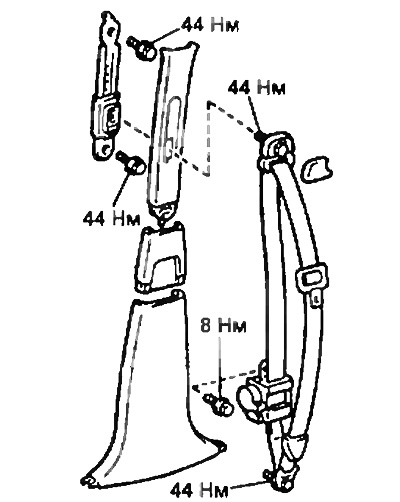
c) Loosen the bolts and remove the seat belt assembly.
Installation
1. Install the seat belt assembly.
a) Install the seat belt inertia reel by securing it with two bolts.
Tightening torque:
- Top bolt - 8 Nm
- Bottom bolt - 44 Nm
b) Secure the seat belt with two bolts.
- Tightening torque - 44 Nm
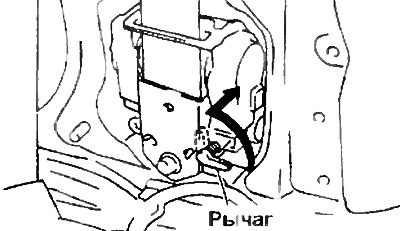
c) Turn the safety device lever as shown in the figure to release the safety device.
2. Install previously removed parts in the reverse order of removal.