



Share information:
Exterior (external elements) of the car Toyota Camry 3 (XV30)

General information about the car body
The body of Camry cars is a load-bearing four-door, consisting of a frame and hanging elements. The body frame includes the base, sidewalls, roof and frame parts, connected to each other by electric welding (point, seam...
The body of Camry cars is a load-bearing four-door, consisting of a frame and hanging elements. The body frame includes the base, sidewalls, roof and frame parts, connected to each other by electric welding (point, seam...

Impact force absorption
Fig. 8.1. Impact-absorbing structure of the Camry car body The impact-absorbing structure of the new Camry body (Fig. 8.1) helps to effectively absorb the impact energy in the event of a frontal (Fig. 8.2) or side...
Fig. 8.1. Impact-absorbing structure of the Camry car body The impact-absorbing structure of the new Camry body (Fig. 8.1) helps to effectively absorb the impact energy in the event of a frontal (Fig. 8.2) or side...

Reducing body vibration
Fig. 8.4. Anti-vibration features of the Camry car body frame (part 1) In order to reduce body vibration, the new design uses vibration damping and noise-proofing materials, and connects the instrument panel and floor...
Fig. 8.4. Anti-vibration features of the Camry car body frame (part 1) In order to reduce body vibration, the new design uses vibration damping and noise-proofing materials, and connects the instrument panel and floor...

Noise Reducing Add-ons
Fig. 8.6. Noise-absorbing and aerodynamic additions to the Camry car body structure In order to reduce the noise level, multilayer sound-absorbing panels (Fig. 8.6) are used, which are installed in the front part of the...
Fig. 8.6. Noise-absorbing and aerodynamic additions to the Camry car body structure In order to reduce the noise level, multilayer sound-absorbing panels (Fig. 8.6) are used, which are installed in the front part of the...

Anti-corrosion treatment of the body
Fig. 8.7. Anti-corrosion treatment of the Camry car body The corrosion resistance of the car body is increased by using anti-corrosion sheet steel, as well as anti-corrosion treatment, which includes the use of wax,...
Fig. 8.7. Anti-corrosion treatment of the Camry car body The corrosion resistance of the car body is increased by using anti-corrosion sheet steel, as well as anti-corrosion treatment, which includes the use of wax,...

Removal the front bumper
Fig. 8.25. Removable components of the front bumper: 1 – front and side elements of the upper bumper shock absorber; 2 – bumper reinforcement from the body side; 3 – lower bumper shock absorber; 4 – decorative trim for...
Fig. 8.25. Removable components of the front bumper: 1 – front and side elements of the upper bumper shock absorber; 2 – bumper reinforcement from the body side; 3 – lower bumper shock absorber; 4 – decorative trim for...

Removal the rear bumper
Fig. 8.37. Removable components of the rear bumper: 1 – Trunk trim mounting brackets; 2 – trunk lining; 3 – bumper reinforcement from the body side; 4 – bumper shock absorber; 5 – side bumper holders; 6 – rear bumper; 7...
Fig. 8.37. Removable components of the rear bumper: 1 – Trunk trim mounting brackets; 2 – trunk lining; 3 – bumper reinforcement from the body side; 4 – bumper shock absorber; 5 – side bumper holders; 6 – rear bumper; 7...

Removal and installation the rear spoiler
Removal Note: Install in the reverse order of removal. If some installation steps have special features, they are mentioned in the corresponding section with the general title "Installation". After disconnecting 15...
Removal Note: Install in the reverse order of removal. If some installation steps have special features, they are mentioned in the corresponding section with the general title "Installation". After disconnecting 15...

Removal and installation the upper molding
Removal Note: Install in the reverse order of removal. If some installation steps have special features, they are mentioned in the corresponding section with the general title "Installation". Fig. 8.44. Removing the top...
Removal Note: Install in the reverse order of removal. If some installation steps have special features, they are mentioned in the corresponding section with the general title "Installation". Fig. 8.44. Removing the top...

Removal and installation front and rear door moldings
Note: Install in the reverse order of removal. If some installation steps have special features, they are mentioned in the corresponding section with the general title "Installation". Wrap the end of the screwdriver...
Note: Install in the reverse order of removal. If some installation steps have special features, they are mentioned in the corresponding section with the general title "Installation". Wrap the end of the screwdriver...

Removal and installation the lower molding
Note: Install in the reverse order of removal. If some installation steps have special features, they are mentioned in the corresponding section with the general title "Installation". Unscrew the six mounting screws....
Note: Install in the reverse order of removal. If some installation steps have special features, they are mentioned in the corresponding section with the general title "Installation". Unscrew the six mounting screws....

Removal and installation the decorative trunk trim
Note: Install in the reverse order of removal. If some installation steps have special features, they are mentioned in the corresponding section with the general title "Installation". After disconnecting 15 fastening...
Note: Install in the reverse order of removal. If some installation steps have special features, they are mentioned in the corresponding section with the general title "Installation". After disconnecting 15 fastening...

Removal and installation of decorative emblems and fonts
Fig. 8.49. Decorative emblems and fonts Note: For correct installation and the corresponding dimensions and tolerances, see Figure 8.49 Note: Tolerances and dimensions are given in millimetres.
Fig. 8.49. Decorative emblems and fonts Note: For correct installation and the corresponding dimensions and tolerances, see Figure 8.49 Note: Tolerances and dimensions are given in millimetres.

Removal the side turn signal repeater
Fig. 8.61. Removing the side turn signal repeater Press lightly on the side turn signal repeater housing and slide it in the direction shown in Figure 8.61. Remove the side repeater and disconnect the power connector.
Fig. 8.61. Removing the side turn signal repeater Press lightly on the side turn signal repeater housing and slide it in the direction shown in Figure 8.61. Remove the side repeater and disconnect the power connector.

Removal the rear combination light
Fig. 8.62. Rear combination light glass mounting bolts Unscrew the three bolts securing the rear light diffuser (Fig. 8.62). Disconnect the power connectors from the light on the trunk side. Pull the headlight diffuser...
Fig. 8.62. Rear combination light glass mounting bolts Unscrew the three bolts securing the rear light diffuser (Fig. 8.62). Disconnect the power connectors from the light on the trunk side. Pull the headlight diffuser...
Removal the headlight
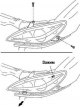
Unscrew the two headlight bracket mounting bolts and remove the brackets. Fig. 8.67. Removing the headlight Disconnect the mounting clamp, pull the headlight towards you and remove it (Fig. 8.67).
Unscrew the two headlight bracket mounting bolts and remove the brackets. Fig. 8.67. Removing the headlight Disconnect the mounting clamp, pull the headlight towards you and remove it (Fig. 8.67).

Removal the windshield wiper rod
Set the steering column switch to the automatic windshield wiper off position. Disconnect the windshield wiper arms. Remove the gutter. Fig. 8.68. Removing the protective apron Disconnect the six pins securing the...
Set the steering column switch to the automatic windshield wiper off position. Disconnect the windshield wiper arms. Remove the gutter. Fig. 8.68. Removing the protective apron Disconnect the six pins securing the...
Car body exterior repair
Removal minor scratches If the scratch is superficial and does not affect the metal of the body panel, its repair is extremely simple. To remove particles of peeling paint and wax coating, lightly rub the scratched area...
Removal minor scratches If the scratch is superficial and does not affect the metal of the body panel, its repair is extremely simple. To remove particles of peeling paint and wax coating, lightly rub the scratched area...
This section is available on: russian, bulgarian, belarusian, ukrainian, serbian, croatian, romanian, polish, slovak, hungarian
Similar sections for other Toyota models
➥ Exterior and interior Toyota Cruiser 60/80 (1980-1997, petrol)
➥ Exterior (external elements) Toyota RAV 4 XA10 (1994-2000)
➥ Exterior (external elements) Toyota Carina T190 (1992-1996)
➥ Exterior (external elements) Toyota 4Runner N120 (1989-1995)
➥ Exterior (external elements) Toyota Corolla E80 (1983-1990)
➥ Exterior (external elements) Toyota Highlander 1 (2000-2007, petrol)
Link in different formats to this article
TEXTHTMLBB Code
- User manual
- Vehicle description
- Keys, locks and alarms
- Governing bodies
- Salon equipment
- Driving and operation
- Maintenance
- Power unit
- 4-cylinder engine
- Control system (I4)
- Engine overhaul (I4)
- 6-cylinder engine
- Control system (V6)
- Engine overhaul (V6)
- Transmission
- Clutch
- Mechanical gearbox
- Automatic gearbox
- Drive mechanism
- Chassis, running gear
- Wheels and tires
- Car suspension
- Steering
- Brake system
- Body and interior
- Exterior (external elements)
- Doors, locks and windows
- Air conditioning and heater
- Electrical equipment
- Equipment and devices
- Power devices
- Electrical circuits
- General information
- Controls and instruments
- Driving and operation
- Daily care
- Maintenance
- Power unit
- 4-cylinder engine
- 6-cylinder engine
- Engine overhaul
- Engine electrical equipment
- Cooling system
- Heating and ventilation
- Fuel system
- Exhaust system
- Transmission
- Mechanical gearbox
- Automatic gearbox
- Clutch
- Chassis, running gear
- Suspension and axle shafts
- Steering
- Brake system
- Body and interior
- Exterior (external elements)
- Interior (internal elements)
- Doors, locks and windows
- Electrical equipment
- Equipment and devices
- Electrical circuits
- General information
- User manual
- Maintenance
- Power unit
- 4-cylinder engine
- 6-cylinder engine
- Overhaul of engines
- Cooling and heating
- Fuel system
- Engine electrical equipment
- Control system
- Transmission
- Mechanical gearbox
- Automatic gearbox
- Clutch and drive shafts
- Chassis, running gear
- Brake system
- Car suspension
- Steering
- Body and interior
- Exterior (external elements)
- Interior (internal elements)
- Doors, locks and windows
- Electrical equipment
- Equipment and devices
- Headlights and lighting
- Electrical circuits
- General information
- User manual
- Maintenance
- Power unit
- Petrol engines
- Diesel engines
- Engine overhaul
- Cooling and lubrication system
- Fuel system (diesel)
- Fuel injection (petrol)
- Engine electrical equipment
- Transmission
- Clutch and cardan
- Automatic gearbox
- Chassis, running gear
- Front suspension
- Rear suspension
- Steering
- Brake system
- Body and interior
- Body elements
- Air conditioning and heater
- SRS security system
- Electrical equipment
- Equipment and devices
- Electrical circuits