



Share information:
Electrical equipment and appliances Toyota Camry 2 (XV20)
The electrical equipment is designed to be powered from the positive pole of a 12 V battery, the negative pole is connected to ground. When working on any piece of electrical equipment, disconnect the battery from the ground. On some cars, this should be done after making sure that you know the code for decoding the radio.

Troubleshooting electrical equipment
The electrical circuits of a car include a consumer, switches, relays and wires connected according to the attached diagram. Before you start looking for a fault, you should study the diagram and determine the possible...
The electrical circuits of a car include a consumer, switches, relays and wires connected according to the attached diagram. Before you start looking for a fault, you should study the diagram and determine the possible...

Fuses — location and replacement
Fuse Box Location (Avalon) The fuse box on Avalon vehicles is mounted under the instrument panel to the left of the steering column. Relay and fuse box (Solara and Camry) On Solara and Camry, a single relay and fuse box...
Fuse Box Location (Avalon) The fuse box on Avalon vehicles is mounted under the instrument panel to the left of the steering column. Relay and fuse box (Solara and Camry) On Solara and Camry, a single relay and fuse box...

Fusible Links — Location and Replacement
Location of fusible links The cassette type fusible links are located at the rear of the main relay and fuse mounting block. Fusible links are designed to protect the circuit under high current overloads. The links are...
Location of fusible links The cassette type fusible links are located at the rear of the main relay and fuse mounting block. Fusible links are designed to protect the circuit under high current overloads. The links are...

Circuit breakers — description and testing
These devices protect the electric window drive circuits, door locks and headlights. On some vehicles, when the circuit is overloaded, the circuit breakers are triggered automatically and immediately close, the circuit...
These devices protect the electric window drive circuits, door locks and headlights. On some vehicles, when the circuit is overloaded, the circuit breakers are triggered automatically and immediately close, the circuit...

Relay — location and testing
Fuse Box Location (Avalon) The fuse box on Avalon vehicles is mounted under the instrument panel to the left of the steering column. Relay and fuse box (Solara and Camry) On Solara and Camry, a single relay and fuse box...
Fuse Box Location (Avalon) The fuse box on Avalon vehicles is mounted under the instrument panel to the left of the steering column. Relay and fuse box (Solara and Camry) On Solara and Camry, a single relay and fuse box...

Direction indicator/hazard warning flasher
Location of direction indicator/hazard warning flasher The direction indicator/hazard warning flasher (indicated by the arrow) is mounted on a plastic bracket on the engine compartment bulkhead behind the mounting...
Location of direction indicator/hazard warning flasher The direction indicator/hazard warning flasher (indicated by the arrow) is mounted on a plastic bracket on the engine compartment bulkhead behind the mounting...
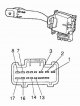
Steering column switch combination
Steering Column Multi-Contact Switch Terminal Designation and Test Diagram Switch position The terminals between which there should be a chain Headlight switch – OFF No Headlight Switch - Taillights 14 and 16 Headlight...
Steering Column Multi-Contact Switch Terminal Designation and Test Diagram Switch position The terminals between which there should be a chain Headlight switch – OFF No Headlight Switch - Taillights 14 and 16 Headlight...

Ignition switch and lock drum — checking and replacement
Ignition Switch Test Diagram Key position Tested outputs Presence of a chain LOCK – No chain ACC 2 – 3 There is a chain ON 2 – 3 – 4 – 6 – 7 There is a chain START 1 – 2 – 4 – 6 – 7 – 8 There is a chain Examination 1....
Ignition Switch Test Diagram Key position Tested outputs Presence of a chain LOCK – No chain ACC 2 – 3 There is a chain ON 2 – 3 – 4 – 6 – 7 There is a chain START 1 – 2 – 4 – 6 – 7 – 8 There is a chain Examination 1....

Instrument Panel Switches — Checking and Replacing
Hazard warning light switch Hazard warning light switch and its test diagram Switch position Tested outputs Presence of a chain OFF (switched off) 7 – 10 There is a chain ON (on) 5 – 6 – 9 – 7 – 8 There is a chain...
Hazard warning light switch Hazard warning light switch and its test diagram Switch position Tested outputs Presence of a chain OFF (switched off) 7 – 10 There is a chain ON (on) 5 – 6 – 9 – 7 – 8 There is a chain...

Fuel level and oil temperature indicators
Resistance diagram between the terminals of the fuel level and oil temperature indicators 1. Fuel level indicator 2. Temperature indicator Examination 1. Turn the ignition key to the ON position. 2. If the pointer...
Resistance diagram between the terminals of the fuel level and oil temperature indicators 1. Fuel level indicator 2. Temperature indicator Examination 1. Turn the ignition key to the ON position. 2. If the pointer...

Instrument cluster — removal and installation
1. Disconnect the battery from ground. 2. Remove the instrument panel trim. 3. Unscrew the screws (indicated by arrows) and move the shield towards the steering wheel. 4. Disconnect all connectors. 5. Remove the shield,...
1. Disconnect the battery from ground. 2. Remove the instrument panel trim. 3. Unscrew the screws (indicated by arrows) and move the shield towards the steering wheel. 4. Disconnect all connectors. 5. Remove the shield,...

Windscreen wiper motor — checking and replacing
Presence of voltage on the electric motor When voltage is applied to terminal 5 (ground – terminal 4), the electric motor should rotate at low speed, and when voltage is applied to terminal 3, at high speed. Examination...
Presence of voltage on the electric motor When voltage is applied to terminal 5 (ground – terminal 4), the electric motor should rotate at low speed, and when voltage is applied to terminal 3, at high speed. Examination...

Receiver, Speakers and Antenna — Removal and Installation
1. Disconnect the battery from ground. Receiver 2. Remove the central instrument panel trim (see subsection 11.23. ). 3. Loosen the screws (arrows) and pull the receiver towards you, disconnect the antenna plug (A) and...
1. Disconnect the battery from ground. Receiver 2. Remove the central instrument panel trim (see subsection 11.23. ). 3. Loosen the screws (arrows) and pull the receiver towards you, disconnect the antenna plug (A) and...

Rear Window Defogger — Checking and Repairing
The heater consists of thin wires sintered with the glass surface. Minor damage to wires can be repaired independently. Examination 1. Turn on the ignition and heater. If there is voltage on the heater, but there is no...
The heater consists of thin wires sintered with the glass surface. Minor damage to wires can be repaired independently. Examination 1. Turn on the ignition and heater. If there is voltage on the heater, but there is no...

Headlight bulbs — removal and installation
1. Disconnect the connector at the rear of the headlight. 2. Turn the lamp holder counterclockwise and remove it from the housing. 3. Pull and remove the bulb from the holder, insert a new bulb.
1. Disconnect the connector at the rear of the headlight. 2. Turn the lamp holder counterclockwise and remove it from the housing. 3. Pull and remove the bulb from the holder, insert a new bulb.
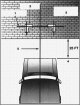
Headlight adjustment
Attention! The headlight adjustment should be checked every 12 months, when replacing a headlight or after repairing the front part of the body. The described procedure allows only approximate adjustment of the...
Attention! The headlight adjustment should be checked every 12 months, when replacing a headlight or after repairing the front part of the body. The described procedure allows only approximate adjustment of the...

Halogen headlight housing — removal and installation
1. Remove the lamp. 2. Remove the front turn signal (see subsection 1.3.5.2. ). 3. Unscrew the bolts (indicated by arrows arrows) and remove the headlight. 4. Installation is carried out in reverse order.
1. Remove the lamp. 2. Remove the front turn signal (see subsection 1.3.5.2. ). 3. Unscrew the bolts (indicated by arrows arrows) and remove the headlight. 4. Installation is carried out in reverse order.

Sound signal — check and replacement
Warning: If the signal fails, first check the fuses. Examination 1. Disconnect the connector from the signal. 2. Connect the battery directly to the horn. If there is no sound, replace the horn. 3. If there is sound,...
Warning: If the signal fails, first check the fuses. Examination 1. Disconnect the connector from the signal. 2. Connect the battery directly to the horn. If there is no sound, replace the horn. 3. If there is sound,...

Replacement of lamps in lighting fixtures
Side indicator/side light bulbs 1. Unscrew the screw (or remove the latch) upper mount (arrow), move the flashlight housing outward, turning it on the axis, turn the lamp holder counterclockwise and remove the lamp from...
Side indicator/side light bulbs 1. Unscrew the screw (or remove the latch) upper mount (arrow), move the flashlight housing outward, turning it on the axis, turn the lamp holder counterclockwise and remove the lamp from...
Electrically adjustable side mirrors
In most models, the mirror drive is carried out by 2 electric motors for vertical and horizontal displacement. 1. Turn on the ignition (do not start the engine) and lower the side windows. Using the selector built into...
In most models, the mirror drive is carried out by 2 electric motors for vertical and horizontal displacement. 1. Turn on the ignition (do not start the engine) and lower the side windows. Using the selector built into...
Cruise control system — check
The cruise control system maintains the vehicle's speed using an electric drive located in the engine compartment. The electric drive is connected to the throttle cable. The system includes a control unit, a brake light...
The cruise control system maintains the vehicle's speed using an electric drive located in the engine compartment. The electric drive is connected to the throttle cable. The system includes a control unit, a brake light...

Electric window lifter — check
Diagram for testing the main switch of the electric window lifter Switch Switch position The numbers of the terminals between which the circuit should be Front left Up 3 – 8 – 9 4 – 5 – 6 Front left Off 3 – 4 – 5 4 – 5...
Diagram for testing the main switch of the electric window lifter Switch Switch position The numbers of the terminals between which the circuit should be Front left Up 3 – 8 – 9 4 – 5 – 6 Front left Off 3 – 4 – 5 4 – 5...

Electric door lock drive — check
Driver's Door Lock Master Switch Test Diagram Switch position Numbers of the tested outputs Presence of a chain Lock 2 – 4 There is a chain Off – No chain Unlock 3 – 5 There is a chain Passenger Door Lock Master Switch...
Driver's Door Lock Master Switch Test Diagram Switch position Numbers of the tested outputs Presence of a chain Lock 2 – 4 There is a chain Off – No chain Unlock 3 – 5 There is a chain Passenger Door Lock Master Switch...
Airbags
All cars are equipped with 2 airbags, one of which (from the driver's side) mounted in the center of the steering wheel, and the other on the right side of the instrument panel. The system also includes a sensor and...
All cars are equipped with 2 airbags, one of which (from the driver's side) mounted in the center of the steering wheel, and the other on the right side of the instrument panel. The system also includes a sensor and...
This section is available on: russian, bulgarian, belarusian, ukrainian, serbian, croatian, romanian, polish, slovak, hungarian
Similar sections for other Toyota models
➥ Equipment and devices Toyota Dyna Y50/Y60 (1984-1995)
➥ Equipment and devices Toyota Highlander 1 (2000-2007, petrol)
➥ Equipment and devices Toyota 4Runner N120 (1989-1995)
➥ Equipment and devices Toyota Corona T190 (1992-1997)
➥ Equipment and devices Toyota Corolla E80 (1983-1990)
➥ Equipment and devices Toyota RAV 4 XA20 (2000-2005)
Link in different formats to this article
TEXTHTMLBB Code
- User manual
- Vehicle description
- Keys, locks and alarms
- Governing bodies
- Salon equipment
- Driving and operation
- Maintenance
- Power unit
- 4-cylinder engine
- Control system (I4)
- Engine overhaul (I4)
- 6-cylinder engine
- Control system (V6)
- Engine overhaul (V6)
- Transmission
- Clutch
- Mechanical gearbox
- Automatic gearbox
- Drive mechanism
- Chassis, running gear
- Wheels and tires
- Car suspension
- Steering
- Brake system
- Body and interior
- Exterior (external elements)
- Doors, locks and windows
- Air conditioning and heater
- Electrical equipment
- Equipment and devices
- Power devices
- Electrical circuits
- General information
- Controls and instruments
- Driving and operation
- Daily care
- Maintenance
- Power unit
- 4-cylinder engine
- 6-cylinder engine
- Engine overhaul
- Engine electrical equipment
- Cooling system
- Heating and ventilation
- Fuel system
- Exhaust system
- Transmission
- Mechanical gearbox
- Automatic gearbox
- Clutch
- Chassis, running gear
- Suspension and axle shafts
- Steering
- Brake system
- Body and interior
- Exterior (external elements)
- Interior (internal elements)
- Doors, locks and windows
- Electrical equipment
- Equipment and devices
- Electrical circuits
- General information
- User manual
- Maintenance
- Power unit
- 4-cylinder engine
- 6-cylinder engine
- Overhaul of engines
- Cooling and heating
- Fuel system
- Engine electrical equipment
- Control system
- Transmission
- Mechanical gearbox
- Automatic gearbox
- Clutch and drive shafts
- Chassis, running gear
- Brake system
- Car suspension
- Steering
- Body and interior
- Exterior (external elements)
- Interior (internal elements)
- Doors, locks and windows
- Electrical equipment
- Equipment and devices
- Headlights and lighting
- Electrical circuits
- General information
- User manual
- Maintenance
- Power unit
- Petrol engines
- Diesel engines
- Engine overhaul
- Cooling and lubrication system
- Fuel system (diesel)
- Fuel injection (petrol)
- Engine electrical equipment
- Transmission
- Clutch and cardan
- Automatic gearbox
- Chassis, running gear
- Front suspension
- Rear suspension
- Steering
- Brake system
- Body and interior
- Body elements
- Air conditioning and heater
- SRS security system
- Electrical equipment
- Equipment and devices
- Electrical circuits