



Share information:
Automatic car gearbox Toyota Camry 3 (XV30)

Automatic transmission — general information
The new Camry uses the following types of automatic transmissions in a block with the main gear: 1AZ, 2AZ-FE – U241E; 1MZ-FE – U140E. These automatic four-speed gearboxes are compact and high-performance and feature ECT...
The new Camry uses the following types of automatic transmissions in a block with the main gear: 1AZ, 2AZ-FE – U241E; 1MZ-FE – U140E. These automatic four-speed gearboxes are compact and high-performance and feature ECT...

Planetary gearbox
Fig. 3.73. Planetary gearbox: 1 – planetary gear carrier; 2 – epicycle of the step-up planetary gear row; 3 – intermediate shaft; 4 – epicycle of the rear planetary row; 5 – sun gears of the front and rear planetary...
Fig. 3.73. Planetary gearbox: 1 – planetary gear carrier; 2 – epicycle of the step-up planetary gear row; 3 – intermediate shaft; 4 – epicycle of the rear planetary row; 5 – sun gears of the front and rear planetary...

Elements of a planetary gearbox
The locking clutch of the step-up planetary gear row (Co) connects the planet carrier and the sun wheel of the step-up row. Boost Row Brake (Vo) -stops the solar wheel of the boost row. Clutch No.1 of the overdrive row...
The locking clutch of the step-up planetary gear row (Co) connects the planet carrier and the sun wheel of the step-up row. Boost Row Brake (Vo) -stops the solar wheel of the boost row. Clutch No.1 of the overdrive row...

Hydraulic control system
The control system includes: a pump, a valve block, electromagnetic valves, hydraulic accumulators, locking clutches and brakes. The main pressure in the system is created by the pump, it is regulated by the control...
The control system includes: a pump, a valve block, electromagnetic valves, hydraulic accumulators, locking clutches and brakes. The main pressure in the system is created by the pump, it is regulated by the control...
Safety precautions when working with automatic transmissions
1. The automatic transmission in the block with the main gear consists of high-precision components, which require careful inspection before reassembly, because even a small scratch can cause a leak of the working fluid...
1. The automatic transmission in the block with the main gear consists of high-precision components, which require careful inspection before reassembly, because even a small scratch can cause a leak of the working fluid...

Checking the automatic transmission fluid
Drive the vehicle until the engine and transmission warm up to normal operating temperature. Liquid temperature: 70–80°C. Stop the vehicle on a level surface and apply the parking brake. With the engine idling and the...
Drive the vehicle until the engine and transmission warm up to normal operating temperature. Liquid temperature: 70–80°C. Stop the vehicle on a level surface and apply the parking brake. With the engine idling and the...

Checking and adjusting the throttle valve control cable
Press the accelerator pedal all the way down and make sure the throttle valve is fully open. With the accelerator pedal fully released, loosen the adjusting nuts. Adjust the cable so that the distance between the cover...
Press the accelerator pedal all the way down and make sure the throttle valve is fully open. With the accelerator pedal fully released, loosen the adjusting nuts. Adjust the cable so that the distance between the cover...

Checking and inspecting the park/neutral position switch
Apply the parking brake and turn the ignition key to the ON position. Press the brake pedal and check that the engine can only be started when the gearshift lever is in position N or P. Make sure that the reversing...
Apply the parking brake and turn the ignition key to the ON position. Press the brake pedal and check that the engine can only be started when the gearshift lever is in position N or P. Make sure that the reversing...
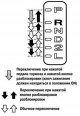
Checking the position of the gear shift lever
When moving the gear shift lever to each position, make sure the lever moves smoothly and the gear shift indicator works properly. The range in which the lever can be moved without pressing the button on the lever...
When moving the gear shift lever to each position, make sure the lever moves smoothly and the gear shift indicator works properly. The range in which the lever can be moved without pressing the button on the lever...

Adjusting the position of the gear shift lever
Fig. 3.79. Loosening the nut on the control shaft lever Loosen the nut on the control shaft lever (Fig. 3.79). Move the control shaft down until it stops. Move the control shaft lever 2 clicks to the N position. Set the...
Fig. 3.79. Loosening the nut on the control shaft lever Loosen the nut on the control shaft lever (Fig. 3.79). Move the control shaft down until it stops. Move the control shaft lever 2 clicks to the N position. Set the...

Inspection and testing of the torque converter clutch
Inspect the one-way clutch. Install special tool 09350-32014 into the inner ring of the one-way clutch. Fig. 3.81. Installation of a special device Install the special device so that it fits into the groove of the...
Inspect the one-way clutch. Install special tool 09350-32014 into the inner ring of the one-way clutch. Fig. 3.81. Installation of a special device Install the special device so that it fits into the groove of the...

Cleaning and checking the oil line and oil cooler
Fig. 3.84. Cleaning and checking the oil line and oil cooler When inspecting the torque converter clutch or replacing the working fluid, clean the oil line and oil cooler (Fig. 3.84). Note: Apply compressed air at 196...
Fig. 3.84. Cleaning and checking the oil line and oil cooler When inspecting the torque converter clutch or replacing the working fluid, clean the oil line and oil cooler (Fig. 3.84). Note: Apply compressed air at 196...

Inspection of the ring gear and drive disk
Fig. 3.86. Measuring the runout of the drive disk Install a dial indicator and measure the runout of the drive disk (Fig. 3.86). Inspect the ring gear for damage. Maximum runout: 0.20 mm. If the runout is not within...
Fig. 3.86. Measuring the runout of the drive disk Install a dial indicator and measure the runout of the drive disk (Fig. 3.86). Inspect the ring gear for damage. Maximum runout: 0.20 mm. If the runout is not within...

Removal the Park/Neutral Position Switch
Remove the battery. Remove engine cover No.1. Remove the air filter assembly. Remove air filter hose #1. Remove the exhaust system resonator assembly. Remove the left lower engine cover. Disconnect the transmission...
Remove the battery. Remove engine cover No.1. Remove the air filter assembly. Remove air filter hose #1. Remove the exhaust system resonator assembly. Remove the left lower engine cover. Disconnect the transmission...

Adjusting the Park/Neutral Position Switch
Install the park/neutral position switch on the manual valve shaft. Temporarily install 2 bolts. Place the new lock plate and tighten the nut. Tightening torque: 6.9 Nm. Temporarily install the control shaft lever. Fig....
Install the park/neutral position switch on the manual valve shaft. Temporarily install 2 bolts. Place the new lock plate and tighten the nut. Tightening torque: 6.9 Nm. Temporarily install the control shaft lever. Fig....

Installing the Park/Neutral Position Switch
Fig. 3.95. Installing the control shaft lever Install the control shaft lever, washer and nut (Fig. 3.95). Tightening torque: 12.7 Nm. Install the transmission control cable. Fig. 3.96. Installing the gearbox control...
Fig. 3.95. Installing the control shaft lever Install the control shaft lever, washer and nut (Fig. 3.95). Tightening torque: 12.7 Nm. Install the transmission control cable. Fig. 3.96. Installing the gearbox control...

Removal and installation gearbox speed sensors
Removal Remove the battery. Remove engine cover No.1. Remove the air filter assembly. Remove air filter hose #1. Fig. 3.97. Removing the NT gearbox speed sensor Disconnect the transmission speed sensor connector. Remove...
Removal Remove the battery. Remove engine cover No.1. Remove the air filter assembly. Remove air filter hose #1. Fig. 3.97. Removing the NT gearbox speed sensor Disconnect the transmission speed sensor connector. Remove...

Replacing the valve block of an automatic transmission
Removal Remove the right lower engine cover. Remove the drain plug with gasket and drain the working fluid from the gearbox. Install a new gasket and drain plug. Tightening torque: 49 Nm. Fig. 3.99. Automatic...
Removal Remove the right lower engine cover. Remove the drain plug with gasket and drain the working fluid from the gearbox. Install a new gasket and drain plug. Tightening torque: 49 Nm. Fig. 3.99. Automatic...

Removal the oil pump stator shaft
Inspect the oil pump. Fig. 3.109. Checking the oil pump gear Turn the oil pump drive gear with 2 screwdrivers and make sure it rotates smoothly (fig. 3.109). Caution: Be careful not to damage the seal projection. Fig....
Inspect the oil pump. Fig. 3.109. Checking the oil pump gear Turn the oil pump drive gear with 2 screwdrivers and make sure it rotates smoothly (fig. 3.109). Caution: Be careful not to damage the seal projection. Fig....

Checking oil pump clearances
Fig. 3.112. Measuring the gap between the driven gear and the stator shaft housing Press the driven gear against the housing wall. Using a feeler gauge, measure the gap between the driven gear and the stator shaft...
Fig. 3.112. Measuring the gap between the driven gear and the stator shaft housing Press the driven gear against the housing wall. Using a feeler gauge, measure the gap between the driven gear and the stator shaft...
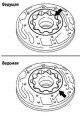
Removal the leading and driven gears of the oil pump
Fig. 3.115. Removing the driving and driven gears of the oil pump Remove the front oil pump drive gear, then remove the oil pump driven gear (fig. 3.115).
Fig. 3.115. Removing the driving and driven gears of the oil pump Remove the front oil pump drive gear, then remove the oil pump driven gear (fig. 3.115).

Removal the front sealing ring and front oil seal of the oil pump housing
Fig. 3.116. Removing the oil pump housing sealing ring Using a screwdriver, remove the oil pump housing sealing ring (fig. 3.116). Note: Wrap the working part of the screwdriver with electrical tape before use. Secure...
Fig. 3.116. Removing the oil pump housing sealing ring Using a screwdriver, remove the oil pump housing sealing ring (fig. 3.116). Note: Wrap the working part of the screwdriver with electrical tape before use. Secure...

Checking the oil pump
Fig. 3.118. Measuring the inner diameter of the oil pump housing bushing Using a dial indicator, measure the inside diameter of the oil pump housing bushing (fig. 3.118). Standard inner diameter: 38.113-38.138 mm....
Fig. 3.118. Measuring the inner diameter of the oil pump housing bushing Using a dial indicator, measure the inside diameter of the oil pump housing bushing (fig. 3.118). Standard inner diameter: 38.113-38.138 mm....

Assembling the oil pump
Fig. 3.120. Pressing in a new pump seal Using special tool 09350-32014 (09351-32140) and a hammer, install a new pump seal (fig. 3.120). Note: Before installing, lubricate the lip of the oil seal with Vaseline. The seal...
Fig. 3.120. Pressing in a new pump seal Using special tool 09350-32014 (09351-32140) and a hammer, install a new pump seal (fig. 3.120). Note: Before installing, lubricate the lip of the oil seal with Vaseline. The seal...

Replacing the front differential seal of the automatic transmission
Remove the front wheels. Remove the lower engine covers. Remove the automatic transmission drain plug and drain the working fluid. After replacing the drain plug gasket, install it in place, tightening it to a...
Remove the front wheels. Remove the lower engine covers. Remove the automatic transmission drain plug and drain the working fluid. After replacing the drain plug gasket, install it in place, tightening it to a...
This section is available on: russian, bulgarian, belarusian, ukrainian, serbian, croatian, romanian, polish, slovak, hungarian
Similar sections for other Toyota models
➥ Automatic gearbox Toyota Cruiser 100 (1998-2007)
➥ Automatic gearbox Toyota RAV 4 XA10 (1994-2000)
➥ Automatic gearbox Toyota Duet (1998-2004)
➥ Automatic gearbox Toyota Corona T190 (1992-1997)
➥ Automatic gearbox Toyota Carina T190 (1992-1996)
➥ Automatic gearbox Toyota Corolla E80 (1983-1990)
Link in different formats to this article
TEXTHTMLBB Code
- User manual
- Vehicle description
- Keys, locks and alarms
- Governing bodies
- Salon equipment
- Driving and operation
- Maintenance
- Power unit
- 4-cylinder engine
- Control system (I4)
- Engine overhaul (I4)
- 6-cylinder engine
- Control system (V6)
- Engine overhaul (V6)
- Transmission
- Clutch
- Mechanical gearbox
- Automatic gearbox
- Drive mechanism
- Chassis, running gear
- Wheels and tires
- Car suspension
- Steering
- Brake system
- Body and interior
- Exterior (external elements)
- Doors, locks and windows
- Air conditioning and heater
- Electrical equipment
- Equipment and devices
- Power devices
- Electrical circuits
- General information
- Controls and instruments
- Driving and operation
- Daily care
- Maintenance
- Power unit
- 4-cylinder engine
- 6-cylinder engine
- Engine overhaul
- Engine electrical equipment
- Cooling system
- Heating and ventilation
- Fuel system
- Exhaust system
- Transmission
- Mechanical gearbox
- Automatic gearbox
- Clutch
- Chassis, running gear
- Suspension and axle shafts
- Steering
- Brake system
- Body and interior
- Exterior (external elements)
- Interior (internal elements)
- Doors, locks and windows
- Electrical equipment
- Equipment and devices
- Electrical circuits
- General information
- User manual
- Maintenance
- Power unit
- 4-cylinder engine
- 6-cylinder engine
- Overhaul of engines
- Cooling and heating
- Fuel system
- Engine electrical equipment
- Control system
- Transmission
- Mechanical gearbox
- Automatic gearbox
- Clutch and drive shafts
- Chassis, running gear
- Brake system
- Car suspension
- Steering
- Body and interior
- Exterior (external elements)
- Interior (internal elements)
- Doors, locks and windows
- Electrical equipment
- Equipment and devices
- Headlights and lighting
- Electrical circuits
- General information
- User manual
- Maintenance
- Power unit
- Petrol engines
- Diesel engines
- Engine overhaul
- Cooling and lubrication system
- Fuel system (diesel)
- Fuel injection (petrol)
- Engine electrical equipment
- Transmission
- Clutch and cardan
- Automatic gearbox
- Chassis, running gear
- Front suspension
- Rear suspension
- Steering
- Brake system
- Body and interior
- Body elements
- Air conditioning and heater
- SRS security system
- Electrical equipment
- Equipment and devices
- Electrical circuits