



Share information:
6-cylinder car engine Toyota Camry 2 (XV20)

Technical characteristics of 6-cylinder engines
View of the engine compartment of models with a 6-cylinder engine 1. Brake fluid reservoir; 2. Air filter housing; 3. Battery; 4. Automatic transmission fluid level dipstick; 5. Engine oil filler cap; 6. Oil filter; 7....
View of the engine compartment of models with a 6-cylinder engine 1. Brake fluid reservoir; 2. Air filter housing; 3. Battery; 4. Automatic transmission fluid level dipstick; 5. Engine oil filler cap; 6. Oil filter; 7....

Checking the compression in the cylinders
Numbering and sequence of cylinders If the engine runs poorly or intermittently, check the ignition system and fuel system. If the reasons for poor engine performance cannot be found, perform a compression test....
Numbering and sequence of cylinders If the engine runs poorly or intermittently, check the ignition system and fuel system. If the reasons for poor engine performance cannot be found, perform a compression test....

Top dead center (TDC) of piston N1
The top dead center is taken to be the highest point reached by piston N1 during the compression stroke. Piston N1 is located in the front part of the right cylinder bank on the timing belt side. Installation 1....
The top dead center is taken to be the highest point reached by piston N1 during the compression stroke. Piston N1 is located in the front part of the right cylinder bank on the timing belt side. Installation 1....

Cylinder Head Covers — Removal and Installation
Removal 1. Disconnect the negative battery cable. 2. Remove the engine cover. 3. Disconnect the ignition coil wires, remove the coils and spark plugs. 4. Remove the two nuts and disconnect the wire harnesses from the...
Removal 1. Disconnect the negative battery cable. 2. Remove the engine cover. 3. Disconnect the ignition coil wires, remove the coils and spark plugs. 4. Remove the two nuts and disconnect the wire harnesses from the...

Intake manifold — removal and installation
Removal 1. Relieve the pressure in the fuel system and disconnect the negative battery cable. Upper chamber of the collector 2. Drain the coolant. 3. Remove the two bolts (arrows) and remove the engine cover. 4. Remove...
Removal 1. Relieve the pressure in the fuel system and disconnect the negative battery cable. Upper chamber of the collector 2. Drain the coolant. 3. Remove the two bolts (arrows) and remove the engine cover. 4. Remove...

Exhaust manifolds — removal and installation
Removal 1. Disconnect the negative battery cable. 2. Lubricate the manifold bolts with penetrating oil. 3. Remove the oxygen sensors from both manifolds. 4. Disconnect the EGR pipe from the rear manifold and cylinder...
Removal 1. Disconnect the negative battery cable. 2. Lubricate the manifold bolts with penetrating oil. 3. Remove the oxygen sensors from both manifolds. 4. Disconnect the EGR pipe from the rear manifold and cylinder...
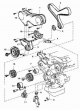
Timing belt and sprockets
Timing belt 1. Gasket; 2. Timing belt; 3. Belt guide disc; 4. Bracket; 5. Gasket; 6. Protective wire cover; 7. Intermediate pulley N1; 8. Cover; 9. Plate; 10. Belt tensioner; 11. Crankshaft sprocket; 12. Washer; 13....
Timing belt 1. Gasket; 2. Timing belt; 3. Belt guide disc; 4. Bracket; 5. Gasket; 6. Protective wire cover; 7. Intermediate pulley N1; 8. Cover; 9. Plate; 10. Belt tensioner; 11. Crankshaft sprocket; 12. Washer; 13....

Front Crankshaft Oil Seal — Replacement
1. Remove the timing belt and crankshaft sprocket. 2. Cut off the edge of the seal, wrap the tip of the screwdriver with electrical tape and remove the seal. 3. Clean the oil seal seat. Lubricate the new oil seal with...
1. Remove the timing belt and crankshaft sprocket. 2. Cut off the edge of the seal, wrap the tip of the screwdriver with electrical tape and remove the seal. 3. Clean the oil seal seat. Lubricate the new oil seal with...

Camshaft Seals — Replacement
1. Remove the timing belt and camshaft sprockets. Remove the upper section of the rear belt cover. 2. Remove the seals using a small screwdriver. 3. Lubricate the new seals with engine oil or multi-purpose grease. 4....
1. Remove the timing belt and camshaft sprockets. Remove the upper section of the rear belt cover. 2. Remove the seals using a small screwdriver. 3. Lubricate the new seals with engine oil or multi-purpose grease. 4....

Camshafts and valve lifters
Intake Valve Shaft Bearing Cap Bolt Tightening Sequence (right head) Intake Valve Shaft Bearing Cap Bolt Tightening Sequence (left head) Tightening Sequence of Exhaust Valve Shaft Bearing Cap Bolts (right head)...
Intake Valve Shaft Bearing Cap Bolt Tightening Sequence (right head) Intake Valve Shaft Bearing Cap Bolt Tightening Sequence (left head) Tightening Sequence of Exhaust Valve Shaft Bearing Cap Bolts (right head)...

Cylinder heads — removal and installation
Removal 1. Disconnect the negative battery cable. 2. Drain the coolant. 3. Remove the upper and lower sections of the intake manifold. 4. Remove the exhaust manifolds. 5. Remove the timing belt, camshaft sprockets and...
Removal 1. Disconnect the negative battery cable. 2. Drain the coolant. 3. Remove the upper and lower sections of the intake manifold. 4. Remove the exhaust manifolds. 5. Remove the timing belt, camshaft sprockets and...

Oil pan — removal and installation
Removal 1. Remove the hood. 2. Disconnect the negative battery cable. 3. Raise and support the front of the vehicle. 4. Remove the engine guards. 5. Drain the engine oil and remove the oil filter. 6. Disconnect the...
Removal 1. Remove the hood. 2. Disconnect the negative battery cable. 3. Raise and support the front of the vehicle. 4. Remove the engine guards. 5. Drain the engine oil and remove the oil filter. 6. Disconnect the...

Oil pump — removal, inspection and installation
Removal 1. Remove the oil pan. 2. Remove the timing belt and lower idler pulley. 3. Remove the crankshaft sprocket. 4. Unscrew the bolts (arrows) and remove the oil intake pipe. 5. Remove the generator. 6. Remove the...
Removal 1. Remove the oil pan. 2. Remove the timing belt and lower idler pulley. 3. Remove the crankshaft sprocket. 4. Unscrew the bolts (arrows) and remove the oil intake pipe. 5. Remove the generator. 6. Remove the...

Rear crankshaft oil seal
Cm. subsection 3.1.15. Apply a layer of sealant to the area of the oil seal housing indicated by the dark stripe (layer thickness 2–3 mm).
Cm. subsection 3.1.15. Apply a layer of sealant to the area of the oil seal housing indicated by the dark stripe (layer thickness 2–3 mm).

Engine Mounts — Checking and Replacing
Cm. subsection 3.1.16. Additional front support To replace the rubber shock absorber, remove the through bolt (A) and loosen the nut (B). Rear support Remove the through bolt, lift the engine and unscrew the nuts...
Cm. subsection 3.1.16. Additional front support To replace the rubber shock absorber, remove the through bolt (A) and loosen the nut (B). Rear support Remove the through bolt, lift the engine and unscrew the nuts...
This section is available on: russian, bulgarian, belarusian, ukrainian, serbian, croatian, romanian, polish, slovak, hungarian
Similar sections for other Toyota models
➥ Petrol engines 1.3 l Toyota Duet (1998-2004)
➥ 6-cylinder engines Toyota 4Runner N120 (1989-1995)
➥ Engines 3S-FE/GE and 4S-FE Toyota Corona T190 (1992-1997)
➥ Engine repair Toyota Corolla E80 (1983-1990)
➥ Petrol engines 2F and 3F-E Toyota Cruiser 60/80 (1980-1997, petrol)
➥ 4-cylinder engine Toyota Highlander 1 (2000-2007, petrol)
Link in different formats to this article
TEXTHTMLBB Code
- User manual
- Vehicle description
- Keys, locks and alarms
- Governing bodies
- Salon equipment
- Driving and operation
- Maintenance
- Power unit
- 4-cylinder engine
- Control system (I4)
- Engine overhaul (I4)
- 6-cylinder engine
- Control system (V6)
- Engine overhaul (V6)
- Transmission
- Clutch
- Mechanical gearbox
- Automatic gearbox
- Drive mechanism
- Chassis, running gear
- Wheels and tires
- Car suspension
- Steering
- Brake system
- Body and interior
- Exterior (external elements)
- Doors, locks and windows
- Air conditioning and heater
- Electrical equipment
- Equipment and devices
- Power devices
- Electrical circuits
- General information
- Controls and instruments
- Driving and operation
- Daily care
- Maintenance
- Power unit
- 4-cylinder engine
- 6-cylinder engine
- Engine overhaul
- Engine electrical equipment
- Cooling system
- Heating and ventilation
- Fuel system
- Exhaust system
- Transmission
- Mechanical gearbox
- Automatic gearbox
- Clutch
- Chassis, running gear
- Suspension and axle shafts
- Steering
- Brake system
- Body and interior
- Exterior (external elements)
- Interior (internal elements)
- Doors, locks and windows
- Electrical equipment
- Equipment and devices
- Electrical circuits
- General information
- User manual
- Maintenance
- Power unit
- 4-cylinder engine
- 6-cylinder engine
- Overhaul of engines
- Cooling and heating
- Fuel system
- Engine electrical equipment
- Control system
- Transmission
- Mechanical gearbox
- Automatic gearbox
- Clutch and drive shafts
- Chassis, running gear
- Brake system
- Car suspension
- Steering
- Body and interior
- Exterior (external elements)
- Interior (internal elements)
- Doors, locks and windows
- Electrical equipment
- Equipment and devices
- Headlights and lighting
- Electrical circuits
- General information
- User manual
- Maintenance
- Power unit
- Petrol engines
- Diesel engines
- Engine overhaul
- Cooling and lubrication system
- Fuel system (diesel)
- Fuel injection (petrol)
- Engine electrical equipment
- Transmission
- Clutch and cardan
- Automatic gearbox
- Chassis, running gear
- Front suspension
- Rear suspension
- Steering
- Brake system
- Body and interior
- Body elements
- Air conditioning and heater
- SRS security system
- Electrical equipment
- Equipment and devices
- Electrical circuits