
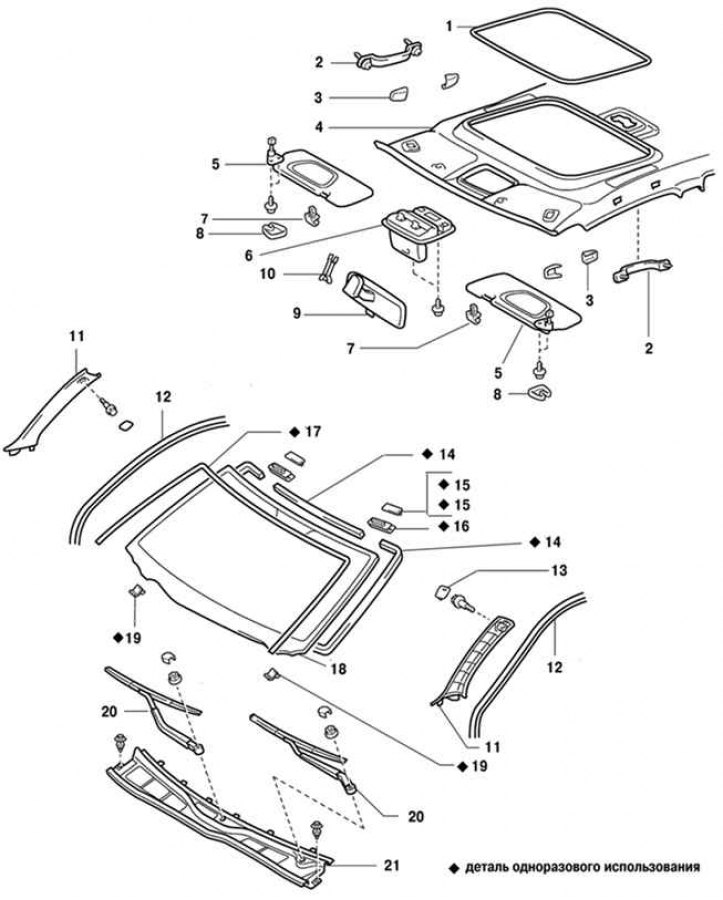
Pic. 8.50. Vehicle front components: 1 - laying the hatch on the roof; 2 - handrails; 3 - overlay handrails; 4 - roof frame; 5 - sun visors; 6 - module for interior lighting and sunroof position controller; 7 - holders
The components of the front of the car are shown in fig. 8.50
Removing
Remove the following components:
- sun visors and holders;
- interior lamp and sunroof control module;
- sun visors and holders;
- upper trim of the front pillars;
- hood;
- windscreen wipers;
- front protective apron;
- interior rearview mirror.
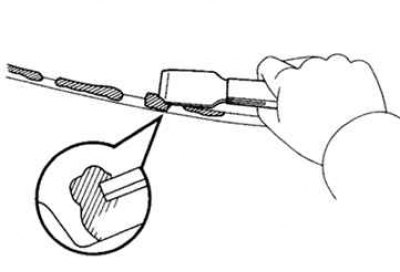
Using a thin-bladed knife, remove the windshield seal.
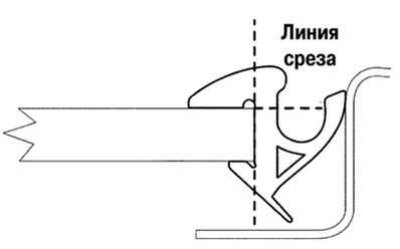
Pic. 8.51. Windshield Seal Cut Lines
Note. In order not to damage the glass, proceed as follows - cut the seal with a knife along the lines shown in Figure 8.51. Remove the rest of the seal by hand.
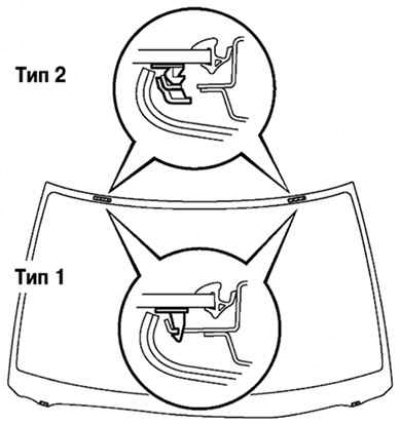
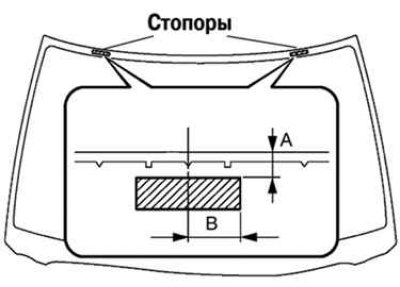
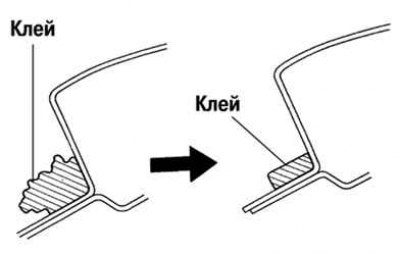
Pic. 8.52. Mounting types of molding stoppers
Note. There are two types of windshield molding stoppers. The type of fastening of each type is different. Pay attention to this when removing and installing the windshield (pic. 8.52).
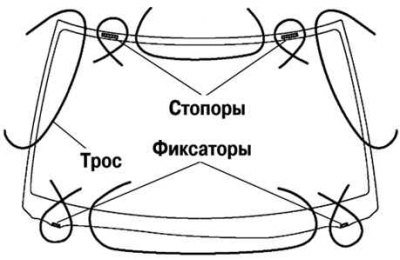
Pic. 8.53. Windshield removal cable installation areas
Pull the string from the salon and fasten its ends to wooden blocks (pic. 8.53).
Apply adhesive tape to the outer surface of the windshield to avoid scratching the surface.
When removing the glass, take care not to damage the painted surfaces and finishes.
Cut off the adhesive layer.
Remove glass.
Pic. 8.54. Removing adhesive residue from the glass edge
Using a scraper, clean the glass edge from adhesive residue (pic. 8.54).
Wipe the places where the adhesive residues have been cleaned off with white spirit.
Note. Do not touch degreased surfaces.
Lubricate the contact surfaces of the lower retainer with a primer.
Attention! The drying time of the primer is at least 3 minutes. Do not apply primer over adhesive. Exposed primer must not be reused.
Installation
Pic. 8.55. Laying the seal and installing the stoppers
Position the seal on the adhesive tape and install the top stops as shown in Figure 8.55.
- A - 7 mm.
- B - 40 mm.
Pic. 8.56. Installing the lower glass clamps
Install the lower glass clamps, as shown in Figure 8.56.
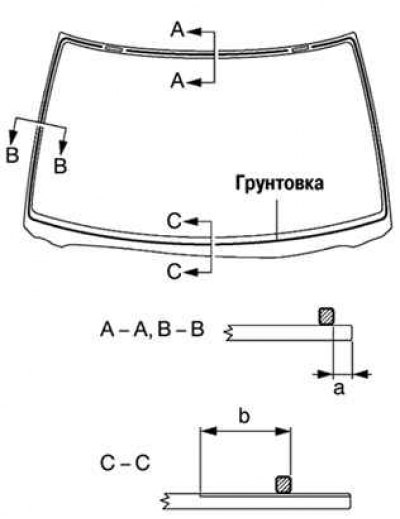
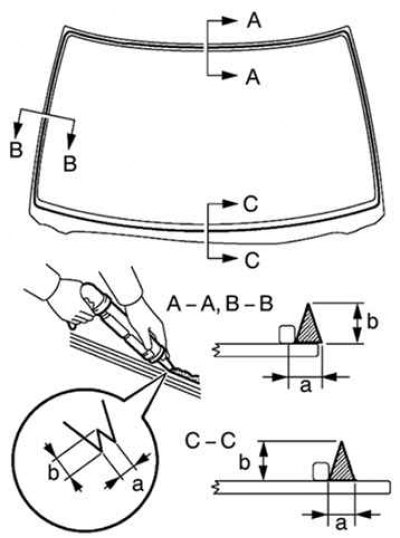
Pic. 8.57. Scheme of laying soil on the glass contact surface
Using a brush or spatula, coat the fin and glass contact surface with primer «G», as shown in figure 8.57.
- a - 7 mm.
- b - 35 mm.
Pic. 8.58. Alignment of adhesive remaining on the body
Use a knife to even out the layer of glue remaining on the body, be careful not to damage the paintwork of the body (pic. 8.58).
Clean the cut surface with solvent.
Note. When cleaning, try not to damage the painted surface of the body.
Temporarily replace the glass.
Make sure that the glass contact surface is completely flat and does not touch the bottom brackets.
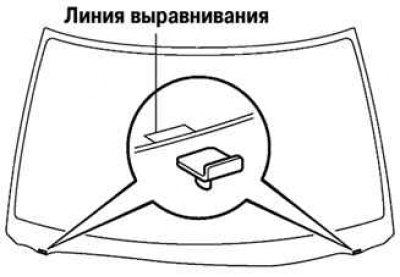
Apply alignment marks to the glass and body.
Remove glass.
Pic. 8.59. Scheme of laying soil on the contact surface of the body
Using a syringe, apply glue to all contact surfaces of the glass along the ledge, as shown in Figure 8.59.
The thickness of the sealant layer in the sections in the figure:
- a - 8 mm;
- b - 12 mm.
Install glass.
Position the glass according to the alignment marks and carefully push it along the rim.
Apply adhesive to the edge of the glass with a spatula.
Remove excess adhesive with a spatula.
Press firmly on the glass to keep it on the adhesive.
Some time after the material has hardened, check the tightness of the connection.
Repair leaks with automotive glass sealant.
Apply glue and install the top and side windshield moldings.
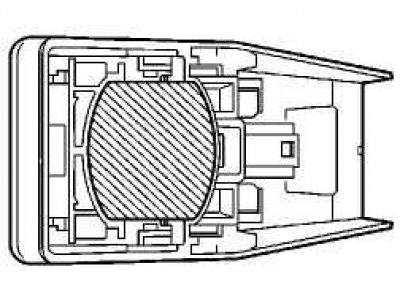
Pic. 8.60. Installation location of the adhesive tape on the rain sensor
Remove the old adhesive tape from the rain sensor and install a new one in the place indicated by hatching in Figure 8.60.
Install the rain sensor.
Install the hood guard and drain chute.
Install other components in the reverse order of removal.