
Checking the electromagnetic clutch on the car
1. Visual check.
A) Check that there are no traces of oil on the pressure plate and rotor.
b) Check for noise and grease leakage from the clutch bearings.
2. Check the absence of extraneous noise from the clutch bearings.
A) Start the engine.
b) Check that there is no abnormal noise from the clutch bearings when the air conditioner is turned off.
If there is abnormal noise, replace the magnetic clutch.
3. Checking the electromagnetic clutch.
A) Disconnect the connector from the electromagnetic clutch.
b) Connect the positive battery terminal to the clutch connector terminal (see picture), negative terminal to "earth".
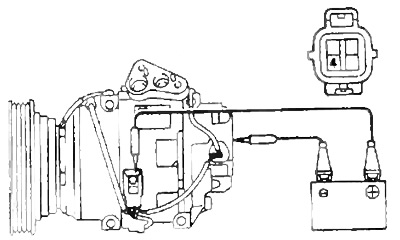
V) Check clutch operation. Replace the magnetic clutch if it does not work.
Checking the compressor on the car
Measure resistance between leads "1" And "2".
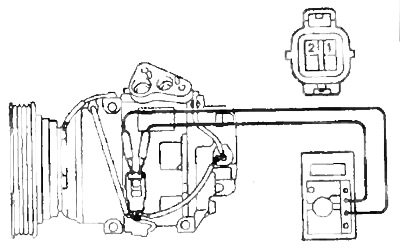
Rated resistance - 185 ohms at 20°C
Checking the heater resistor
Measure the resistance between the leads.
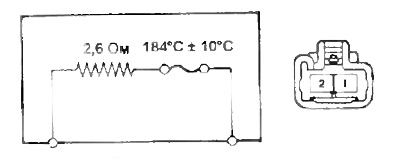
- Resistance - 2.6 Ohm
Check heater fan transistor
1. Measure the resistance between the leads.
Rated resistance:
- between pins "2" And "1" - 2.2 kOhm
- between pins "3" And "4" - 1.92 kOhm
2. Checking work.
A) Connect "+" batteries to output "2", through a control lamp 12V, 3.4W to the output "3".
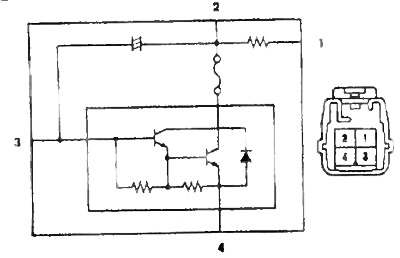
b) After that connect "+" To "4", make sure the lamp is on.
Note: The test must be carried out in a short time.
Checking the temperature sensor in the cabin
Check if the temperature dependence of the sensor resistance is correct (see picture).
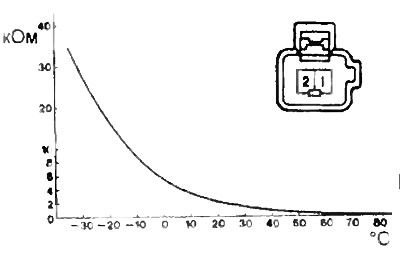
- Resistance at 25°C - 1.6-1.8 kOhm
Checking the ambient air temperature sensor
Checking the temperature sensor in the cabin is similar.
Checking the temperature sensor downstream of the evaporator
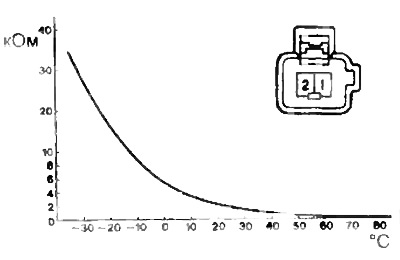
Resistance:
- at 0°C - 4.6-5.1 kOhm
- at 15°C - 2.1 -2.6 kOhm
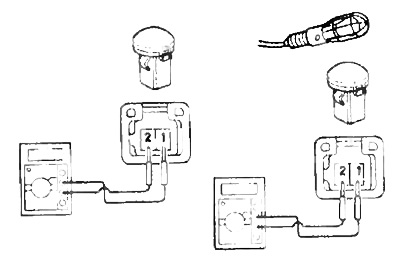
Light sensor test
1. Shield the sensor from light and check that there is no continuity between the leads.
2. Point a bright light source at the sensor, check for conductivity.
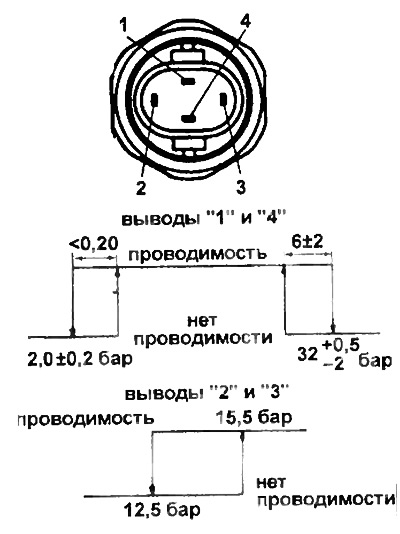
Checking pressure switches
Check that the pressure switches are working.
Checking switches for coolant temperature
Put the bottom of the sensor into the water, check the conductivity between the case and the lead when the temperature changes.
Sensor #1
- A) Conductivity is at a temperature of 90°C and above.
- b) There is no conductivity at temperatures of 83°C and below.
Sensor #2
- A) Conductivity is at a temperature of 100°C and above.
- b) There is no conductivity at temperatures of 95°C and below.