
Company Honda Company Ford Company Skoda Company Kia Company Mazda Company Mercedes Company Renault
English Русский
Български
Беларускі
Український
Српски
Hrvatski
Română
Polski
Slovenský
Magyar
Bookmark Articles Sitemap Contacts
ToyotaMan.ru


Camry Corolla Corona Carina Land Cruiser Highlander 4Runner RAV4 Others
Camry XV30 (2001-2006) Camry XV20 (1996-2001) Camry XV10 (1991-1996) Camry Vista V40 (1994-1998)

Rear window defroster [Toyota Camry Vista-V40]

  • Main
  • Camry
  • Vista-V40 (1994-1998)
  • Electrical equipment
  • Equipment and devices
  • Rear window defroster
0
Contents: Checking the heater relay ↓ Checking and repairing rear window…↓

Checking the heater relay


1. Check for continuous conductivity between terminals "1" and "2" of the relay.
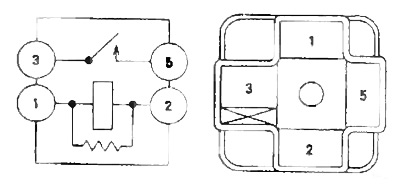


2. Check for continuity between terminals "1" and "2" of the relay when applying battery voltage between terminals "3" and "5". If the continuity does not match the description, replace the relay.

Checking and repairing rear window defroster wires


Note.
  • When cleaning the glass, use a soft, dry cloth, wipe the glass parallel to the heater wires. Try not to damage the wires.
  • It is prohibited to use detergents and compounds containing abrasive particles.
  • When measuring voltage, wrap the negative terminal of the tester with foil and press the edge of the foil to the wire with your finger.
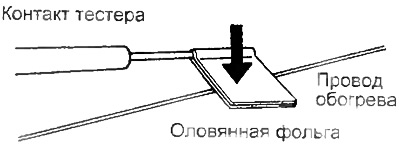


1. Checking for broken wires.


a) Turn on the ignition and the rear window heater.

b) Measure the voltage at the center of each thermocouple wire as shown in the figure.
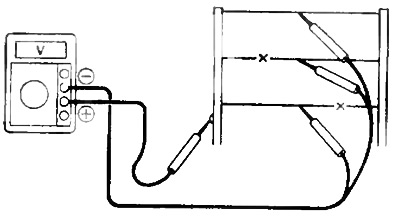


c) If the voltage is about 5V, then the wire is normal.

d) If the voltage is about 10 V, then there is a break in the wire between the middle and the side bus (+) of the thermoelement.

d) If the voltage is about 0 V, then there is a break in the wire between the middle and the ground.

2. Finding the location of the break in the wire.

a) Connect the "plus" of the voltmeter to the side bus (+) of the thermocouple

b) Wrap the "minus" of the voltmeter with foil. Connect the foil to the thermocouple wire at the side bus (+) and slowly move it to the opposite end (to "ground").

The original source is located on the website [ToyotaMan.ru]

c) The point at which the voltmeter needle deviates from zero by several volts is the break point.
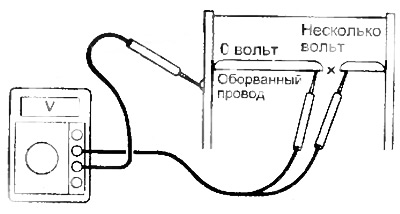


Note: If there is no wire break, the voltmeter will show 0 V at the side bus (+) of the thermocouple and, when the voltmeter contact is moved to the opposite end of the wire, the voltage will gradually increase to approximately 12 V.


3. Repair of wires.

a) Clean the ends of the wire at the break point with solvent and stick protective tape on both sides of the wire.
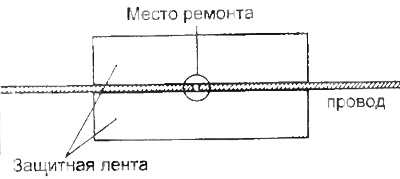


b) Mix the repair compound thoroughly and apply a drop of the substance to the wire using a fine-tipped brush.
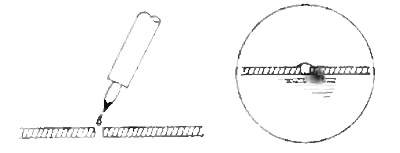


Repair compound: DUPONT PASTE No.4817 or similar substance.

c) After a few minutes, remove the protective tape and leave to harden for 24 hours.
This article is available at: russian, bulgarian, belarusian, ukrainian, serbian, croatian, romanian, polish, slovak, hungarian
The article material has been checked: Mitrofanova Elena
Share information:
◀ Previous
Camry Vista V40: Equipment and devices
Next ▶

Instrument cluster
Windscreen wiper control switch (combination switch)
Checking the lighting control system elements
Automatic headlight and side light switching system
Combination switch
Electric windows
Central lock
Remote control lock
Electric sunroof drive
Seat adjustment system
Similar articles on other Toyota models

➥ Rear window defroster switch Toyota Corolla E80 (1983-1990)
➥ Checking and repairing rear window defroster wires Toyota Carina T190 (1992-1996)
➥ Checking and replacing the rear window defroster switch Toyota Cruiser 100 (1998-2007)
➥ Rear window defroster Toyota 4Runner N120 (1989-1995)
➥ Rear window defroster for 1996-2000 models Toyota RAV 4 XA10 (1994-2000)
➥ Scheme 29. Windshield and rear window defrosters Toyota Corona T190 (1992-1997)
Link in different formats to this article
Comments and feedback from visitors
No comments yet


Add two numbers 34 + 37


Camry XV30 (2001-2006) 
  • User manual
  • Vehicle description
  • Keys, locks and alarms
  • Governing bodies
  • Salon equipment
  • Driving and operation
  • Maintenance
  • Power unit
  • 4-cylinder engine
  • Control system (I4)
  • Engine overhaul (I4)
  • 6-cylinder engine
  • Control system (V6)
  • Engine overhaul (V6)
  • Transmission
  • Clutch
  • Mechanical gearbox
  • Automatic gearbox
  • Drive mechanism
  • Chassis, running gear
  • Wheels and tires
  • Car suspension
  • Steering
  • Brake system
  • Body and interior
  • Exterior (external elements)
  • Doors, locks and windows
  • Air conditioning and heater
  • Electrical equipment
  • Equipment and devices
  • Power devices
  • Electrical circuits
Camry XV20 (1996-2001) 
  • General information
  • Controls and instruments
  • Driving and operation
  • Daily care
  • Maintenance
  • Power unit
  • 4-cylinder engine
  • 6-cylinder engine
  • Engine overhaul
  • Engine electrical equipment
  • Cooling system
  • Heating and ventilation
  • Fuel system
  • Exhaust system
  • Transmission
  • Mechanical gearbox
  • Automatic gearbox
  • Clutch
  • Chassis, running gear
  • Suspension and axle shafts
  • Steering
  • Brake system
  • Body and interior
  • Exterior (external elements)
  • Interior (internal elements)
  • Doors, locks and windows
  • Electrical equipment
  • Equipment and devices
  • Electrical circuits
Camry XV10 (1991-1996) 
  • General information
  • User manual
  • Maintenance
  • Power unit
  • 4-cylinder engine
  • 6-cylinder engine
  • Overhaul of engines
  • Cooling and heating
  • Fuel system
  • Engine electrical equipment
  • Control system
  • Transmission
  • Mechanical gearbox
  • Automatic gearbox
  • Clutch and drive shafts
  • Chassis, running gear
  • Brake system
  • Car suspension
  • Steering
  • Body and interior
  • Exterior (external elements)
  • Interior (internal elements)
  • Doors, locks and windows
  • Electrical equipment
  • Equipment and devices
  • Headlights and lighting
  • Electrical circuits
Camry Vista V40 (1994-1998) 
  • General information
  • User manual
  • Maintenance
  • Power unit
  • Petrol engines
  • Diesel engines
  • Engine overhaul
  • Cooling and lubrication system
  • Fuel system (diesel)
  • Fuel injection (petrol)
  • Engine electrical equipment
  • Transmission
  • Clutch and cardan
  • Automatic gearbox
  • Chassis, running gear
  • Front suspension
  • Rear suspension
  • Steering
  • Brake system
  • Body and interior
  • Body elements
  • Air conditioning and heater
  • SRS security system
  • Electrical equipment
  • Equipment and devices
  • Electrical circuits
ToyotaMan.ru © 2018–2026 • Mobile version • Interesting about Toyota • Administration • Sitemap: EN BG BY UA RS HR RO PL SK HU • Search system • Bookmark
Camry Vista-V40 • Camry XV10 • Camry XV20 • Camry XV30 • Corolla Verso-AR10 • Corolla E80 • Corona T190 • Carina T170 • Carina T190 • Land Cruiser J70 (diesel) • Land Cruiser J60 (petrol) • Land Cruiser J100 • Highlander XU20 (petrol) • 4Runner N120 • RAV4 XA10 • RAV4 XA20 • Duet M100 • Dyna Y50 •
We require cookies to enable some interactive features. Is that ok with you?