Company Honda Company Ford Company Skoda Company Kia Company Mazda Company Mercedes Company Renault
English Русский
Български
Беларускі
Український
Српски
Hrvatski
Română
Polski
Slovenský
Magyar
Bookmark Articles Sitemap Contacts
ToyotaMan.ru


Camry Corolla Corona Carina Land Cruiser Highlander 4Runner RAV4 Others
Camry XV30 (2001-2006) Camry XV20 (1996-2001) Camry XV10 (1991-1996) Camry Vista V40 (1994-1998)

Checking the generator [Toyota Camry Vista-V40]

  • Main
  • Camry
  • Vista-V40 (1994-1998)
  • Power unit
  • Engine electrical equipment
  • Checking the generator
0
Contents: Checking the rotor ↓ Stator check ↓ Checking the brushes ↓ Checking the rectifier unit ↓ Checking bearings ↓

Checking the rotor


1. Check if there is a break in the excitation winding.

Using an ohmmeter, measure the resistance between the slip rings.
  • Nominal resistance (in a cold state) — 2.8-3.0 Ohm
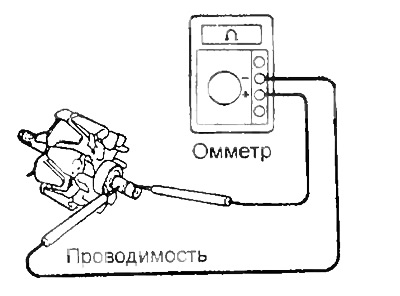


If the resistance tends to infinity, i.e. the circuit is open, then replace the rotor.

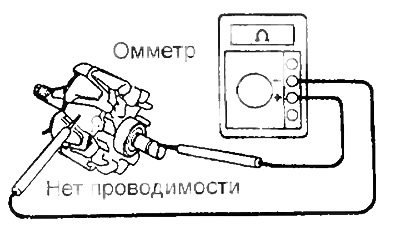
2. Check if the excitation winding is shorted to ground.

Using an ohmmeter, measure the resistance between the rotor pole and the slip ring.

If there is no resistance (the circuit is closed), then replace the rotor.


3. Check the slip rings.

a) Check the working surfaces of the contact rings. They should not have any burrs or chips.


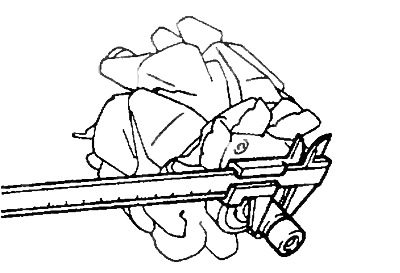
b) Using a caliper, measure the diameter of the slip rings.
  • Nominal diameter - 14.2-14.4 mm
  • Minimum allowable - 12.8 mm


If the diameter of the slip rings is less than the minimum allowable, replace the rotor.

Stator check


1. Check if there is a break in the stator winding.

Using an ohmmeter, check for conductivity between the terminals of the stator winding coils.
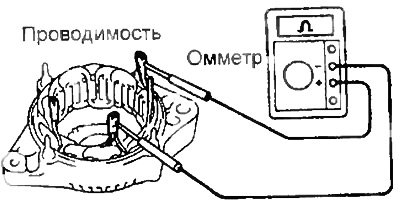


Otherwise, replace the stator.

2. Check if the stator winding is shorted to ground.

Using an ohmmeter, make sure there is no conductivity between the stator housing and the terminals of the stator winding coils.
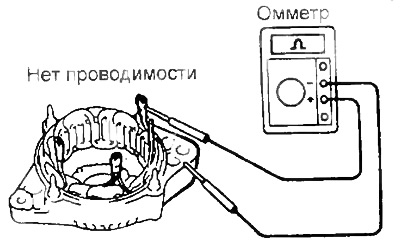


Otherwise, replace the stator.


Checking the brushes


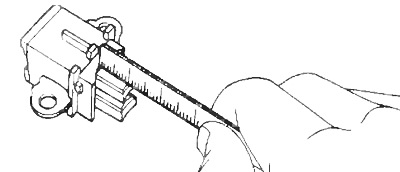
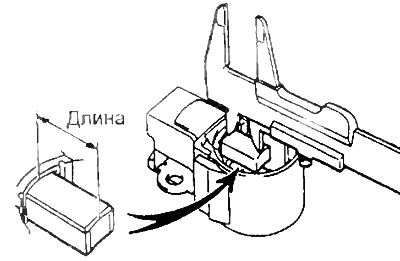
1. Measure the length of the protruding part of the brushes.
  • Nominal - 10.5 mm
  • Minimum allowable - 1.5 mm


Type A


Type B


If the brush protrusion length is less than the minimum allowable length, replace the brushes (usually type A) or brush holder assembly (type B).

2. Replacing brushes (if necessary)

a) Unsolder the brush wire from the brush holder terminal and remove the brush and brush spring.
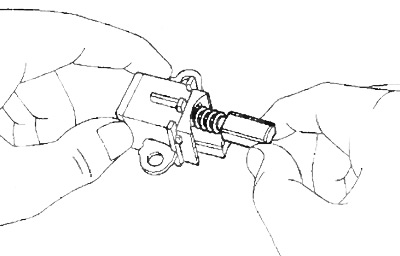


b) Pass the wire through the hole in the brush holder and insert the brush into the brush holder.


c) Solder the brush wire to the brush holder terminal so that the protruding length of the brush corresponds to the nominal value specified above.
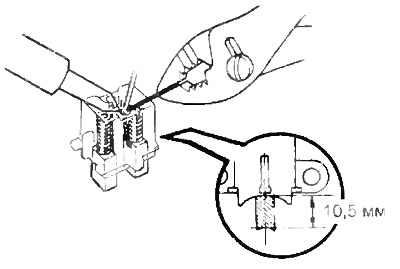


d) Make sure that the brushes move freely without jamming.

d) Cut off the remaining part of the wire.

e) Apply insulating paint to the soldering points.

Checking the rectifier unit


1. Checking the positive valve.

a) Connect the negative probe of the ohmmeter to the positive terminal of the rectifier block, and connect the positive probe in series to each of the other three terminals.

Make sure there is conductivity in all three measurements.
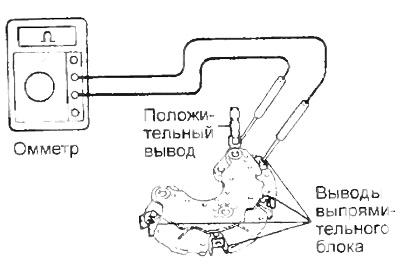


b) Change the polarity of the tester probes and repeat the procedure of point a). Make sure there is no conductivity in all three measurements. If the conditions are not met, replace the rectifier unit.


2. Checking the negative valve.

a) Connect the positive probe of the ohmmeter to the negative terminal of the rectifier unit, and connect the negative probe in series to each of the other three terminals. Make sure that there is conductivity in all three measurements.
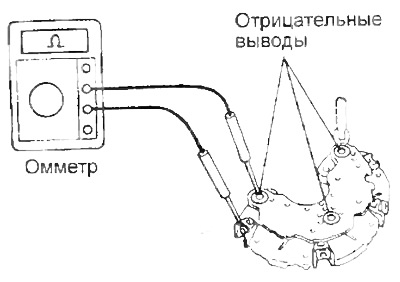


b) Change the polarity of the tester probes and repeat the procedure of point a). Make sure there is no conductivity in all three measurements. If the conditions are not met, replace the rectifier unit.

Checking bearings


1. Check the front bearing. Check that the front bearing moves smoothly and without binding.
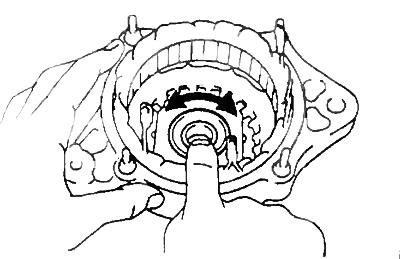


2. Replace the bearing if necessary.

a) Unscrew 4 screws and remove the bearing holder.
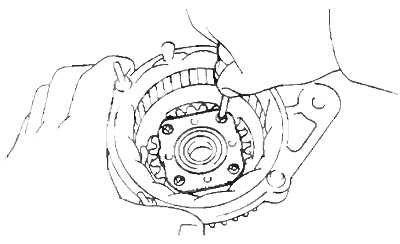


b) Using a press and a socket of the appropriate size, press out the front bearing.
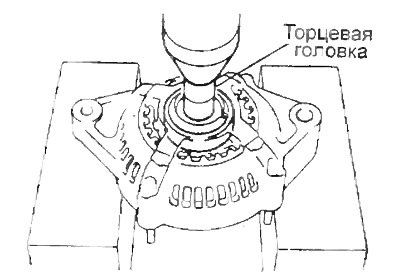


c) Using a special punch and press, press the new front bearing into the generator cover on the drive side.
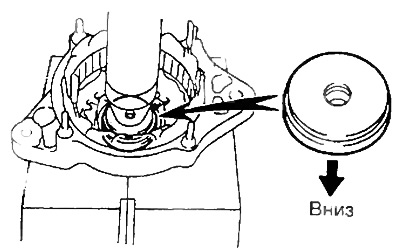


d) Install the bearing holder and tighten the 4 screws that secure it.
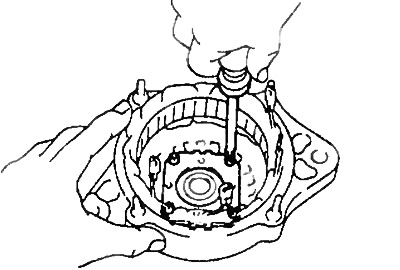


3. Check the rear bearing. Check that the rear bearing moves smoothly and without sticking.

4. Replace the rear bearing if necessary.


a) Using a puller, remove the outer bearing cover and rear bearing.

Note: Be careful not to damage the rotor.
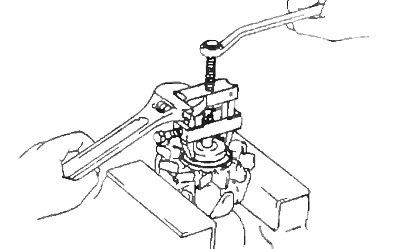


b) Remove the inner bearing cover.

c) Install the inner bearing cover onto the rotor.
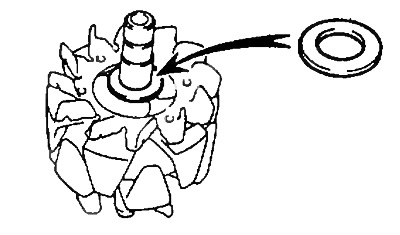


b) Using a press and mandrel, install the new rear bearing onto the rotor shaft.
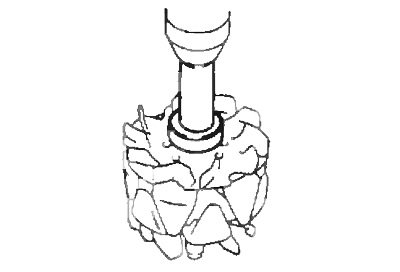


c) Install the outer bearing cover.
This article is available at: russian, bulgarian, belarusian, ukrainian, serbian, croatian, romanian, polish, slovak, hungarian
The article material has been checked: Mitrofanova Elena
Share information:
◀ Previous
Camry Vista V40: Engine electrical equipment
Next ▶

Disassembling the generator
Charging system — on-car checks
Charging system — precautions
Charging system — operating principle
Checking the starter operation
Generator assembly
Similar articles on other Toyota models

➥ Checking the poly V-belt of the generator drive Toyota Corolla Verso 3 (2004-2009)
➥ Checking the generator elements Toyota Corona T190 (1992-1997)
➥ Checking the generator stator Toyota Carina T190 (1992-1996)
➥ Checking the condition and replacing generator components Toyota Cruiser 100 (1998-2007)
➥ Generator Parts — Checking and Replacing Toyota 4Runner N120 (1989-1995)
➥ Checking the standard generator Toyota Dyna Y50/Y60 (1984-1995)
Link in different formats to this article
Comments and feedback from visitors
No comments yet


Add two numbers 37 + 25


Camry XV30 (2001-2006) 
  • User manual
  • Vehicle description
  • Keys, locks and alarms
  • Governing bodies
  • Salon equipment
  • Driving and operation
  • Maintenance
  • Power unit
  • 4-cylinder engine
  • Control system (I4)
  • Engine overhaul (I4)
  • 6-cylinder engine
  • Control system (V6)
  • Engine overhaul (V6)
  • Transmission
  • Clutch
  • Mechanical gearbox
  • Automatic gearbox
  • Drive mechanism
  • Chassis, running gear
  • Wheels and tires
  • Car suspension
  • Steering
  • Brake system
  • Body and interior
  • Exterior (external elements)
  • Doors, locks and windows
  • Air conditioning and heater
  • Electrical equipment
  • Equipment and devices
  • Power devices
  • Electrical circuits
Camry XV20 (1996-2001) 
  • General information
  • Controls and instruments
  • Driving and operation
  • Daily care
  • Maintenance
  • Power unit
  • 4-cylinder engine
  • 6-cylinder engine
  • Engine overhaul
  • Engine electrical equipment
  • Cooling system
  • Heating and ventilation
  • Fuel system
  • Exhaust system
  • Transmission
  • Mechanical gearbox
  • Automatic gearbox
  • Clutch
  • Chassis, running gear
  • Suspension and axle shafts
  • Steering
  • Brake system
  • Body and interior
  • Exterior (external elements)
  • Interior (internal elements)
  • Doors, locks and windows
  • Electrical equipment
  • Equipment and devices
  • Electrical circuits
Camry XV10 (1991-1996) 
  • General information
  • User manual
  • Maintenance
  • Power unit
  • 4-cylinder engine
  • 6-cylinder engine
  • Overhaul of engines
  • Cooling and heating
  • Fuel system
  • Engine electrical equipment
  • Control system
  • Transmission
  • Mechanical gearbox
  • Automatic gearbox
  • Clutch and drive shafts
  • Chassis, running gear
  • Brake system
  • Car suspension
  • Steering
  • Body and interior
  • Exterior (external elements)
  • Interior (internal elements)
  • Doors, locks and windows
  • Electrical equipment
  • Equipment and devices
  • Headlights and lighting
  • Electrical circuits
Camry Vista V40 (1994-1998) 
  • General information
  • User manual
  • Maintenance
  • Power unit
  • Petrol engines
  • Diesel engines
  • Engine overhaul
  • Cooling and lubrication system
  • Fuel system (diesel)
  • Fuel injection (petrol)
  • Engine electrical equipment
  • Transmission
  • Clutch and cardan
  • Automatic gearbox
  • Chassis, running gear
  • Front suspension
  • Rear suspension
  • Steering
  • Brake system
  • Body and interior
  • Body elements
  • Air conditioning and heater
  • SRS security system
  • Electrical equipment
  • Equipment and devices
  • Electrical circuits
ToyotaMan.ru © 2018–2026 • Mobile version • Interesting about Toyota • Administration • Sitemap: EN BG BY UA RS HR RO PL SK HU • Search system • Bookmark
Camry Vista-V40 • Camry XV10 • Camry XV20 • Camry XV30 • Corolla Verso-AR10 • Corolla E80 • Corona T190 • Carina T170 • Carina T190 • Land Cruiser J70 (diesel) • Land Cruiser J60 (petrol) • Land Cruiser J100 • Highlander XU20 (petrol) • 4Runner N120 • RAV4 XA10 • RAV4 XA20 • Duet M100 • Dyna Y50 •
We require cookies to enable some interactive features. Is that ok with you?