



Resistance diagram between the terminals of the fuel level and oil temperature indicators
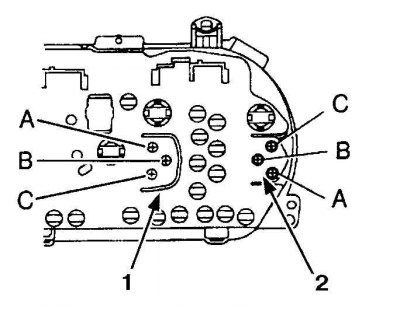
1. Fuel level indicator
2. Temperature indicator
Examination
1. Turn the ignition key to the ON position.
2. If the pointer arrows remain stationary, check the fuse. If the fuse is OK, find the sensor for the corresponding pointer and connect the sensor wire to ground. If the pointer moves to the desired area of the pointer scale, replace the sensor. Otherwise, connect the terminal on the back of the pointer that is connected to the sensor to ground (in this case, follow the diagram). If the pointer has moved, the wiring from the pointer to the sensor is faulty. Otherwise, check the voltage at the second terminal of the pointer. If voltage is present, replace the pointer.
Attention! The resistance between terminals A and B on a working fuel gauge should be 126 Ohm, between A and C – 280 Ohm, and between B and C – 154 Ohm. On a working temperature gauge, these resistances should be 175 Ohm (A – B), 54 Ohm (A – C), and 229 Ohm (B – C).
The text is quoted from the source website (ToyotaMan)
3. To check the indicators themselves, remove the instrument panel and check the resistance of the indicators.