
Stop the engine and turn on the hazard warning lights.
Apply the parking brake firmly and shift the transmission to "P" (Automatic transmission) or reverse gear (manual transmission).
Everyone should get out of the car in the opposite direction from the movement.
Please read the following instructions carefully:
When using the jack, be sure to use caution to reduce the risk of injury. Follow the instructions for operating the jack.
Do not start or crank the engine when the vehicle is only supported by a jack.
Stop the vehicle on a firm, level surface, apply the parking brake firmly, and shift the transmission to "P" (Automatic transmission) or reverse gear (manual transmission). If required, chock the wheel diagonally opposite the wheel to be replaced.
Be sure to place the jack properly on the jacking point. Raising the vehicle with an incorrectly positioned jack will damage the vehicle or may allow the vehicle to come off the jack and cause injury.
Never crawl under a vehicle when it is supported by only one jack.
Use the jack only to lift the car during a wheel change.
Do not raise the vehicle when someone is inside the vehicle.
When raising the vehicle, do not place any objects on or under the jack.
Raise the vehicle only high enough to remove and replace a tire.
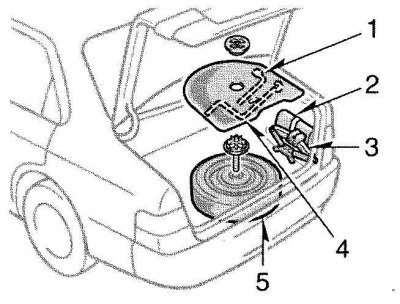
1. Wrench for wheel nuts; 2. Bag with tools; 3. Jack; 4. Jack handle; 5. Spare tire
Take the required tools and a spare tire.
For self-preparation for a critical situation, you need to familiarize yourself with the use of a jack, each tool and their storage location
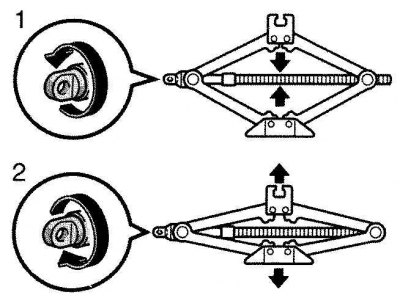
Turn the jack connection by hand.
To remove, turn the connection in direction 1 until the jack is free.
For storage - turn the coupling in direction 2 until the jack is securely fastened to prevent it from moving forward during a collision or hard braking.
Removing the spare tire
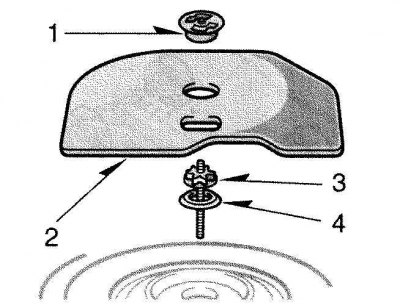
Loosen nut 1 and remove it.
Remove cover 2 of the spare tire.
Loosen bolt 3 and remove it.
Remove washer 4.
Then remove the spare tire from the vehicle.
When storing a spare tire, install it in place with the outer side of the wheel facing out. Then secure the tire by reversing the above removal steps to prevent it from moving forward during a collision or hard braking.
Wheel lock
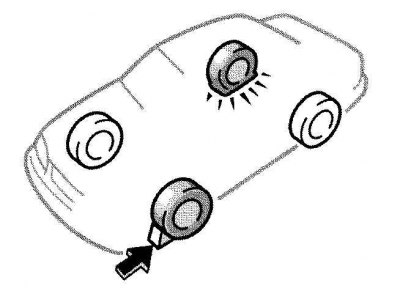
Chock the wheel diagonally opposite the flat tire to keep the vehicle from rolling when it is jacked up.
When blocking the wheels, place a chock at the front for the front wheels or at the back for the rear wheels.
Removing the decorative wheel cover
Steel wheels
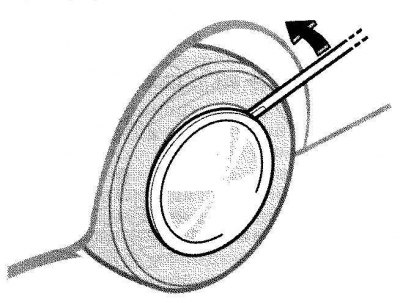
Remove the decorative wheel cover.
Aluminum wheels
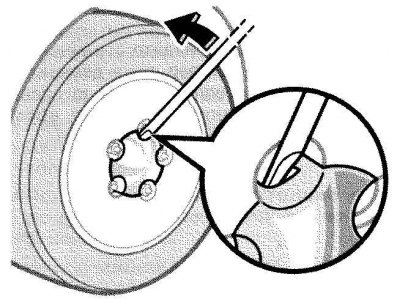
Remove the wheel trim cover using the pointed end of a wheel nut wrench.
Attention! Do not attempt to remove the decorative cover by hand.
Loose wheel nuts
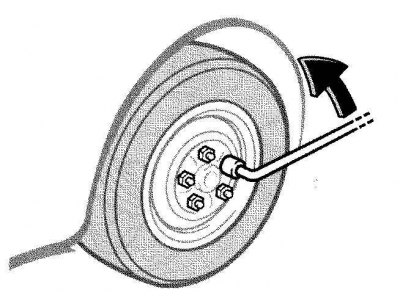
Loosen all wheel nuts.
Always loosen the wheel nuts before lifting the vehicle.
The nuts are turned counterclockwise to loosen them. For maximum leverage, install a wrench on the nut with the handle on the right side as shown. Grab the handle near the end and pull the handle up. Be careful not to let the wrench come off the nut.
Do not remove the nuts yet - just unscrew them about one and a half turns.
Jack location
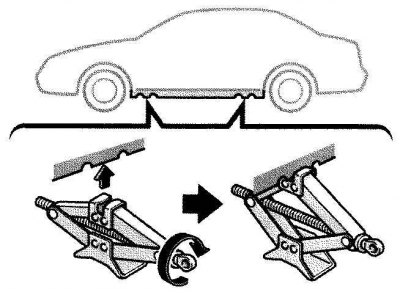
Position the jack at the correct jacking point.
Make sure the jack is on a level and firm surface.
Vehicle lifting
Raise the vehicle high enough to fit the spare tire. Remember that more ground clearance will be required when installing a spare tire than when removing a flat tire.
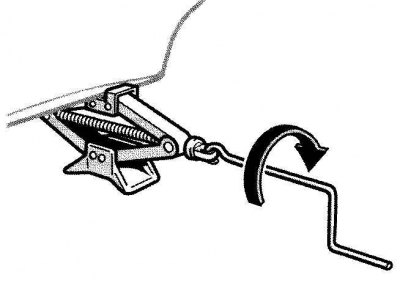
To raise the vehicle, insert the jack handle into the jack (loose fit) and turn it clockwise. As soon as the jack touches the vehicle and begins to raise it, double check that it is correctly positioned.
Wheel replacement
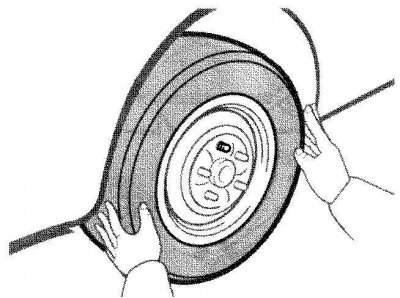 | 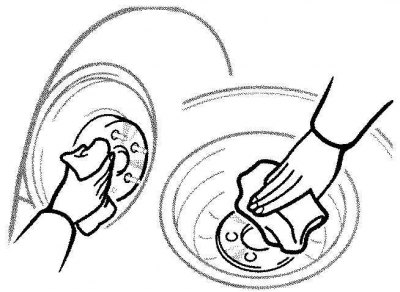 |
Remove wheel nuts and replace tires.
Remove the flat tire straight ahead and lay it aside.
Roll the spare wheel into position and align the holes in the wheel with the bolts. Then lift the wheel up and make sure the top bolt goes through the hole. Rock the wheel and put it on the other bolts.
Before installing the wheel, remove any corrosion from the wheel mounting surface with a wire brush or similar. Mounting a wheel without good metal-to-metal contact on the mounting surface can loosen the wheel nuts and even cause the wheel to come off while driving. Therefore, after the first 1600 km, check whether the wheel nuts are tight enough.
Reinstalling the wheel nuts
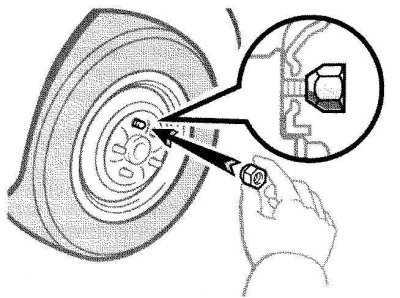
Reinstall all wheel nuts and finger tighten.
Reinstall the wheel nuts (tapering end inwards) and tighten them as tight as possible by hand. Press the tire and see if you can tighten them further.
Lowering the car
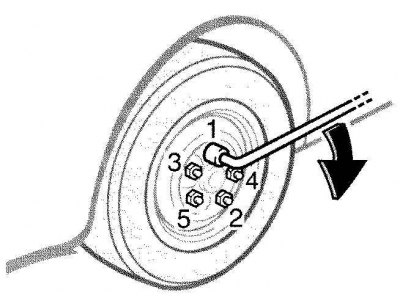
Lower the vehicle completely and tighten the wheel nuts.
Turn the jack handle counterclockwise to lower the vehicle.
Use only a wheel wrench to tighten the nuts. Do not use other tools or any additional levers other than hands, such as a hammer, pipe. Make sure the wrench has a secure grip on the nut.
Tighten each nut a little at a time in the sequence shown in the illustration. Repeat the process until all nuts are fully tightened.
Reinstallation of the decorative wheel cover
Reinstall the decorative wheel cover:
Steel wheels
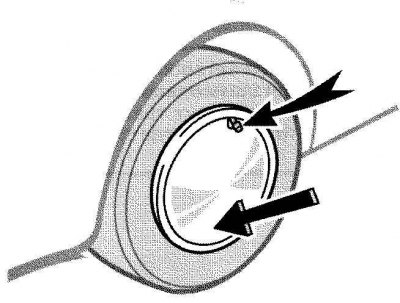
Install the wheel trim cover in the correct position.
Aluminum wheels
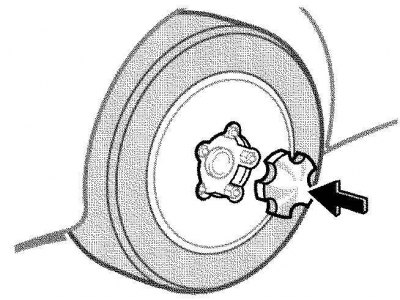
On some models, align the slot on the wheel trim cover with the valve stem.
Then tap it firmly with the edge of your hand to snap it into place.
After wheel change
Check the air pressure in the replaced tire.
Adjust air pressure to required. If it is lower, drive slowly to the nearest service station and inflate the tire to the correct pressure.
Be sure to reinstall the tire's air valve cap, as dirt and moisture may get into the valve stem, causing air to leak. If the cap is lost, install a new one as soon as possible.
Store all tools, jack and flat tire securely.
As soon as possible after changing the wheels, tighten the wheel nuts to torque with a torque wrench and have the flat tire serviced.
Warning! Before driving, make sure all tools, jack and flat tire are securely stowed in their storage areas to avoid injury during a collision or hard braking.