
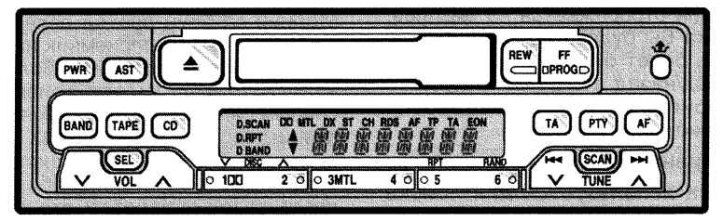
Preset buttons 1, 2, 3, 4, 5, 6
These buttons are used to preset and tune radio stations. To preset a radio station to a specific button - tune in to the desired station (see TUNE). Press and hold the button until you hear a beep - this will mean that the station is set to the button. The button or cell number will appear on the display.
To tune in to a preset station, press the desired station button. The button or slot number and station frequency will appear on the display.
These systems can store one LW/MW station and three VHF stations under each button. (The display will show "LW" or "MW", "U1", "U2" or "U3", when you press the button "BAND"). The preset station memory will be canceled if the power supply is interrupted (battery disconnected or fuse blown).
Eject button
Press this button to eject the cassette.
|>| Higher/lower track number
Using this button, you can skip to a higher/lower track number or fast forward/backward the track you are listening to.
Skip to a higher/lower track number - quickly press and release the button >>| (up) or |<< (down). The track number will appear on the display. If you hear a beep, you have held the button too long and the player will fast forward or reverse the track.
Fast track forward/backward - press and hold the button >>| (forward) or |<< (back) until you hear a beep. As long as you hold the button, the current playing time is shown on the display. As long as you hold the button, the player will fast forward/rewind the track. When you release the button, the player will resume playback.
AF (alternative frequencies)
This button is used to search for RDS stations (radio information system) over the entire frequency band.
Click "AF" less than 2 seconds to receive the same program while tuning in an RDS station. "AF" will appear on the display. If reception conditions worsen, the network that transmits the same program will be selected from the AF list (alternative frequencies) for RDS stations.
To change the AF mode, press the button "AF" for at least 2 seconds. When "REG ON" appears on the display, the radio will select the RDS station that has the same PI code (program identification). When "REG OFF" appears on the display, the radio selects an RDS station that has the same three-digit PI code (program identification).
If the radio cannot find an RDS station within 60 seconds, the radio will mute all programs and start searching for an RDS station of the same PI code using the AF list. If the radio cannot find any station in one pass due to weak signals, it will start searching again using higher sensitivity to search for stations with weak signals. At this time, the display will show "DX". A beep will sound and the display will show "PI SEEK", indicating when the feature starts to work.
If the signal becomes extremely weak, the radio will pause the search for a station and the display will show "NOTHING". After that, if the radio cannot find RDS stations within 20 seconds, it starts searching again.
To cancel AF mode, press the button again "AF".
AST (Automatic memorization)
This button is used to automatically preset 6 radio stations for each frequency band (LW/MW, VHF1, VHF2 and VHF3).
Click "AST" until you hear a beep. If the radio cannot find any station, it will tune in to the frequency it was receiving before using the "AST".
BAND
Click "BAND" to switch between LW/MW and VHF frequency bands.
"LM", "MW", "U1", "U2" or "U3" will appear on the display. These systems allow you to install eighteen VHF stations, three for each button.
If the audio system is off, you can turn on the radio by pressing "BAND". You should also click "BAND" to switch from cassette or CD operation to radio operation.
CD (CD)
Click "CD" To switch from radio or cassette operation to CD operation, you can turn on the CD player by pressing "CD".
When the audio system is set to CD operation, the display will show the track number of the current playback.
DISC
By pressing this button, you can select the disc you wish to listen to.
Dolby NR
If you are using a tape recorded with Dolby noise reduction, press the button marked with the double D symbol. The double D symbol will appear on the display. Press the button again to turn off Dolby NR.
Dolby NR mode reduces tape noise by approximately 10 dB. For best sound reproduction, play tapes with this button on or off, depending on the mode used to record the tape.
The Dolby noise reduction system is manufactured under license from Dolby Laboratories Lisensing Corporation. "DOLBY" and the double D symbol are trademarks of Dolby Laboratories Licensing Corporation.
FF (Fast forward)
Click the button "FF" to fast forward the tape. To stop the tape during fast forward, lightly press the button "REW".
When the tape is fast-forwarded to the end, the cassette player will start playing the other side of the tape using the auto reverse function.
MTL indication (Metal)
Click the button "MTL" when inserting metal or chrome tape. The display will show "MTL".
PROG (Program)
Press both buttons "PROG" to select the other side of the cassette tape. Autoreverse function. Once the cassette player reaches the end of one side of the tape, it automatically reverses direction and starts playing the other side. This occurs regardless of whether the cassette is being played or fast-forwarded.
RTY (program type)
Click the button "PTY". If the button is pressed while receiving a code "PTY RDS station, current program type "NEWS" (news), "SPORT" (sport), "TALK" (talk), "POP" (pop music), "Classics" (classic) appears on the display. If a different program type is required, press PTY until the desired program type appears.
If the button "TUNE ↑" or "TUNE ↓" is pressed while the program type is displayed, the radio will search for a station that is broadcasting the PTY code. If the radio cannot find any station, the display will show "NOTHING".
If the system is left untouched for 6 seconds while a program type is being displayed, or if another operation is in progress, the program type indication will disappear and the radio will transmit the program of the last program type displayed.
PWR (Nutrition)
Click "PWR" to turn the audio system on and off.
RAND (Arbitrarily)
There are two random playback functions. You can randomly listen to all tracks on all CDs in the store, or you can randomly listen to only the tracks on a specific CD.
Random play of tracks on a disc - quickly press and release the button "RAND". "RAND" appears on the display and the player will play all the tracks on the disc you are listening to in random order. If you hear a beep, then you have held the button too long, and the player will play in random order all the tracks from all the discs available in the store. To turn off the random play function, press the button "RAND" again.
Random play of all tracks in the store - press "RAND" until you hear a beep. "D*RAND" appears on the display and the player will play all tracks from all discs in the magazine in random order. To turn off the random play function, press the button "RAND" again.
REW (Fast rewind)
Click the button "REW" to fast rewind the tape. To stop the tape during fast forward, lightly press the button "FF". The tape will start playing immediately.
When the tape is rewound to the end, the cassette player will stop and then playback of the same side will start.
RDS display (radio information system)
The radio will automatically switch to RDS mode to receive an RDS station while tuning into a VHF broadcast. "RDS" and the name of the RDS station appear on the display.
RPT (Repeat): CD player
There are two repeat playback functions. You can repeat a track on a disc or an entire CD. Track repeat - quickly press and release the button "RPT" until you hear a beep. "D*RPT" will appear on the display. The player will repeat all the tracks on the disc you are listening to.
When disc playback ends, the player will automatically skip to the beginning track of the disc and perform repeat playback. This process will continue until you press the button again to turn off this feature.
SCAN
Radio
You can scan all frequencies in a band, or only the frequencies of preset stations in that band.
To scan the frequencies of preset stations - quickly press and release the button "SCAN". If you hear a beep, it means that you have held the button for too long, and the radio will scan all the frequencies of the band. The radio will tune in to the next preset station up the band and play it for a few seconds before moving on to the next preset station. Press the button again to select a station "SCAN".
CD player
There are two scanning functions. You can scan the tracks of a specific disc or the first tracks of all discs in the magazine.
Scan tracks on a disc - quickly press and release the button "SCAN". "SCAN" appears on the display and the player will scan all the tracks on the disc you are playing. If you hear a beep, then you have held the button too long, and the player will scan the first tracks of the magazine's discs. To select a track, press the button again "SCAN". If the player scans all the tracks on the disc, it will stop scanning.
Scanning the first tracks of magazine discs - press the button "SCAN" until you hear a beep. "D*SCAN" appears on the display and the player will play the first track of the next disc for 10 seconds and then proceed to scan the next disc. Press to select a drive "SCAN" second time. If the player scans all discs, it will stop scanning.
SEL (Choice) and VOL (Volume)
Volume control function
These buttons are used to adjust the volume. Press again to adjust the volume "SEL" until "VOL" will not appear on the display. Then push the side "↑" (up) or "↓" (down) buttons "VOL". The display will show a range from "VOL 0" before "VOL 36".
Sound balance adjustment function
These buttons are used to adjust the sound balance between the right and left and front and rear speakers.
Press repeatedly to adjust right/left balance "SEL" until "BAL" will not appear on the display. Then push the side "↑" (up) or "↓" (down) buttons "VOL".
The display will show a range from "BAL L7" before "BAL R7".
Press repeatedly to adjust the front/rear balance "SEL" until "FAD" will not appear on the display. Then push the side "↑" (up) or "↓" (down) buttons "VOL".
The display will show a range from "FAD F7" before "FAD R7".
Manual tone control function
These buttons are also used to manually adjust the tone.
Press the button repeatedly to adjust the low tone "SEL" until "BAS" will not appear on the display. Then press side "↑" (up) or "↓" (down) buttons "VOL" to adjust to your own taste.
The display will show a range from "BAS –5" up to BAS +5".
Press the button repeatedly to adjust the treble tone "SEL" until "TRE" will not appear on the display. Then press side "↑" (up) or "↓" (down) buttons "VOL" to adjust to your own taste.
The display will show a range from "TRE –5" before "TRE +5".
ST indication (Stereo reception)
The radio automatically switches to stereo reception when tuned to a stereo broadcast. "ST" appears on the display. If the signal becomes weak, the radio lowers the channel spacing value to prevent the generation of noise due to the weak signal. If the signal becomes extremely weak, the radio will switch from stereo to mono reception.
TA (traffic news)
This button is used to receive TA stations over the entire frequency band.
System "EON" (additional extended network). If the RDS station (with EON data), you are listening to is not broadcasting traffic information programs in TA mode (road news), the radio switches to the traffic information program automatically using the AF list for EON.
After the end of the transmission of traffic information, the radio automatically returns to the original program. The buzzer tells you when the function starts and ends.
Click "TA" to switch the radio to TP mode. "TR" will appear on the display.
In TP mode, the radio starts searching for a TP station. When a TP station is received, the program service name will appear on the display. Also in AF mode, the radio searches for a TP station using the AF list.
If the radio cannot find any TP station, "NOTHING" appears on the display for 2 seconds and the TP station search starts again.
When a TP station is received, if the TP signal stops for 20 seconds, the radio will start searching for another TP station automatically.
Click again "TA" to switch the radio to TA mode. "TA TR" will appear on the display.
In TA mode, the radio starts searching for a TP station. It will only sound when a TP station is received. When a TP station is received, the program service name will appear on the display. Also in AF mode, the radio searches for a TP station using the AF list.
If the radio cannot find any TP station, "NOTHING" appears on the display for 2 seconds and the TP station search starts again.
When a TP station is received, if the TP signal stops for 20 seconds, the radio will start searching for another TP station automatically.
Volume memory function "TA" – memorizes the volume when receiving traffic news.
When "TA" received next time, the system compares the volume of the received station "TA" and the memorized TA volume and automatically selects a higher volume. But the volume memory range is limited: if the volume of the previously received program is higher than the maximum volume of the range, then the maximum volume of the range is stored, and if it is below the minimum volume of the range, then the minimum volume of the range is stored.
You can adjust the volume regardless of the memorized volume "TA" when receiving a station "TA" (see SEL and VOL).
To return to normal mode from TA mode, press again "TA".
TAPE
Click "TAPE" to switch from radio operation to cassette player operation. If the audio system is off, you can turn on the cassette player by pressing "TAPE". In both cases, the cassette must already be inserted into the player.
TUNE
Setting
The Toyota car has an electronically tuned radio (ETR). Press and release side "↑" (up) or "↓" (down) buttons "TUNE" to change the frequency of a station up or down the frequency band. If you hear a beep, it means that you have held the button for too long and the radio will enter the search mode.
Search
In seek mode, the radio finds and plays the next station up or down the frequency band. To search for a station, press and hold "↑" or "↓" buttons "TUNE" until you hear a beep. To find another station, perform this procedure again.