
Fuel filter replacement
Attention! On models from 1993, if the battery is disconnected for a long time, the airbag system will be damaged.
1. To improve access, remove the air filter cover.
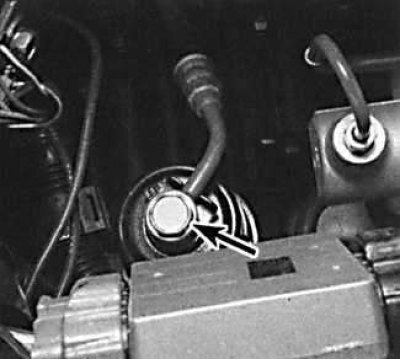
2. While holding the fuel filter from turning, unscrew the bolts securing the fuel lines to the filter.
3. Remove the fuel filter mounting bolts and remove the fuel filter.
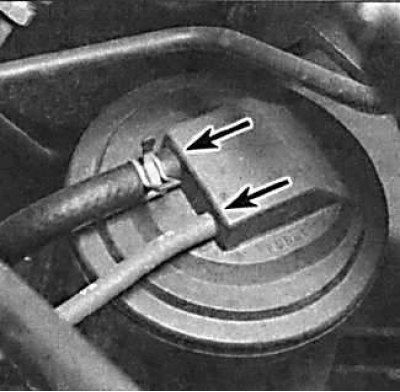
4. Install a new filter in accordance with the markings on the filter housing and secure it with bolts.
5. Using new washers, secure the fuel lines with bolts.
6. Further installation is carried out in the reverse order of removal.
Coolant replacement
Attention! The coolant is changed on a cold engine. Avoid getting coolant on painted body surfaces and clothing. Otherwise, wash the area where the coolant has entered with plenty of water.
Coolant drain
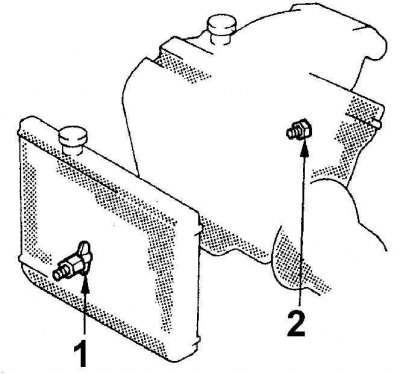
The location of the coolant drain plugs on the 3MZ-FEV6 engine
1 - plug for draining the coolant from the radiator;
2 - plug for draining the coolant from the engine block
1. Raise the front of the car and secure it on stands.
2. Remove the radiator cap.
 |  |
3. Place a large container under the radiator inlet. Connect a 10mm ID hose to the drain valve to direct the coolant into the container, then open the drain valve.
4. When the flow of coolant from the radiator stops, place a container under the cylinder block drain plug. Remove the drain plug and allow the coolant to drain from the cylinder block.
Flushing the cooling system
The coolant must be changed periodically, and the cooling system must be flushed, as rust and dirt form in the channels of the system.
1. To flush the radiator, drain the coolant from the cooling system...
2....then disconnect the hoses from the base and upper tank of the radiator.
3. Insert a garden hose into the top outlet of the radiator and run water through the radiator until water comes out clean from the outlet at the base of the radiator. If it is not possible to flush the radiator with clean water, then use a detergent.
4. To flush the engine, insert a garden hose into the water outlet of the thermostat and run water through the engine until water comes out clean from the bottom hose.
5. Flush the heater radiator by first opening the heater tap and disconnecting the hoses from the heater. Connect a hose to one of the hoses and flush with clean water until the water comes out clean from the second hose.
Filling the cooling system
Before filling the cooling system, make sure that all hoses and clamps are in good condition. Note that the antifreeze mixture must be used all year round to prevent corrosion. Also check that the radiator cap and cylinder block drain plugs are in place.
1. Set the heater control knob to the maximum temperature position.
2. Slowly pour coolant into the radiator.
3. Without closing the radiator cap, start the engine and warm it up to operating temperature, at which the thermostat will open and coolant will begin to flow through the radiator, while the upper radiator hose will become hot.
4. Stop and cool the engine, check the coolant level and top up if necessary.
5. While squeezing the upper radiator hose, bleed air from the engine cooling system, then add coolant to the correct level. Reinstall the radiator cap.
6. Start the engine and warm it up to normal operating temperature and check the engine cooling system for leaks.
Checking the evaporative emission system
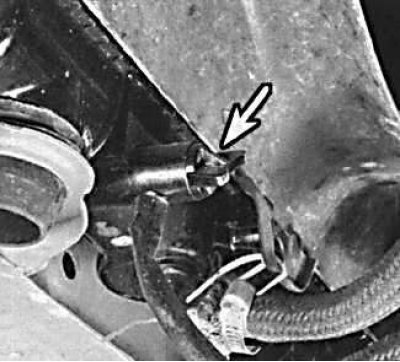
Location of the coolant drain plug from the 1MZ-FE engine block
An EVAP system is designed to capture fuel vapors from the fuel system and store them in a charcoal canister and then burn them out during normal engine operation.
One of the signs of damage to the evaporative emission system is the smell of fuel in the engine compartment. In this case, inspect the charcoal canister located on the front side of the engine compartment. Check the condition of the canister and hoses.
Exhaust system check
1. Check exhaust pipes for corrosion or damage.
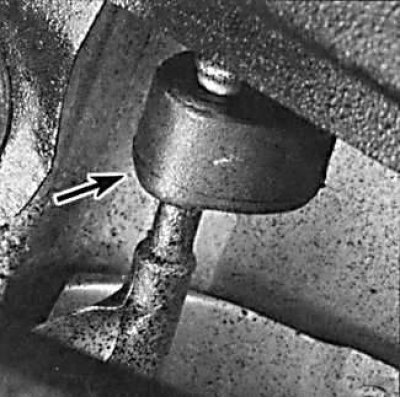
2. Check the condition of the exhaust rubber mounts.
3. When moving the exhaust system of the car to the sides, check that it does not touch the car body, otherwise replace the rubber suspensions of the exhaust system.
Oil change in automatic transmission and final drive
Gearbox oil ages over time. At the same time, its lubricating properties inevitably deteriorate. It is therefore necessary, as a rule, to carry out an oil change at certain intervals.
When changing the oil, the car must be in a horizontal position, as well as when checking the oil level. In addition, the gearbox must be warmed up so that the oil is thin enough and foreign particles are still mixed with the oil, that is, so that they come out with the oil. Therefore, before changing the oil, it is necessary to drive several kilometers to warm up the gearbox. Sometimes the automatic transmission oil gets very hot, so be extra careful if the car is being repaired immediately after driving.
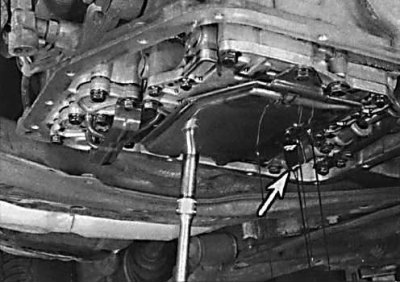
1. Install the car over a viewing hole. Watch out for hot exhaust pipe when working under a vehicle.
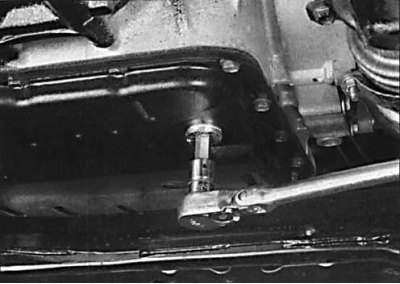
2. Place a suitable container under the automatic transmission drain plug and unscrew the drain plug.
3. After draining the oil from the automatic transmission, reinstall the oil drain plug.
Cleaning the strainer
 | 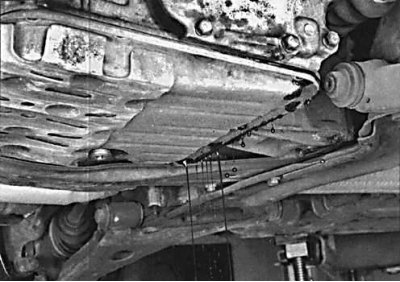 |
1. Remove the front transmission oil pan bolts, then loosen the rear oil pan bolts.
2. Using a screwdriver, separate the sump from the gearbox housing and drain the remaining oil from the gearbox.
3. After draining the oil from the automatic transmission, unscrew the remaining bolts and remove the transmission oil pan.
4. Unscrew the bolts securing the strainer and remove it.
5. Wash the strainer in fresh automatic transmission oil.
6. Install strainer to gearbox and secure with bolts.
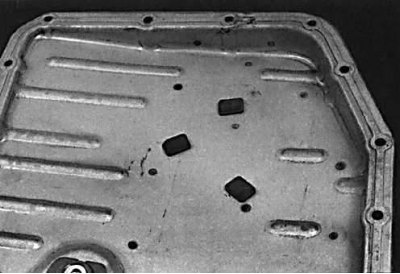
7. Clean mating surfaces of gearbox housing and oil pan. Mark the location of the magnets in the oil pan, remove them and wash the pan in solvent and dry it with compressed air. Install the magnets on the oil pan.
8. Install the oil pan with a new gasket on the automatic transmission and secure it with bolts, tightening them to the required torque.
Draining oil from the main gear
1. Place a container under the final drive drain plug.
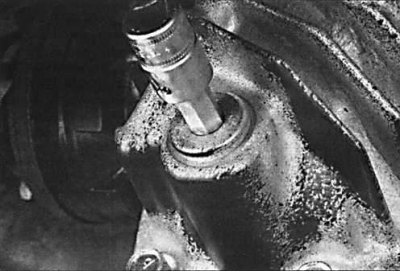
2. Unscrew the drain plug and drain the oil from the final drive, then install the drain plug in place, tightening it to the required torque.
3. Pour fresh oil into the final drive to the lower level of the filler hole.
4. Lower the car to the ground.
Filling gearbox oil
1. Pour oil into the gearbox through the dipstick tube in the automatic transmission.
2. Start the engine and move the selector lever from position P to L, then back to position P and apply the handbrake.
3. With the engine idling, check the oil level in the automatic transmission.
Changing the oil in the manual gearbox
1. Raise the front of the car and secure it on stands.
2. Place an oil container under the gearbox and unscrew the drain plug.
3. Drain the gearbox oil. The presence of metal inclusions in the oil indicates wear of the gearbox parts.
4. Reinstall the plug.
5. Fill in fresh oil through the filler tube.
Suspension mounting check
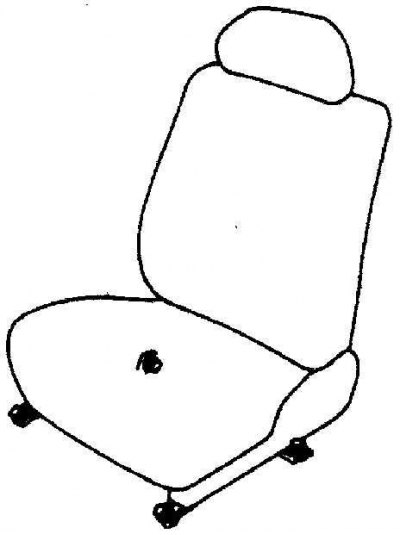
Location of the front seat bolts
Arrangement of rear suspension mounting bolts
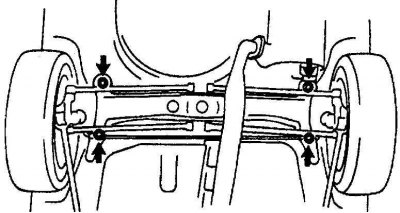
Arrangement of bolts and nuts of fastening of a forward suspension bracket
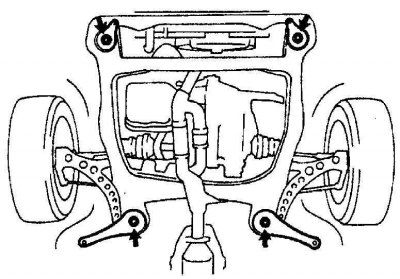
Check the tightening torques of nuts and bolts:
- front seat;
- front suspension to the body;
- rear suspension to the body.
Checking and replacing spark plugs
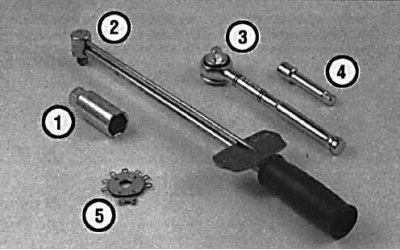
1 - key for unscrewing the spark plug;
2 - torque wrench;
3 - head of the key with a ratchet;
4 - extension;
5 - a template for measuring the interelectrode gap of a candle
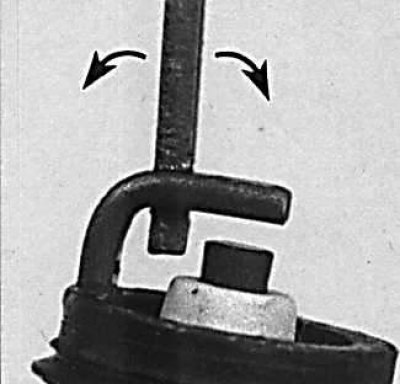
Checking spark plug gap using a template
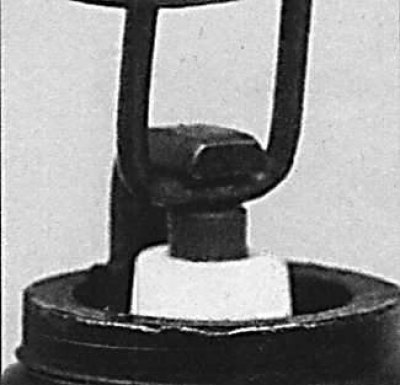
Adjustment of the interelectrode gap of the spark plug by bending the side electrode of the spark plug
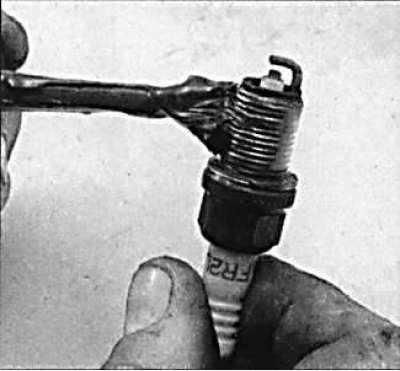
To replace spark plugs, you must use a special spark plug wrench with a rubber sealing ring that allows you to remove the unscrewed spark plug from the socket.
1. Gather together all the necessary tools to replace the spark plugs.
2. Check and, if necessary, adjust the electrode gap in new candles.
Removing
 |  |
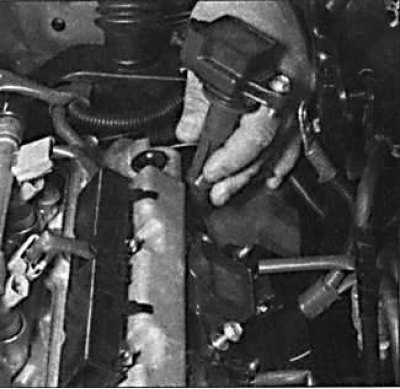
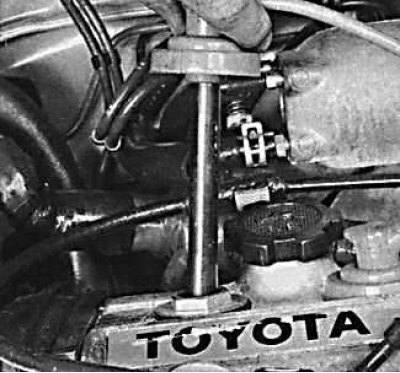
1. On engines V6 unscrew two bolts of fastening of a cover of spark plugs. To access the rear spark plugs on V6 engines, disconnect the hoses and move them to the side.
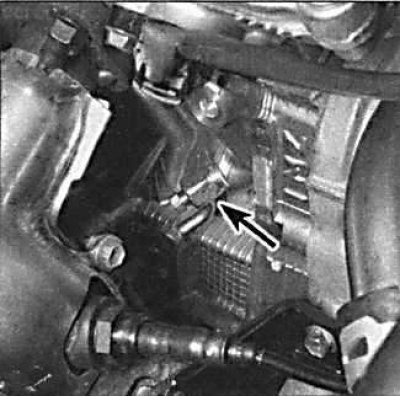
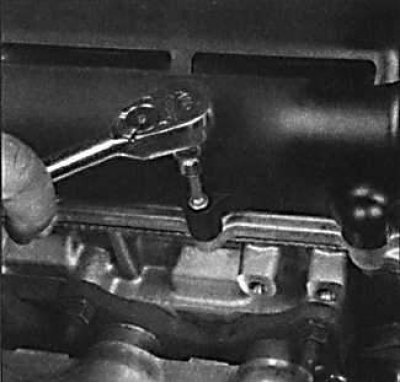
2. Unscrew the bolt securing the ignition coil with high voltage wire on the 1 MZ-FE engine.
 |  |
3. Remove the ignition coil with high voltage wire.
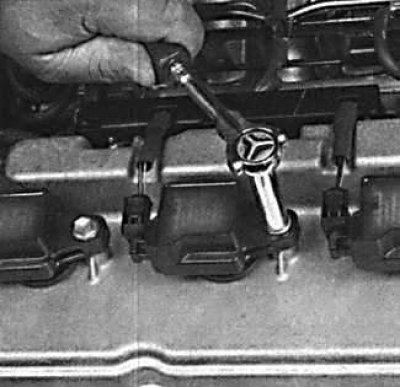
4. To access the rear spark plugs on V6 engines, unscrew the spark plug cap bolts and remove the cap.
5. In order not to mix up the high-voltage wires, replace the spark plugs in turn. When removing high-voltage wires from spark plugs, do not pull on the wire, but on the protective cover.
6. Clean the spark plugs using compressed air to prevent dirt from entering the engine cylinders after the spark plugs are removed.
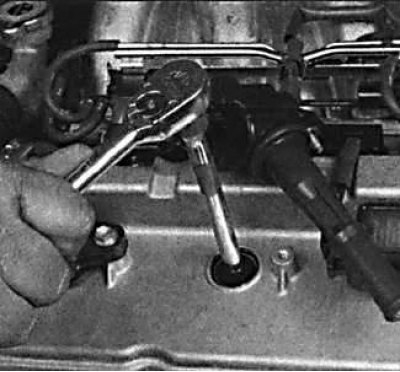
7. Unscrew the spark plugs using a spark plug wrench.
8. Visual inspection of the working part of the spark plugs can show the condition of the engine. If the nose of the spark plug insulator is clean and white with no deposits, then the mixture is too lean. It also indicates that the spark plug is too hot, i.e. heat is slowly removed from the center electrode. If this is the case, then you need to adjust the composition of the mixture or replace the candle. If the nose of the candle insulator is covered with a black coating, then this indicates that the mixture is too rich. If the plaque is black and oily, then this indicates engine wear and the need to check and repair it. If the nose of the insulator is covered with a light brown coating, then the mixture is optimal and the engine is in good condition.
9. The gap between the electrodes of a spark plug is important, because too large or too small a gap changes the size of the spark, which leads to a decrease in engine efficiency. The gap must always comply with the technical requirements.
Installation
1. Before installing the spark plug in the engine, check that the threads are clean and that all threads are intact. Apply a thin layer of non-stick material to the threads of the spark plug.
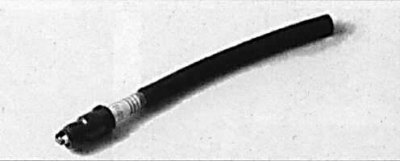
2. To screw the spark plug several turns, you can use a piece of rubber hose, into which, on one side, insert the spark plug insulator and, turning the hose, wrap the spark plug a few turns, then you need to remove the hose and screw the spark plug to the required torque.
Checking and replacing high-voltage wires and distributor parts
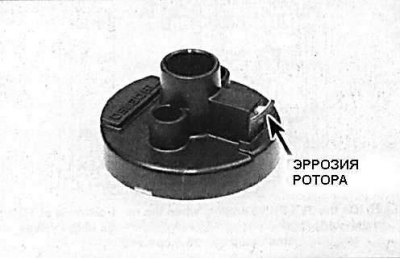
The main defect of the distributor rotor
1. Check the condition of the high-voltage wires, which must be clean and dry, and must not show signs of electrical breakdown and oxidation.
2. Check the internal condition of the spark plug tip, which should show no signs of corrosion, which is a hard white powder.
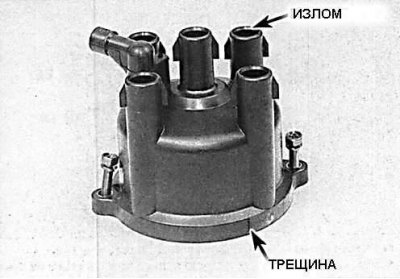
3. Unscrew the two bolts and remove the distributor cover. Wipe the cover thoroughly and check for corrosion of the electrodes.
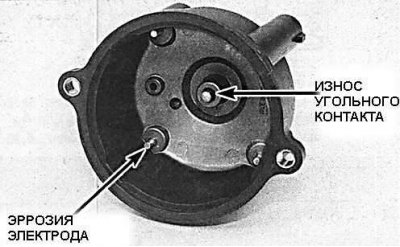
4. Also check the carbon contact in the center of the distributor cap.
5. Remove the distributor rotor and examine it for cracks and carbon tracks.
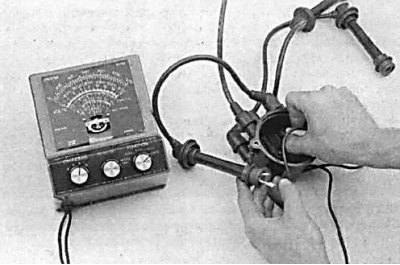
6. Install the high voltage wires on the distributor cap and check the resistance between the high voltage wire tip and ground electrode on the distributor cap. If the resistance exceeds the allowable limits, the distributor cap and/or high voltage wire must be replaced.