
Windshield wiper blades
Regularly check the efficiency of the wiper blades. Wipe dirty wiper blades with a soft cloth and a special agent.
Replace brushes that have hardened, cracked, or silicone coated rubber bands.
1. Raise the wiper arm off the windshield.
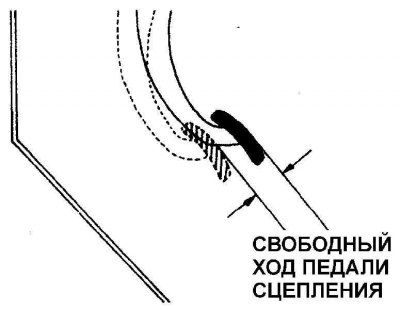
Checking free play and clutch pedal height
Elements for adjusting the free play and the height of the clutch pedal
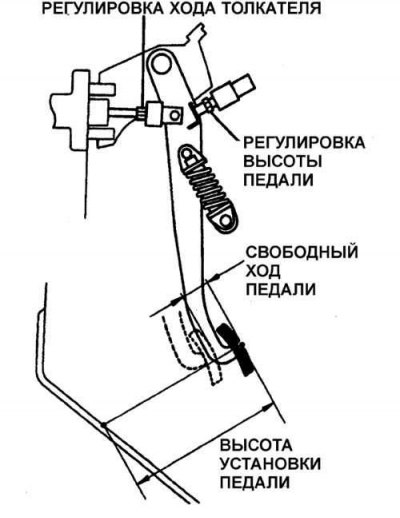
1. Install a steel ruler near the clutch pedal and measure the height of the clutch pedal. Depress the clutch pedal until you feel resistance and measure the clutch pedal free play.
2. Loosen the locknut on the end of the clutch pusher.
3. By turning the clutch pusher, set the clutch pedal free play within the required limits.
4. Tighten locknut.
5. After adjusting the clutch pedal free play, check the pedal installation height.
6. If the clutch pedal height is not correct, loosen the locknut and turn the stop bolt until the desired clutch pedal height is reached. Tighten locknut.
Battery check and maintenance
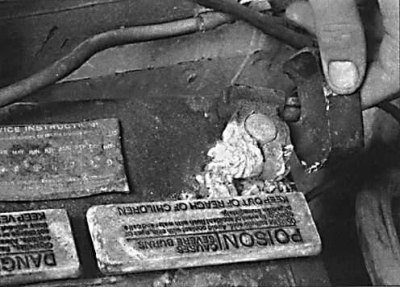
Warning! The electrolyte in the battery is a poisonous and corrosive acid. Therefore, it is necessary to avoid contact of the electrolyte with eyes, skin, painted surfaces, etc. In the event of an electrolyte spill, flush the area with copious amounts of cold water. If the electrolyte comes into contact with the eyes, after rinsing the eyes with water, seek medical attention immediately.
Attention! Hydrogen is generated during battery operation, so never smoke or handle open flames or sparks in the immediate vicinity of the battery.
Attention! Always disconnect the negative cable from the battery before working on electrical equipment. This will prevent unintentional short circuits from occurring.
Attention! Never disconnect the wires from the battery while the engine is running.
Attention! Always disconnect the battery wires when charging the battery using an external charger.
Attention! Always disconnect the wires from the battery and the wires from the alternator while repairing the vehicle using electric welding devices.
Attention! If the radio has an anti-theft code, by disconnecting the battery, check that you have the connection codes.
Attention! On models since 1993, the airbag system is disabled if the battery is disconnected for an extended period. If the airbag warning light comes on and stays on after reconnecting the battery, take it to a specialist workshop to restore the system to normal.
Tools and Materials Required for Battery Maintenance
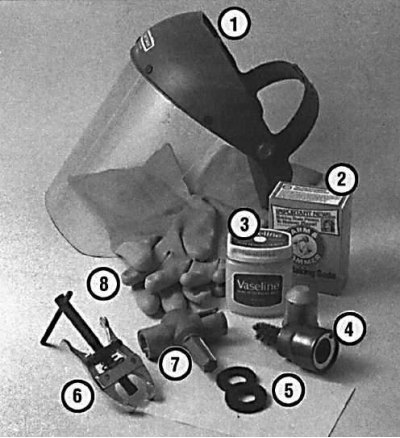
1 - a shield necessary to ensure that the electrolyte does not get on the face; 2 - soda. Soda diluted in water is necessary to neutralize the spilled electrolyte; 3 - vaseline. Used to protect battery terminals from corrosion; 4 - wire brush. It is necessary to remove traces of corrosion from the battery terminals and wires; 5 - plastic washers. Installed on the battery under the wire terminals; 6 - puller. Used to remove terminals from the battery; 7 - a kind of wire brush used to clean the battery terminals; 8 - rubber gloves to be used when working with electrolyte
Removing the wire terminal from the battery
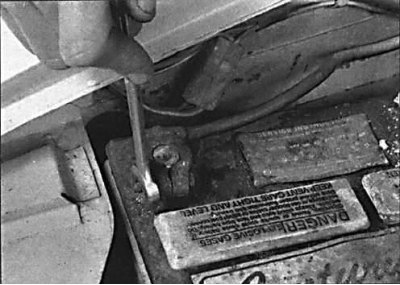
1. Gather together all necessary tools and materials before servicing the battery.
 |  |
2. The cleanliness of the battery, and especially its top surface, is especially important, since the dirt layer that accumulates on it easily forms electrically conductive paths that lead to battery self-discharge. Cleanliness is important not only for a serviceable battery, but also for a maintenance-free battery, which, despite its name, is not completely maintenance-free.
3. Using a metal brush, clean the battery terminals and wire terminals. If necessary, rinse the terminals with a solution of baking soda and warm water. Be careful not to let the baking soda solution get into the battery banks.
|  |
4. Clean the battery terminals until a light shiny metal appears.
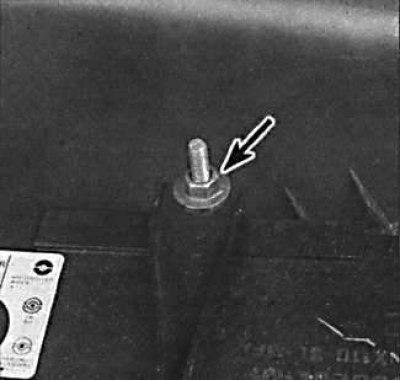
5. Check that the battery retainer nuts are securely tightened. Do not overtighten the nuts as the battery housing may be damaged.
6. Lubricate the terminals with acid-free Vaseline and anti-corrosion compound before connecting the battery clamps.
Accumulator charging
During normal use, the battery does not need to be recharged from external sources. Only for extended periods of inactivity does the battery need to be recharged every 6 weeks. Recharging may also be required when the vehicle is mainly used for short trips at night. Otherwise, the need to recharge the battery indicates a malfunction of the battery or its charging circuit. When charging the battery, the temperature of the electrolyte in the battery should not exceed 38°C. if the battery becomes hot or there is vigorous gas evolution in the electrolyte, then charging should be stopped. Charging should be done with a constant current equal to 1/20 of the battery capacity. The end of charging is indicated by the intensive release of gases from the battery and the fact that the density of the electrolyte does not change over the last 3 hours of charging.
Checking and replacing the drive belt
Examination
The drive belts are located on the right side of the engine.
Depending on the configuration of the car and the engine installed in it, several drive belts are used. One belt is used to transmit torque from the crankshaft to the alternator and A/C compressor. If the vehicle is equipped with power steering, a separate belt is used to drive the power steering pump.
1. Open the cover that covers the belts and check the condition of the belts for cracks, delaminations and oiling. Replace belt if necessary.
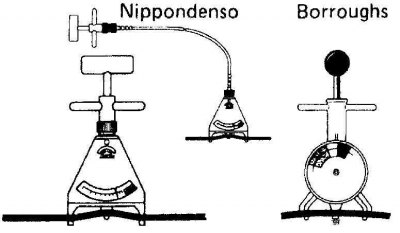
2. Use Nippondenso or Burroughs special tools to check drive belt tension. The tension for a new and used belt is different. A used belt is one that has been on the engine for more than 5 minutes.
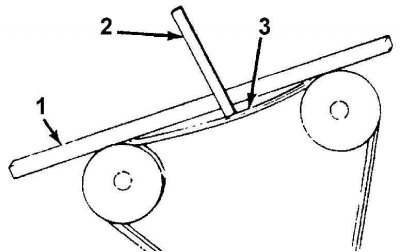
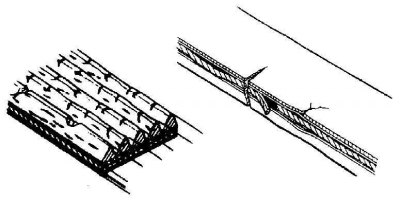
3. In the absence of special tools, the tension of the drive belt must be adjusted so that when the thumb is pressed on a long section of the belt, the deflection is approximately 5 mm if the distance between the central pulleys is about 250 mm, or 10 mm if the distance between the central pulleys is about 350 mm (1 - ruler, 2 - ruler, 3 - belt deflection).
Adjustment
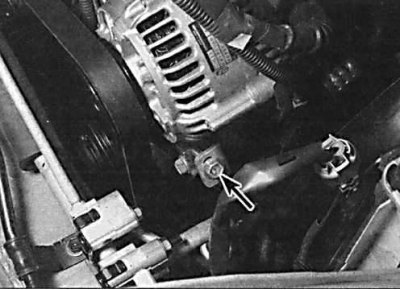
1. To adjust the tension of the alternator drive belt and the air conditioning compressor, loosen the alternator mounting pivot bolt, loosen the alternator mounting clamping bolt and adjust the drive belt tension by turning the adjusting bolt.
2. Adjust the tension of the power steering pump drive belt with the adjusting bolt that moves the pump away from the engine.
Replacement
1. Loosen the drive belt and remove it from the pulleys. If it is necessary to replace the power steering pump drive belt, the alternator and A/C compressor drive belt must first be removed.

2. Install drive belts on pulleys. In this case, the belts must be located exactly in the center of the pulleys. Adjust the tension of the drive belts.
Checking the tightness of the hoses and leakage of liquids
Defects in cooling system hoses
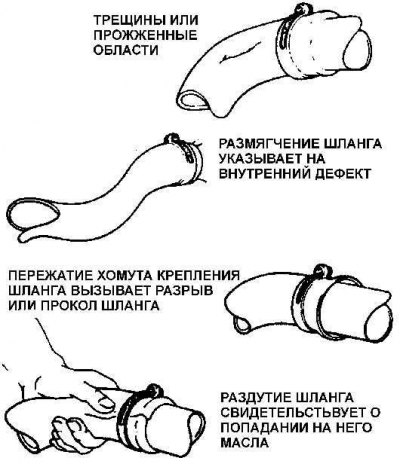
A leak in the cooling system is usually detected by a white or rust-colored coating in the area adjacent to the leak.
1. Carefully check the radiator and coolant hoses along their entire length. Replace hoses with cracks, tears or signs of ageing. Cracks are easier to find if the hose is pinched. Pay special attention to the clamps that attach the hoses to the elements of the cooling system. Hose clamps that have been overtightened can cause the hose to burst or puncture, resulting in leaks in the cooling system.
2. Inspect all components of the cooling system (hoses, connector surfaces, etc.) for leaks. If any problems of this nature are found with the components of the system, then replace this component or gasket.
Fuel hoses
A fuel leak is difficult to pinpoint until the leak is significant and therefore easily visible. Fuel tends to evaporate quickly as soon as it comes into contact with air, especially in a hot engine bay. Small drops may disappear before you can locate the leak. If you suspect that there is a fuel leak in the area of the engine compartment, then cool the engine and start it while it is cold with the hood open. Metal parts tend to shrink when cold, and rubber hoses tend to loosen up, so any leaks will be more obvious as the engine warms up from a cold start.
Carefully check all rubber hoses and metal fuel lines coming from the fuel tank. Check for loose connections, worn hoses, twisted fuel lines, and other damage. Pay special attention to vent pipes and hoses, which often kink around the filler hose and can become blocked, making the tank difficult to fill. Follow the fuel supply and return hoses to the front of the vehicle, carefully inspecting them completely for signs of damage or corrosion.
Unidentified fluid leaks
If there are indications that some fluid is leaking, but you cannot recognize the type of fluid or the exact origin, leave the vehicle for a long time and place a large piece of paper or rag under the vehicle. This will help locate the fluid leak and also help identify the leaking fluid by color. But keep in mind that some leaks may only show up when the engine is running.
Vacuum hoses
Although the braking system is hydraulic, the brake booster increases the amount of force applied to the brake pedal by exploiting the intake manifold vacuum created by the engine. The vacuum is transferred to the booster via a large section hose. Any leak in this hose will reduce the effectiveness of the braking system.
A leak in a vacuum hose means that air is being sucked into the hose rather than coming out of the hose, and this makes the leak very difficult to find. The detection method is to use an old vacuum hose as a kind of stethoscope. While doing so, hold one end of the hose close to your ear and use the other end to examine the area around the suspected leak. When the end of the hose is directly over the leak, a hissing sound will be clearly audible through the additional hose. Contact with hot and moving parts must be avoided, as the engine must be running during the test. Replace any leaking vacuum hoses found.
Checking the cooling system
1. Remove the radiator cap. To do this, turn the cover counterclockwise until the first fixation. Wait until the residual pressure in the cooling system is relieved, then press the cover down and in this position turn counterclockwise and remove the cover.
2. Check the condition of the cooling system hoses. Replace hoses if any defects are found. It is advisable to replace the hoses, regardless of their condition, every two years.
3. Coolant leaks are usually identified by a white coating.
4. Flush or blow out the outer surface of the radiator.
Changing the installation position of the tires
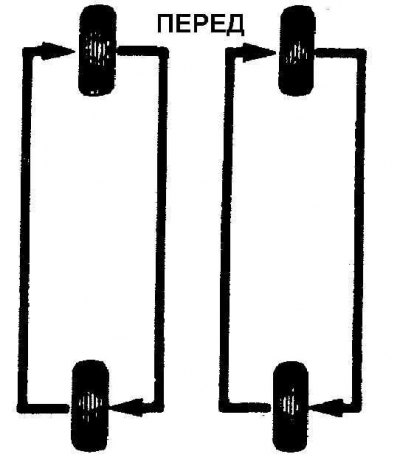
Wheel swap diagram
Tires should be swapped at regular intervals or when there is tread wear on one of the tires.
Inspect the condition of the brakes every time you remove a wheel.