
Company Honda Company Ford Company Skoda Company Kia Company Mazda Company Mercedes Company Renault
English Русский
Български
Беларускі
Український
Српски
Hrvatski
Română
Polski
Slovenský
Magyar
Bookmark Articles Sitemap Contacts
ToyotaMan.ru


Camry Corolla Corona Carina Land Cruiser Highlander 4Runner RAV4 Others
Camry XV30 (2001-2006) Camry XV20 (1996-2001) Camry XV10 (1991-1996) Camry Vista V40 (1994-1998)

Injectors — removal and installation [Toyota Camry Vista-V40]

  • Main
  • Camry
  • Vista-V40 (1994-1998)
  • Power unit
  • Fuel injection (petrol)
  • Injectors — removal and installation
0
Contents: Checking on the engine ↓ Removal injectors ↓ Checking the injectors ↓ Installation of injectors ↓

Checking on the engine


1. Check the functionality of the injectors by ear.

a) With the engine running or when turning it over with the starter, use a phonendoscope to check by ear (by the sound of injected fuel) in the performance of the injectors, making sure that the injection frequency is proportional to the engine crankshaft speed.

b) If you don't have a phonendoscope, you can check the functionality of the injectors by touching them with your finger or a screwdriver.

If there is no sound or if it is unusual in nature, check the wiring, connector, injector, additional resistance of the injector, or the presence of a control signal from the electronic control unit.

2. Check the injector resistance. Disconnect the injector connector and use an ohmmeter to measure the injector resistance.
  • Nominal resistance at 20°C - 13.4-14.2 Ohm
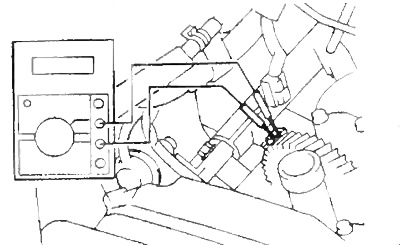


If the resistance value is outside the specified range, replace the injector. Reconnect the injector connector.

Removal injectors


1. Disconnect the (-) cable from the negative battery terminal.


2. Disconnect the accelerator cable and the throttle cable (from the automatic transmission).

3. Remove the bracket and coolant bypass hoses.
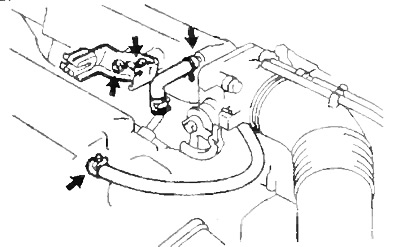


4. Disconnect the power steering hoses and remove the wiring protection.
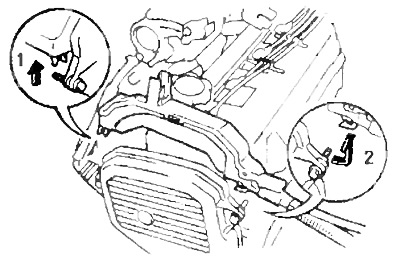


5. Unscrew the 4 caps from the cylinder head and remove the seals.
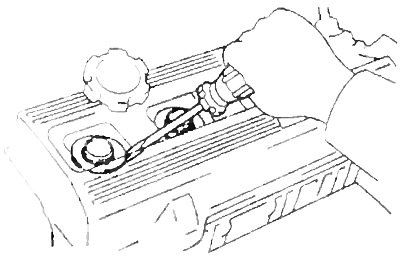


6. Disconnect the injector connectors.
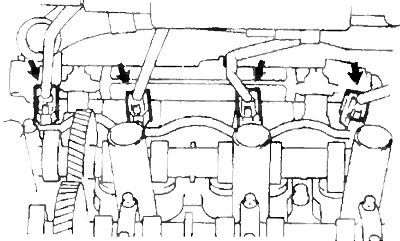


7. Remove the fuel manifold and injectors.

a) Loosen the bolts securing the fuel manifold to the cylinder head.
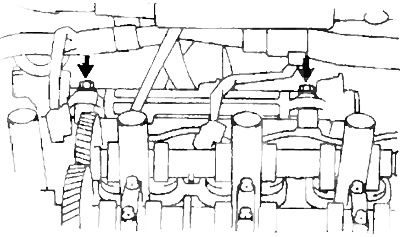


b) Remove the fuel manifold together with the injectors.

Note: Handle the nozzles carefully and do not allow them to fall.


c) Remove the insulators and spacers from the cylinder head.

d) Remove the four injectors from the fuel manifold.

d) Remove the O-ring and protective sleeve from each injector.

Checking the injectors


1. Inspect the injectors, use a match to check if there is dirt on the inlet mesh, if there is, blow it out with air.

2. Check the quality of injection by the injectors.

Note: Avoid sparking during testing. Keep a fire extinguisher handy.


a) Prepare the necessary service tools and assemble a circuit for checking the injectors.


b) Install the nozzle in a measuring container. Put a suitable vinyl hose on the nozzle to prevent fuel splashing.
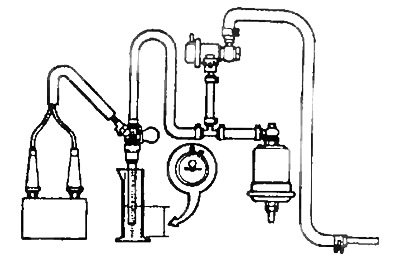


Injector testing scheme


c) Connect the wire to the negative (-) terminal of the battery and turn on the ignition.

Note: Do not start the engine.


d) Use a jumper to short-circuit the "FP" and "+B" terminals of the diagnostic connector.

k) Connect the service cable to the injector and the battery for 15 s, measure the volume of fuel injected into the measuring vessel. Repeat the test 2-3 times for each injector.
  • The volume of injected fuel is 49-52 cm³ in 15 sec
  • The difference in flow between nozzles is up to 5 cm³

If the fuel supply is outside the acceptable range, replace the injector.

d) After completing the previous check, disconnect the wires from the battery and check for fuel leakage through the injector.

Leakage no more than 1 drop per 1 minute

Installation of injectors


1. Install the injectors and fuel manifold.

a) Install a new sealing sleeve on the injector (if you filmed).

b) Apply a thin layer of fuel (lithol) to the new O-ring and install it on the injector.
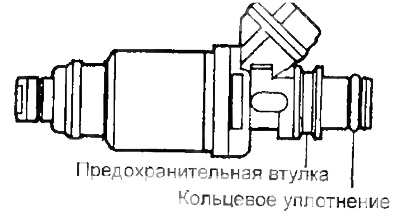


c) Rotate the injectors and insert them into the fuel manifold.
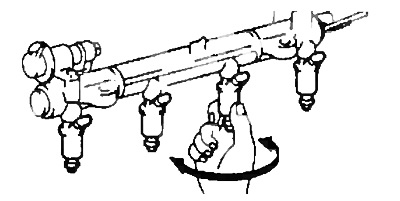


d) Install (better stick it) insulators and spacers.

d) Install the injectors together with the fuel manifold onto the intake manifold. Gradually tighten the bolts securing the fuel manifold to the intake manifold.

e) Make sure that the injectors rotate in their seats without sticking.

Note: If the injectors do not turn, the O-rings may be installed incorrectly. Replace the O-rings.


g) Install the injectors so that their connectors are on top.

c) Bolt the fuel manifold to the cylinder head.
  • Tightening torque - 17 Nm

2. Connect the injector electrical connectors.

3. Apply sealant to the cylinder head as shown in the figure.
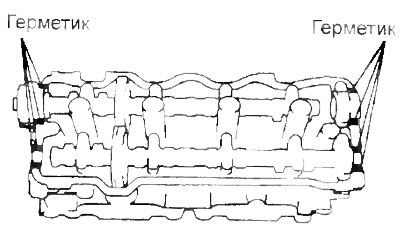


4. Install the caps and seals into the cylinder head cover.
  • Tightening torque - 23 Nm

5. Install the wiring protection and connect the power steering hose.


6. Connect the coolant bypass hoses and install the bracket.

7. Connect the accelerator cable and the throttle cable from the automatic transmission.
This article is available at: russian, bulgarian, belarusian, ukrainian, serbian, croatian, romanian, polish, slovak, hungarian
The article material has been checked: Mitrofanova Elena
Share information:
◀ Previous
Camry Vista V40: Fuel injection (petrol)
Next ▶

Fuel pressure regulator
Fuel pump
Electronic control unit outputs
Electronic Fuel Injection Control System Test Procedure
Troubleshooting with a Voltmeter
Air supply system
Throttle body
Valve of the idle speed control system
Electronic control system
Traction Control (TRC)
Similar articles on other Toyota models

➥ Removal and installation injectors Toyota Corolla E80 (1983-1990)
➥ Checking fuel injectors on the engine Toyota Corona T190 (1992-1997)
➥ Removal injectors Toyota Carina T190 (1992-1996)
➥ Fuel distributor and injectors — removal, inspection and… Toyota Cruiser 60/80 (1980-1997, petrol)
➥ Fuel rail and injectors — removal and installation Toyota Highlander 1 (2000-2007, petrol)
➥ Fuel distributor and injectors — check and replacement Toyota 4Runner N120 (1989-1995)
Link in different formats to this article
Comments and feedback from visitors
No comments yet


Add two numbers 15 + 20


Camry XV30 (2001-2006) 
  • User manual
  • Vehicle description
  • Keys, locks and alarms
  • Governing bodies
  • Salon equipment
  • Driving and operation
  • Maintenance
  • Power unit
  • 4-cylinder engine
  • Control system (I4)
  • Engine overhaul (I4)
  • 6-cylinder engine
  • Control system (V6)
  • Engine overhaul (V6)
  • Transmission
  • Clutch
  • Mechanical gearbox
  • Automatic gearbox
  • Drive mechanism
  • Chassis, running gear
  • Wheels and tires
  • Car suspension
  • Steering
  • Brake system
  • Body and interior
  • Exterior (external elements)
  • Doors, locks and windows
  • Air conditioning and heater
  • Electrical equipment
  • Equipment and devices
  • Power devices
  • Electrical circuits
Camry XV20 (1996-2001) 
  • General information
  • Controls and instruments
  • Driving and operation
  • Daily care
  • Maintenance
  • Power unit
  • 4-cylinder engine
  • 6-cylinder engine
  • Engine overhaul
  • Engine electrical equipment
  • Cooling system
  • Heating and ventilation
  • Fuel system
  • Exhaust system
  • Transmission
  • Mechanical gearbox
  • Automatic gearbox
  • Clutch
  • Chassis, running gear
  • Suspension and axle shafts
  • Steering
  • Brake system
  • Body and interior
  • Exterior (external elements)
  • Interior (internal elements)
  • Doors, locks and windows
  • Electrical equipment
  • Equipment and devices
  • Electrical circuits
Camry XV10 (1991-1996) 
  • General information
  • User manual
  • Maintenance
  • Power unit
  • 4-cylinder engine
  • 6-cylinder engine
  • Overhaul of engines
  • Cooling and heating
  • Fuel system
  • Engine electrical equipment
  • Control system
  • Transmission
  • Mechanical gearbox
  • Automatic gearbox
  • Clutch and drive shafts
  • Chassis, running gear
  • Brake system
  • Car suspension
  • Steering
  • Body and interior
  • Exterior (external elements)
  • Interior (internal elements)
  • Doors, locks and windows
  • Electrical equipment
  • Equipment and devices
  • Headlights and lighting
  • Electrical circuits
Camry Vista V40 (1994-1998) 
  • General information
  • User manual
  • Maintenance
  • Power unit
  • Petrol engines
  • Diesel engines
  • Engine overhaul
  • Cooling and lubrication system
  • Fuel system (diesel)
  • Fuel injection (petrol)
  • Engine electrical equipment
  • Transmission
  • Clutch and cardan
  • Automatic gearbox
  • Chassis, running gear
  • Front suspension
  • Rear suspension
  • Steering
  • Brake system
  • Body and interior
  • Body elements
  • Air conditioning and heater
  • SRS security system
  • Electrical equipment
  • Equipment and devices
  • Electrical circuits
ToyotaMan.ru © 2018–2026 • Mobile version • Interesting about Toyota • Administration • Sitemap: EN BG BY UA RS HR RO PL SK HU • Search system • Bookmark
Camry Vista-V40 • Camry XV10 • Camry XV20 • Camry XV30 • Corolla Verso-AR10 • Corolla E80 • Corona T190 • Carina T170 • Carina T190 • Land Cruiser J70 (diesel) • Land Cruiser J60 (petrol) • Land Cruiser J100 • Highlander XU20 (petrol) • 4Runner N120 • RAV4 XA10 • RAV4 XA20 • Duet M100 • Dyna Y50 •
We require cookies to enable some interactive features. Is that ok with you?