
Company Honda Company Ford Company Skoda Company Kia Company Mazda Company Mercedes Company Renault
English Русский
Български
Беларускі
Український
Српски
Hrvatski
Română
Polski
Slovenský
Magyar
Bookmark Articles Sitemap Contacts
ToyotaMan.ru


Camry Corolla Corona Carina Land Cruiser Highlander 4Runner RAV4 Others
Camry XV30 (2001-2006) Camry XV20 (1996-2001) Camry XV10 (1991-1996) Camry Vista V40 (1994-1998)

Checking, removing and installing the brake booster [Toyota Camry XV30]

  • Main
  • Camry
  • XV30 (2001-2006)
  • Chassis, running gear
  • Brake system
  • Checking, removing and installing the brake booster
0
Contents: Checking the operation of the vacuum…↓ Checking for leaks ↓ Removal ↓ Checking and adjusting the length of…↓ Installation ↓
The brake booster, located on the firewall, operates using the vacuum in the intake manifold and atmospheric pressure. After completing each operation that involved removing any of the brake system components, perform a test drive to check the operation of the vehicle's brakes. Test the brakes while driving on a clean, dry, and level road. Other test conditions may result in inaccurate results. Test the brakes at various speeds, with both low and high brake loads. The vehicle should stop smoothly, without pulling to one side. Avoid locking the brakes, as this will damage the tires and reduce braking efficiency and control.

The operation of the brakes is also affected by the condition of the tires, the vehicle load and the alignment angles of the front wheels.

Checking the operation of the vacuum booster


Release any vacuum with the engine off by depressing the brake pedal several times at 5-second intervals. With the brake pedal fully depressed, start the engine. Make sure that the gap between the brake pedal and the floor panel decreases as the engine vacuum stabilizes.

Checking for leaks


Start the engine and let it idle for about 1 minute. Shut it off by applying vacuum to the booster. Press the brake pedal several times with normal force and release the existing vacuum. Make sure that when you press the brake pedal, the gap between the brake pedal and the floor panel gradually increases. Start the engine. Press the brake pedal and hold it down, then shut off the engine. Hold the pedal down for about 30 seconds or more and make sure that the pedal travel does not change.


Removal


Do not deform or bend the brake pipes and hoses when removing and installing the brake booster. Replace the clevis pin if it is damaged. Do not damage the threads of the brake booster studs. If it is tilted during installation, the threads can be damaged by the partition.

[The original can be found on this resource: ToyotaMan]

Disconnect the vacuum lines from the brake booster.

Remove the master cylinder.

Remove the cotter pin and pin from the shackle on the passenger side. Remove the pressure rod from the brake pedal.

Remove the brake booster and brake pedal assembly mounting nuts.

Remove the brake booster from the engine compartment.

Checking and adjusting the length of the protruding rod


Using a hand vacuum pump, create a vacuum in the brake booster of 66.7 kPa (500 mm Hg.).
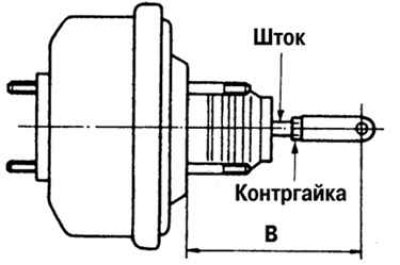


Fig. 6.29. Adjusting the length of the push rod


Loosen the lock nut and adjust the length of the push rod so that length "B" becomes equal to the specified value (Fig. 6.29).

Adjust until the gap between the protruding part of the stem and the screw is 0 mm - nominal length with a vacuum gauge reading of 66.7 kPa (500 mm Hg.)


Installation


After adjusting the length "B", temporarily tighten the lock nut and install the brake booster on the vehicle.

Connect the brake pedal to the push rod earring.

Install the mounting nuts onto the brake pedal assembly and tighten to the specified torque.

Connect the master cylinder to the brake booster.

Adjust the height and free travel of the brake pedal.

Tighten the push rod lock nut to the required torque.

Remove air.
This article is available at: russian, bulgarian, belarusian, ukrainian, serbian, croatian, romanian, polish, slovak, hungarian
The article material has been checked: Evdokimov Evgeniy
Share information:
◀ Previous
Camry XV30: Brake system
Next ▶

Checking and installing the master brake cylinder
Disassembling the master brake cylinder
Removal the master brake cylinder
Checking and adjusting the parking brake
Bleeding the ABS/VSC pressure modulator
Replacing the front brake pads, removing, disassembling and installing the…
Replacing rear brake pads, removing, disassembling and installing rear…
Disassembly, inspection and assembly of the parking brake mechanism
Removal and installation the front wheel speed sensor
Removal and installation the pressure modulator
Similar articles on other Toyota models

➥ Checking, removing and installing the brake booster Toyota Cruiser 100 (1998-2007)
➥ Brake light switch (contact sensor) — checking, removing… Toyota RAV 4 XA20 (2000-2005)
➥ Checking, removing and installing the coolant temperature… Toyota Corolla E80 (1983-1990)
➥ Installing a vacuum brake booster Toyota Corona T190 (1992-1997)
➥ Checking the brake booster check valve Toyota Carina T190 (1992-1996)
➥ Vacuum brake booster — checking, removal and installation Toyota Highlander 1 (2000-2007, petrol)
Link in different formats to this article
Comments and feedback from visitors
No comments yet


Add two numbers 46 + 13


Camry XV30 (2001-2006) 
  • User manual
  • Vehicle description
  • Keys, locks and alarms
  • Governing bodies
  • Salon equipment
  • Driving and operation
  • Maintenance
  • Power unit
  • 4-cylinder engine
  • Control system (I4)
  • Engine overhaul (I4)
  • 6-cylinder engine
  • Control system (V6)
  • Engine overhaul (V6)
  • Transmission
  • Clutch
  • Mechanical gearbox
  • Automatic gearbox
  • Drive mechanism
  • Chassis, running gear
  • Wheels and tires
  • Car suspension
  • Steering
  • Brake system
  • Body and interior
  • Exterior (external elements)
  • Doors, locks and windows
  • Air conditioning and heater
  • Electrical equipment
  • Equipment and devices
  • Power devices
  • Electrical circuits
Camry XV20 (1996-2001) 
  • General information
  • Controls and instruments
  • Driving and operation
  • Daily care
  • Maintenance
  • Power unit
  • 4-cylinder engine
  • 6-cylinder engine
  • Engine overhaul
  • Engine electrical equipment
  • Cooling system
  • Heating and ventilation
  • Fuel system
  • Exhaust system
  • Transmission
  • Mechanical gearbox
  • Automatic gearbox
  • Clutch
  • Chassis, running gear
  • Suspension and axle shafts
  • Steering
  • Brake system
  • Body and interior
  • Exterior (external elements)
  • Interior (internal elements)
  • Doors, locks and windows
  • Electrical equipment
  • Equipment and devices
  • Electrical circuits
Camry XV10 (1991-1996) 
  • General information
  • User manual
  • Maintenance
  • Power unit
  • 4-cylinder engine
  • 6-cylinder engine
  • Overhaul of engines
  • Cooling and heating
  • Fuel system
  • Engine electrical equipment
  • Control system
  • Transmission
  • Mechanical gearbox
  • Automatic gearbox
  • Clutch and drive shafts
  • Chassis, running gear
  • Brake system
  • Car suspension
  • Steering
  • Body and interior
  • Exterior (external elements)
  • Interior (internal elements)
  • Doors, locks and windows
  • Electrical equipment
  • Equipment and devices
  • Headlights and lighting
  • Electrical circuits
Camry Vista V40 (1994-1998) 
  • General information
  • User manual
  • Maintenance
  • Power unit
  • Petrol engines
  • Diesel engines
  • Engine overhaul
  • Cooling and lubrication system
  • Fuel system (diesel)
  • Fuel injection (petrol)
  • Engine electrical equipment
  • Transmission
  • Clutch and cardan
  • Automatic gearbox
  • Chassis, running gear
  • Front suspension
  • Rear suspension
  • Steering
  • Brake system
  • Body and interior
  • Body elements
  • Air conditioning and heater
  • SRS security system
  • Electrical equipment
  • Equipment and devices
  • Electrical circuits
ToyotaMan.ru © 2018–2026 • Mobile version • Interesting about Toyota • Administration • Sitemap: EN BG BY UA RS HR RO PL SK HU • Search system • Bookmark
Camry Vista-V40 • Camry XV10 • Camry XV20 • Camry XV30 • Corolla Verso-AR10 • Corolla E80 • Corona T190 • Carina T170 • Carina T190 • Land Cruiser J70 (diesel) • Land Cruiser J60 (petrol) • Land Cruiser J100 • Highlander XU20 (petrol) • 4Runner N120 • RAV4 XA10 • RAV4 XA20 • Duet M100 • Dyna Y50 •
We require cookies to enable some interactive features. Is that ok with you?