
Removing
1. Remove the inspection hole plug and check the thickness of the brake pads through it.
- Minimum thickness - 1.0 mm
If the thickness of the lining is less than the minimum, then replace the brake pads.
2. Remove the rear wheel.
3. Remove the brake drum.
Note: If the brake drum does not come off easily, follow these procedures:
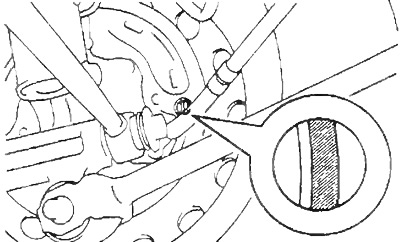
- A) Insert a screwdriver into the inspection hole of the brake shield and move the auto adjuster lever away from the adjuster.
- b) Using another screwdriver, turn the automatic adjuster to reduce its length.
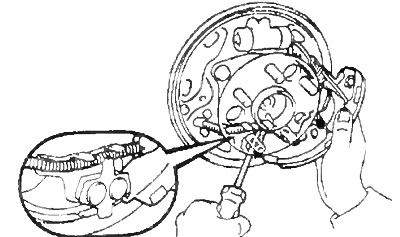
4. Remove the front brake shoe.
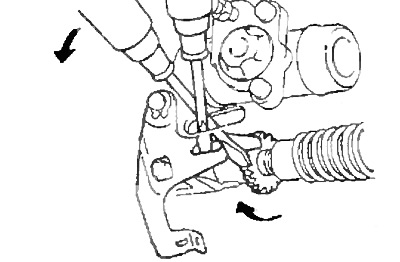
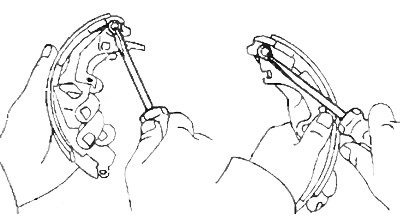
A) Using the special tool, disconnect the return spring.
b) Using the special tool, remove the retainer spring, spring seats, and retainer.

V) Disconnect the retaining spring from the front brake shoe and remove the front brake shoe.
G) Remove the retaining spring from the rear brake shoe.
5. Remove the rear brake shoe.
A) Using the special tool, remove the retainer spring, spring seats, and retainer.
b) Using pliers, remove the auto adjust lever spring.
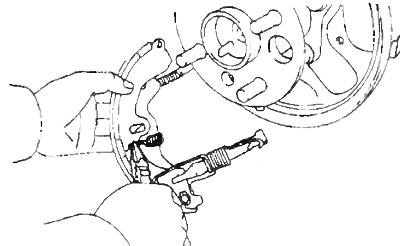
V) Remove the automatic regulator.
G) Using pliers, disconnect the cable from the parking brake lever, and remove the rear shoe.
6. Remove the automatic governor and parking brake levers.
A) Remove the snap ring.
b) Remove the auto adjust lever.
V) Remove the snap ring.
G) Remove the parking brake lever.
7. Remove the wheel brake cylinder.
A) Using the special tool, disconnect the brake pipe. Drain the brake fluid into a container.
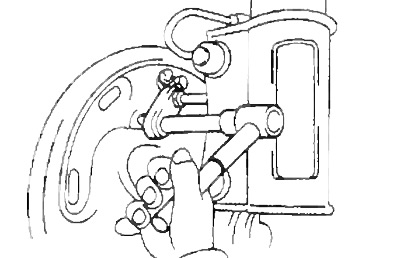
b) Remove 2 bolts and remove the wheel brake cylinder.
8. Disassemble the wheel brake cylinder.
Remove the following parts:
- cap,
- union,
- two anthers, two pistons,
- two cuffs,
- spring.
Checking details
1. Check the removed parts for wear, rust and damage.
2. Measure the thickness of the brake pads.
- Nominal thickness - 4.0 mm
- Minimum allowable - 1.0 mm
If the thickness of the pads is less than the minimum or they have uneven wear, then replace the brake pads.
Note: If any brake pad needs to be replaced, replace all rear brake pads.
3. Measure the inside diameter of the brake drum.
- Nominal diameter - 200.0 mm
- Maximum allowable - 201.0 mm
If the drum is worn or damaged, it can be machined to the maximum allowable inner diameter.
4. Check up tightness of an overlay of a brake shoe to a drum.
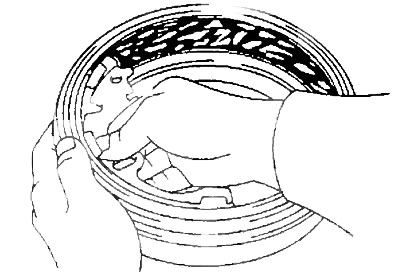
If the contact between the working surfaces is poor, then replace the brake pads.

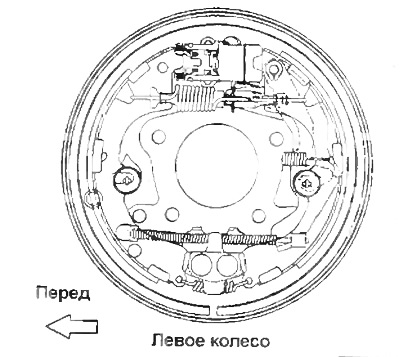
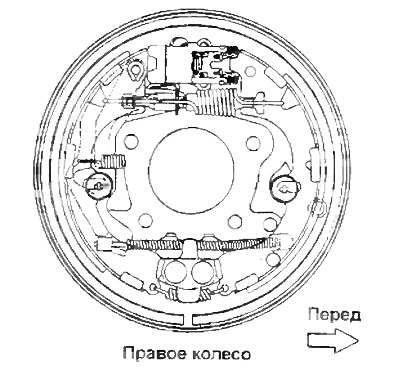
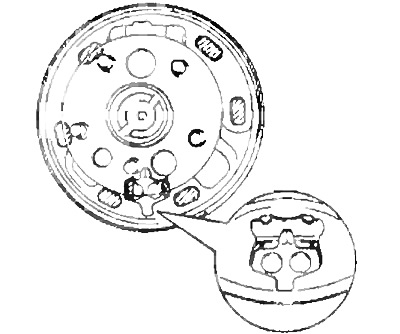
Rear drum brakes.
1 - cork,
2, 22 - holder,
3, 9 - anther,
4, 8 - piston,
5 - cap,
6 - fitting,
7 - cuff,
10 - spring,
11, 15 - retaining ring,
12 - automatic regulator lever,
13 - parking brake lever,
14 - adjusting gasket,
16 - spring seat,
17 - holder spring,
18 - brake drum,
19 - automatic regulator,
20 - return spring,
21 - fixing spring,
23 - brake shoe.
Installation
Note: install the parts as shown in the picture.
 |  |
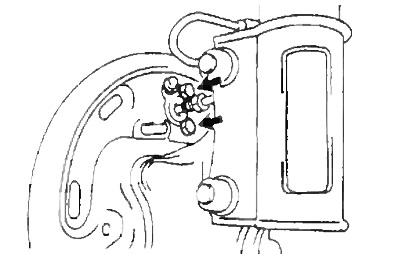
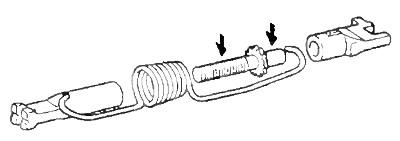
1. Apply grease to the parts indicated by the arrows in the figure.
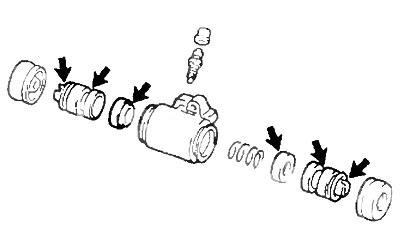
2. Assemble the wheel brake cylinder.
A) Install two new cuffs.
b) Install the spring and two pistons into the cylinder. Make sure the piston flanges are facing inward.
V) Install two dusters.
G) Install the fitting and cap.
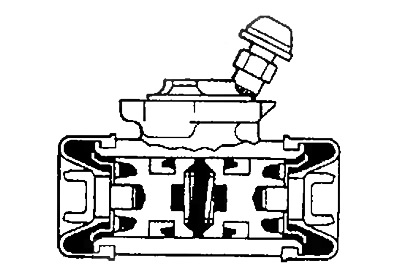
3. Install the wheel brake cylinder on the brake shield and tighten the 2 bolts.
- Tightening torque - 10 Nm
4. Using the special tool, connect the brake pipe to the wheel brake cylinder.
- Tightening torque - 15 Nm
5. Apply high temperature grease to the following parts:
A) The contact surfaces of the brake pad and the brake shield.
b) Contact surfaces of retaining plate and brake pad.
V) Bolt of the automatic regulator.
G) The contact surfaces of the automatic governor and the brake shoe.
6. Using a feeler gauge, measure the clearance between the brake shoe and arm as shown.
- Nominal clearance - 0.35 mm
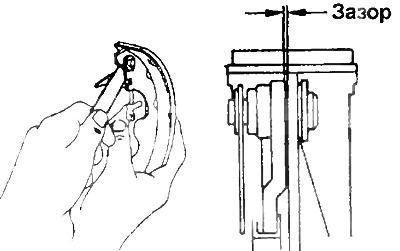
If the gap does not correspond to the nominal, then select the washer of the required thickness (see table below).
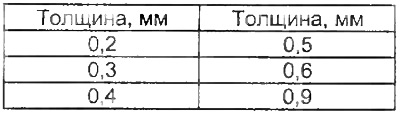
7. If necessary, replace the shim.
A) Remove the parking brake lever and install the matched washer.
b) Install the parking brake lever and a new circlip.
V) Install the auto adjust lever and a new circlip.
8. Install the auto adjuster and rear shoe.
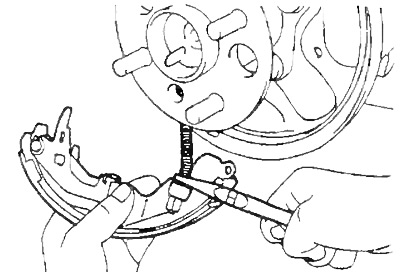
A) Using pliers, connect the parking brake cable to the lever.
b) Install the regulator and return spring.
V) Install the auto adjust lever spring.
G) Install the rear brake shoe with one end behind the retaining plate and the other end in the brake cylinder.
G) Using the special tool, install the retainer, spring seats and retainer spring.
Caution: Do not allow oil or grease to come into contact with friction surfaces.
9. Install the front brake shoe.
A) Install the retaining spring between the rear and front brake pads.
b) Install the front brake shoe with one end behind the retaining plate and the other end in the brake cylinder and auto adjuster.
Caution: Do not allow oil or grease to come into contact with friction surfaces.
V) Using the special tool, install the spring retainer, spring seats and retainer spring.
G) Using the special tool, connect the return spring.
10. Check up work of the mechanism of automatic adjustment of a backlash between pads and a drum.
A) Move the parking brake lever up and down. Make sure the automatic regulator works.
If the automatic regulator does not work, then check the correct assembly of the rear brakes.
b) Set the minimum possible length of the automatic adjuster.
V) Install the brake drum.
G) Tighten the parking brake lever until the ratchet clicks into place.
11. Checking the gap between the brake pads and the drum.
A) Remove the brake drum.
b) Measure the inside diameter of the drum and the diameter formed by the brake pads. Check if the obtained difference is in accordance with the nominal value.
- Nominal clearance - 0.6 mm
If the clearance is not within specification, check the parking brake system.
12. Install the brake drum.
13. Install the rear wheel.
- Tightening torque - 105 Nm
14. Fill the reservoir with brake fluid and bleed the brake system.
15. Check for leaks.