
Description of the diagnostic system
The electronic control unit has a fault protection system that detects a system malfunction. When a malfunction is detected, the electronic unit disables the ABS system and the ABS indicator lights up on the instrument cluster. In 4WD models, a deceleration sensor is used, which sends a signal to the ABS electronic control unit when braking.
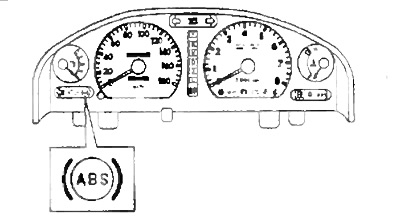
Analog instrument cluster
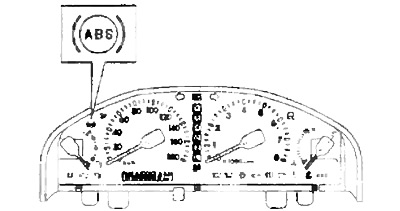
Analog/Digital Instrument Cluster
Checking the ABS system
1. Make sure the battery voltage is (with the ignition off) corresponds to the nominal value.
- Rated voltage - 10-14 V
2. Check the ABS indicator.
A) Turn on the ignition.
b) Make sure the indicator lights up for three seconds. If not, repair or replace (if necessary) fuse, indicator lamp and wiring harness.
3. Read the trouble code.
A) Turn on the ignition.
b) Short the leads "TWITH" And "E1" diagnostic socket.
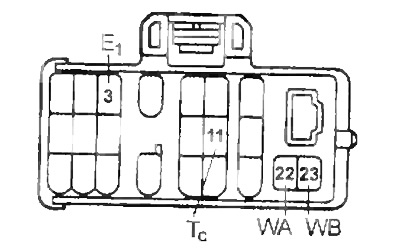
V) Make sure the jumper on the pins "WA" And "WB" the diagnostic connector is removed.
Note: on some models, the ABS system will only be diagnosed when the jumper is installed.
G) In the event of a malfunction, after 4 seconds the indicator will start flashing. Count the number of flashes.
Note:
- The fault code consists of two digits, the first digit is determined by the initial series of flashes, then after a pause of 1.5 seconds, a second series of flashes follows, which corresponds to the second digit of the code.
- If there are two or more fault codes, the smallest code will be displayed first, and then the rest, in ascending order. There will be a 2.5 second pause between codes.
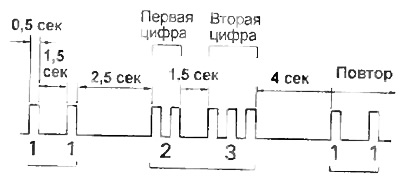
d) If there is no fault, the indicator will flash at 0.5 second intervals.
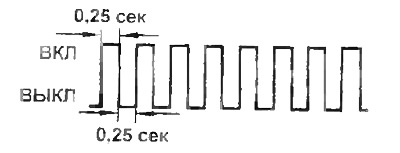
e) After troubleshooting, erase the codes stored in the electronic control unit.
Note: if you disconnect the battery, all fault codes stored in the electronic control unit will be erased.
and) Disconnect Leads "TWITH" And "E1" diagnostic socket.
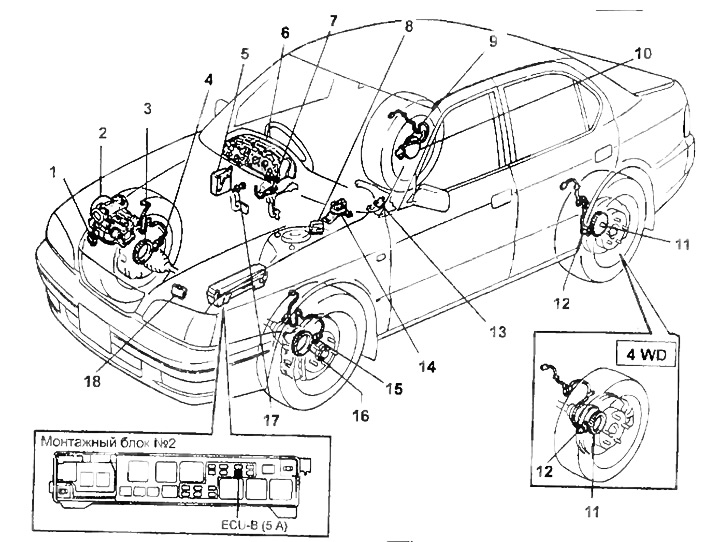
Anti-Lock Braking System (ABS)
1 - control relay (petrol engine models),
2 - pressure modulator,
3, 16 - sensor rotor,
4, 15 - front wheel speed sensor,
5 - ABS electronic control unit,
6 - ABS indicator,
7 - parking brake enable sensor (models with automatic transmission),
8 - diagnostic connector,
9, 12 - rear wheel speed sensor,
10, 11 - rotor to the sensor,
13 - parking brake enable sensor (models with manual transmission),
14 - deceleration sensor (4WD),
17 - brake light switch,
18 - control relay (diesel engine models).
h) Install a jumper on the pins "WA" And "WB".
And) Turn the ignition on and check that the ABS indicator comes on for three seconds and goes off.
Resetting DTCs
1. Method for resetting fault codes No. 1.
A) Turn on the ignition.
b) Short the leads "TWITH" And "E1" diagnostic socket.
Note: This operation must be carried out with the vehicle stationary.
V) Press the brake pedal eight or more times within 3 seconds to reset the fault codes stored in the memory of the ABS control unit.
G) Verify that the indicator flashes match the normal status code (interval 0.5 seconds).
d) Switch off the ignition.
e) Disconnect Leads "TWITH" And "E1" diagnostic socket.
and) Make sure the ABS indicator is off.
2. Method for resetting fault codes No. 2.
A) Switch off the ignition.
6) Remove the fuse "ECU-B" (5 A) for 10 seconds or more depending on the ambient temperature (the lower the temperature, the longer).
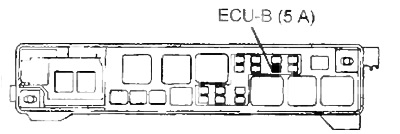
V) Make sure trouble codes are cleared (ABS indicator is off).
Diagnostics of speed and deceleration sensors
Attention: when diagnosing the speed sensors, the brake system works as usual (ABS not working).
1. Make sure the battery voltage is (with the ignition off) corresponds to the nominal value.
- Rated voltage - 10 -14 V
2. Check the ABS indicator.
A) Turn on the ignition.
b) Make sure the indicator lights up for three seconds. If not, repair or replace (if necessary) fuse, indicator lamp and wiring harness.
3. Read fault codes.
A) Switch off the ignition.
b) Short the leads "TS" And "E1" diagnostic connector and make sure that the jumper on the terminals "WA" And "WB" the diagnostic connector is removed.
Note: on some models, the ABS system will only be diagnosed when the jumper is installed.
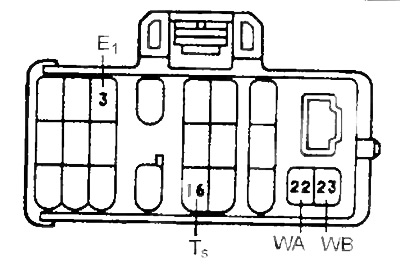
V) Turn on the ignition.
G) If the ABS system is normal, then the blinking of the indicator will correspond to those shown in the figure.
ABS normal code

(): models since 1996
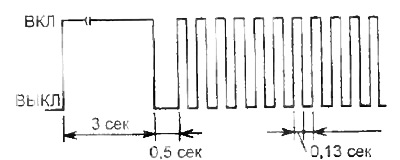
2WD Models (code "0")
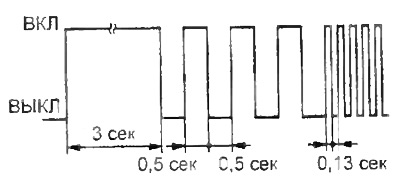
4WD Models (code "3")
4. (Speed sensors (ABS)) Checking while driving.
A) Tighten the parking brake lever.
b) Accelerate the vehicle to a speed of more than 80 km/h for a few seconds. Make sure the indicator flashes according to the diagram in the figure.
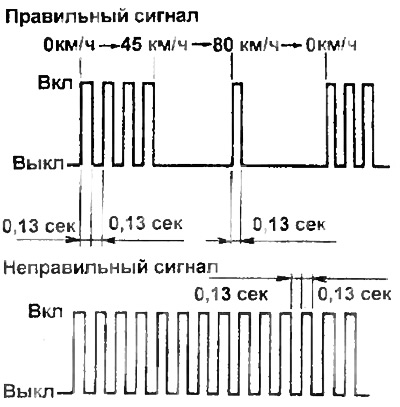
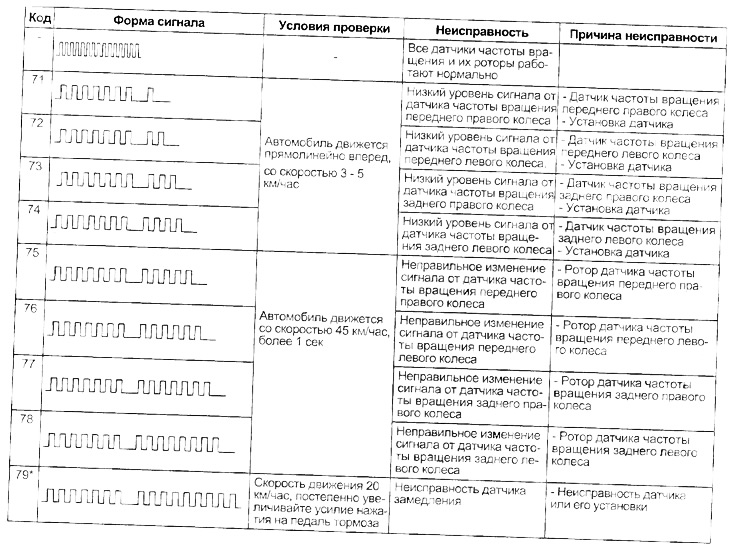
Table. ABS system fault codes
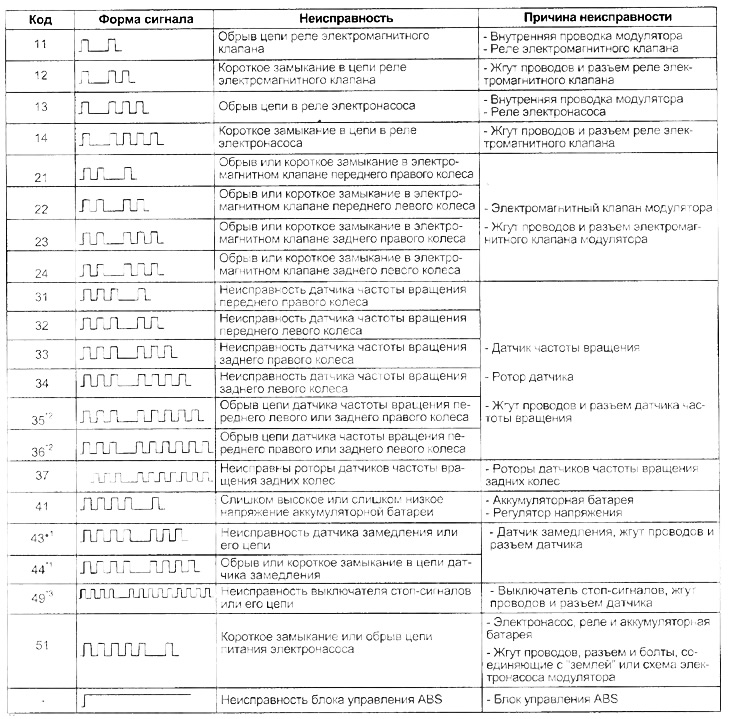
*1: Only for 4WD up to 1996
*2: Models up to 1996
*3: models since 1996
5. Reading trouble codes.
A) Stop the car. The ABS indicator will flash
b) Short the leads "TWITH" And "E1" diagnostic socket.
Note: remove the jumper between the pins "TS" And "E1" diagnostic socket.
V) Determine the fault code by the number of flashes of the ABS indicator (see table "Fault codes for speed sensors and deceleration sensor").
Note:
- During normal operation, the indicator blinks at a frequency of 2 times per second.
- If there are two or more faults. then the fault with the smallest code will be displayed first.
6. (Deceleration sensor)
Check the height of the deceleration sensor.
A) Raise the rear of the car.
Attention: measure the height as shown in the picture.
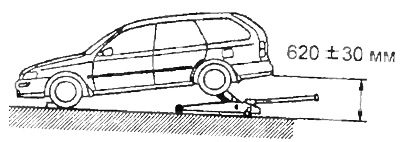
b) Make sure the indicator is blinking. If the indicator is constantly on, then check the voltage between the output "IG" deceleration sensor connector and "earth".
- Rated voltage - 10 -14 V
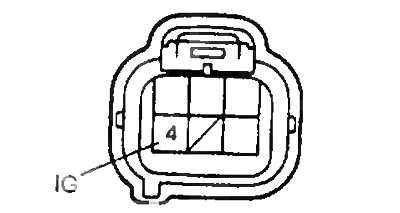
If the voltage is normal, then replace the deceleration sensor.
V) Lower the car.
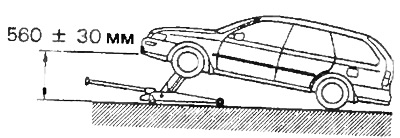
G) Raise the front of the car. Then repeat the steps "b and "V".
Attention: measure the height as shown in the picture.
7. (Deceleration sensor) Check while driving.
A) Make sure the ABS indicator is flashing. If the indicator is constantly on, then check the voltage between the output "IG" sensor connector and "earth".
- Rated voltage - 10 - 14 V
If the voltage is normal, then replace the deceleration sensor.
b) At speeds over 20 km/h, lightly depress the brake pedal.
V) Make sure the indicator is blinking as shown in the picture.
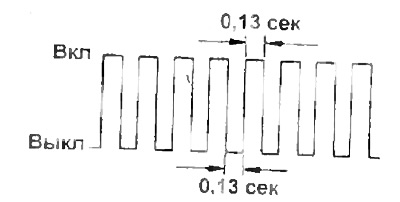
G) At speeds over 20 km/h, depress the brake pedal harder.
d) Make sure that when you press the brake pedal, the indicator flashes as shown in the figure.
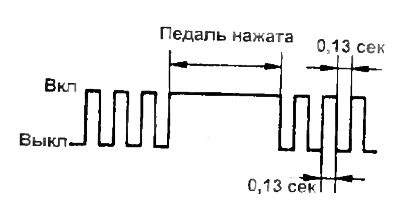
Table. Fault codes for speed sensors and deceleration sensor
e) At a speed of more than 20 km/h, depress the brake pedal to the stop
and) Make sure the indicator flashes when you press the brake pedal as shown in the figure.
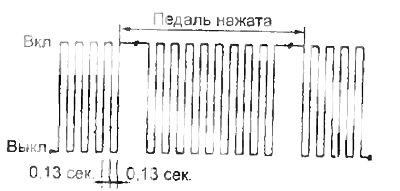
If the description of the blinking indicator does not match, check the correct installation of the deceleration sensor. If the deceleration sensor has been installed correctly, then replace it.
8. Replace or repair faulty system components.
Note: When repairing or replacing ABS parts, turn off the ignition.
9. Disconnect Leads "TWITH", "ES" And "E1" diagnostic socket.
Troubleshooting
1. If the ABS indicator lights up constantly after the ignition is turned on and when driving.
A) Disconnect the jumper from the diagnostic connector and short the leads "TWITH" And "E1". Check for fault codes (ignition on).
b) Check the correct connection of the connector to the ABS control unit and the presence of all pins in the connector.
V) With the ignition on, check for a voltage of 10 - 14 V between the terminal "SOUTH connector and control unit "earth". If there is no voltage, then the power circuit is faulty.
G) With the ignition off, disconnect the control unit connector and the diagnostic connector. Turn on the ignition. If the indicator stays on, then there is a short circuit in the wiring harness between the terminal "WA" ABS control unit and output "WA" control relay. If the indicator goes out, then the control unit is faulty.
2. The ABS indicator does not light up for 3 seconds after the ignition is turned on.
A) With the ignition off, remove the jumper and ground the terminal "WA" on the socket. Turn on the ignition. If the indicator does not light up, then the indicator lamp is faulty or there is an open circuit between the indicator and the output "WA control relay.
b) With the ignition off, disconnect the connectors from the control unit and control relay, and ground the output "WA" or the connector of the control unit from the side of the wires. Turn on the ignition. If the indicator does not light up, then there is an open circuit between the indicator and the output "WA" control unit.
V) With the ignition off, disconnect the control relay connectors and check for continuity between the terminals "WA" And "GND" from the side of the modulator. Reverse the polarity of the connection and check again. If the conductivity is one-sided, then the control unit is faulty. If the conduction is not one-sided, then there is a short circuit in the diode inside the control relay.
Note: if a diode is short-circuited, output 'WA" turns out to be inoperable. When checking the output, connect the control unit connector, and disconnect the diagnostic connector and the pressure modulator connector. Then turn on the ignition. If the indicator does not light up, then the output of the control unit connector is faulty.
3. If the ABS indicator lights up and goes out, then check for a short circuit between the terminals "TWITH" or "ES" And "E1" diagnostic connector
4. If the car pulls to the side when braking; insufficient efficiency of the brakes; ABS is activated during normal braking; ABS is activated before stopping during normal braking; strong pulsation of the brake pedal during ABS operation:
A) Remove the jumper and short the leads "TWITH" And "E1" diagnostic socket.
b) With the ignition on, check for any trouble codes.
V) Check that the speed and deceleration sensors are installed correctly and that the tightening torques of the set bolts are within acceptable limits.
G) Check the diagnostic system of speed sensors and deceleration sensor. If the signal level differs from normal, then check the speed sensors and replace if necessary.
d) Check the diagnostic system of speed sensors and deceleration sensor. If the signal change is normal, then check the sensor rotors and replace if necessary.
e) Disconnect the connector from the ABS control unit and check the continuity between the outputs of the speed sensors on the wire side. The speed sensor wiring harness is faulty if there is a change in conductivity when twisting or bending is attempted.
and) Check for foreign material or swarf at the end of the sensor.
h) Check the function of the speed and deceleration sensors via the diagnostic system. If the sensor is not working properly, then either the sensor is defective or it is installed incorrectly.
And) Check the function of the pressure modulator. If the modulator is working properly, then replace the control unit.
5. If rubber slipping sound is heard during ABS operation (ABS doesn't work well enough).
A) Remove the jumper and short the leads "TWITH" And "E1" diagnostic socket.
b) With the ignition on, check for any trouble codes.
V) Check the voltage between the output "STP" control unit and "earth" with the brake pedal depressed. If the voltage does not match the battery voltage, then there is an open circuit between the brake light switch and/or an open in the wiring harness.
G) Check pressure modulator.