
Attention! If the ball joint will be removed with a grab-type puller, then before dismantling the wheel, loosen the wheel hub nut (axle shafts).
Removing the support using a sliding fork puller
Attention! The following procedure provides the quickest way to remove the ball joint, however, the boot of the ball joint is likely to be damaged. If the cover is to be retained, follow the description in Removing the support with a gripping puller.
1. Rasplintiruyte and loosen the nut of the ball joint pin, do not unscrew the nut completely.
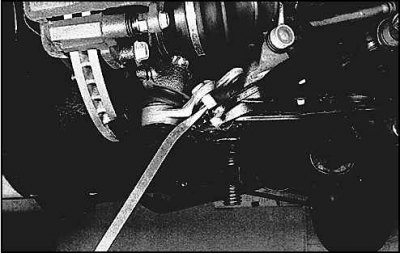
2. Press the ball joint out of the steering knuckle using a sliding fork puller. Lubricate the boot with grease and be careful not to tear the boot. Loosen the support pin nut.
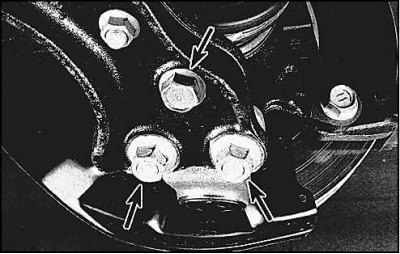 |  |
3. Unscrew the bolt and nuts securing the ball joint to the suspension arm and separate the support from the arm.
4. When assembling, install the ball joint on the steering knuckle and screw on the nut, do not tighten the nut.
5. Install the support on the lever, wrap and tighten the nuts and bolt to the specified torque.
6. Tighten the support pin nut to the specified torque and cotter pin (replace the pin with a new one). If the cotter pin does not fit into the grooves of the nut, then slightly tighten the nut until the nearest groove matches the cotter pin.
7. Install the wheel and lower the car.
Removing the support using a gripping fork puller
1. Separate the ball joint from the suspension arm (see subsection 9.1.6.).
2. Remove the axle shaft from the steering knuckle (see subsection 9.3.2.) and hang with wire.
3. Rasplintiruyte and loosen the nut of the ball joint pin, do not unscrew the nut completely.

4. Put on the gripping part of the puller and press the ball joint out of the steering knuckle.
5. Loosen the ball joint pin nut and remove the ball joint.
6. When assembling, install a new ball joint on the steering knuckle and tighten the nut to the specified torque.
7. Insert the axle shaft into the steering knuckle and tighten the nut. Tighten the nut, but not to the full.
8. Install the support on the lever and tighten the nuts and bolt to the specified torque.
9. Install the wheel and lower the car. Tighten the wheel nuts to the specified torque.
10. Tighten the hub nut to the specified torque (see subsection 8.3.1.), install the lock washer and cotter pin.