



Contents: Examination ↓ Replacement ↓
Gasoline vapor recovery system (4-cylinder engine)
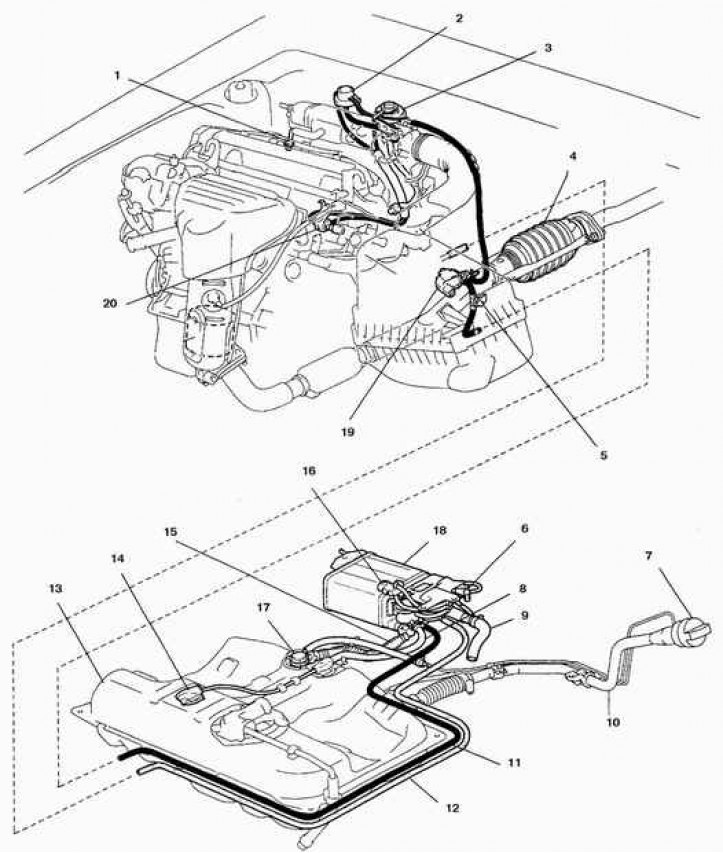
1. Spool valve; 2. Control valve; 3. Recirculation valve; 4. Neutralizer; 5. Nipple for servicing the gasoline vapor absorption system; 6, 19, 20. Pneumatic distributor; 7. Cork; 8. Hose; 9. Ventilation hose; 10. Filler neck pipe; 11. Blow-off line; 12. Inlet line; 13. Tank; 14. Shut-off valve; 15. Ventilation line; 16. Pressure sensor; 17. Fuel limit valve; 18. Tank with absorber
Gasoline vapor recovery system (6-cylinder engine)
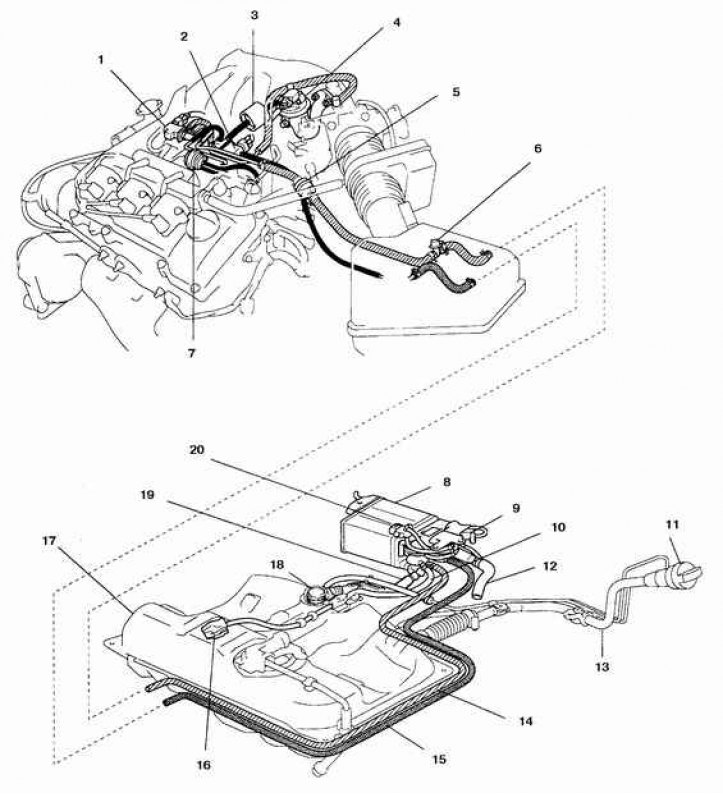
1, 2, 7, 9. Pneumatic distributor; 3, 5. Buffer chamber; 4. Recirculation valve; 6. Nipple for servicing the gasoline vapor absorption system; 8. Tank with absorber; 10. Gasoline vapor line; 11. Cork; 12. Ventilation hose; 13. Filler neck pipe; 14. Blow-off line; 15. Inlet line; 16. Shut-off valve; 17. Tank; 18. Fuel limit valve; 19. Ventilation line; 20. Pressure sensor
The system is designed to absorb fuel vapors and burn them in the combustion chamber. The location of the tank with the absorber of this system depends on the car model and year of manufacture.
Examination
Checking the tank (for 1997 vehicles and 1998 vehicles with V6 engine.)
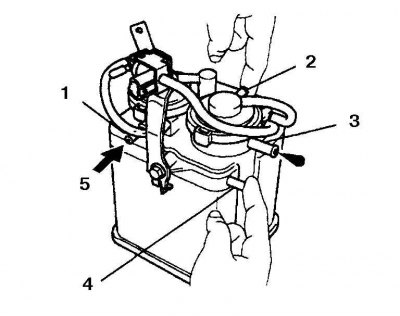
1–4. Fittings A–D
5. Air supply
When air is supplied to the tank purging nipple, air should exit through nipple B, nipples C and D should be plugged.
Checking the tank (for 1998 vehicles with 4-cylinder engine and all 1999 vehicles.)
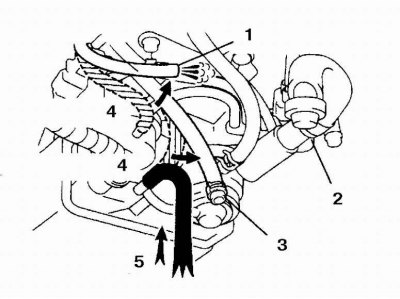
1. Gasoline vapor hose; 2. Cap; 3. Blow-off hose; 4. Disconnect; 5. Air supply
When air is supplied to the tank bleed nipple, air should exit through the gasoline vapor hose.
Checking the fuel vapor pressure sensor on a 1998 4-cylinder vehicle
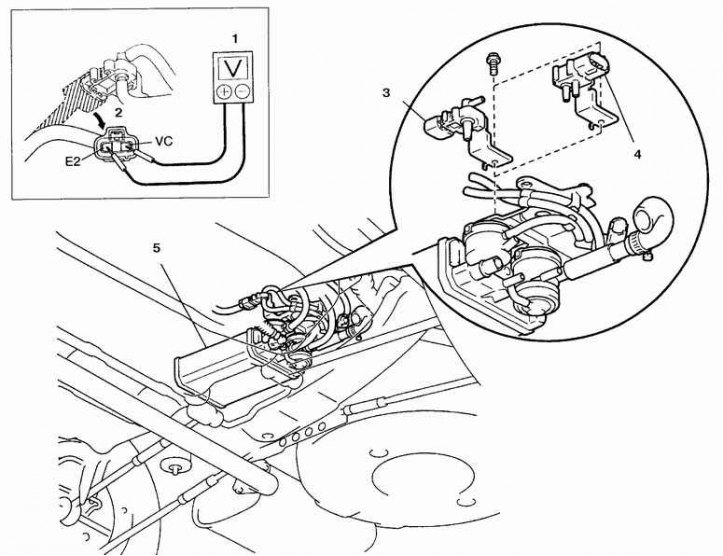
1. Voltmeter; 2. Disconnect; 3. Sensor (type A); 4. Sensor (type B); 5. Tank with absorber
Location of fuel vapor pressure sensor on early models
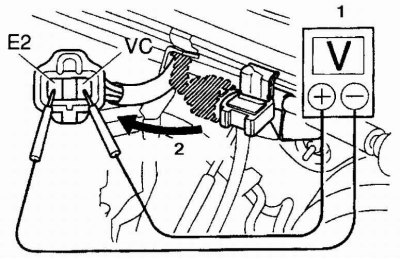
1. Voltmeter
2. Disconnect
Absorber tank and related parts (car 1997.)
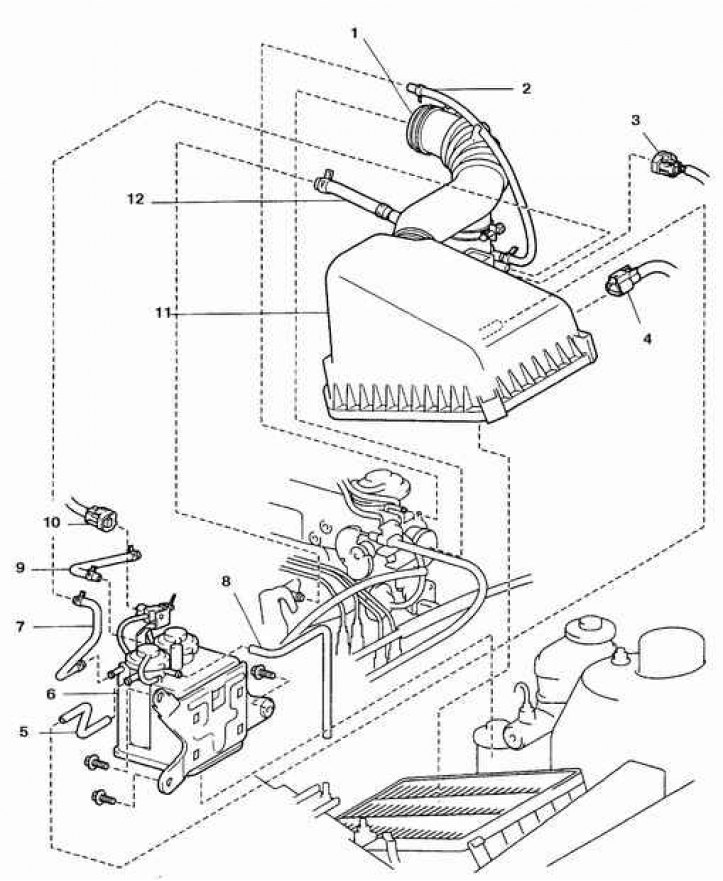
1. Air hose branch; 2, 5, 7, 8, 9, 12. Hose; 3, 10. Pneumatic distributor connectors; 4. Air temperature sensor connector; 6. Tank; 11. Air filter cover
1. Check the condition of the hoses and tubes of the system. Remove and check the tank by creating a slight pressure on the purge nipple (see Fig. Checking the tank (for 1997 vehicles and 1998 vehicles with V6 engine.) and Fig. Checking the tank (for 1998 vehicles with 4-cylinder engine and all 1999 vehicles.)).
2. Check the vapor pressure sensor (see fig. Checking the fuel vapor pressure sensor on a 1998 vehicle with a 4-cylinder engine).
The sensor is mounted either on the tank or in the engine compartment, next to the air filter. The voltage at the sensor connector terminals with the ignition on should be 4.5–5.5 V. When creating a vacuum in the sensor, the voltage should decrease to 2 V, and when applying pressure to the sensor, the voltage should increase slightly (for this check, the connector must be connected to the sensor and the (+) probe of the device must be connected to the back side of the VC terminal).
3. Check the resistance of the coils of all pneumatic distributors, including the pressure sensor distributor, which is mounted next to the tank (see Fig. Tank with absorber and adjacent parts (car 1997.). The resistance should be 33-39 ohms.
Replacement
1. To remove the tank, disconnect the battery from the ground, mark and disconnect the hoses from the tank, unscrew the bolts. On some cars, the tank is removed from below.
2. To remove the air distributors and pressure sensor, first remove the reservoir, and then remove each of these devices (on a V6 engine they are mounted under the cylinder head cover)